Craftsy is back! This is the best deal I’ve ever seen to join! I had to share.

I’m joining today! Happy creating!

Craftsy is back! This is the best deal I’ve ever seen to join! I had to share.
I’m joining today! Happy creating!
Hello,
I’m sorry to have been so quiet lately. I haven’t been working on any projects – well dog boots, but they’re not that exciting.
I received an email from Craftsy this morning. Oh, I’m happy Craftsy is back! And they have some great news.
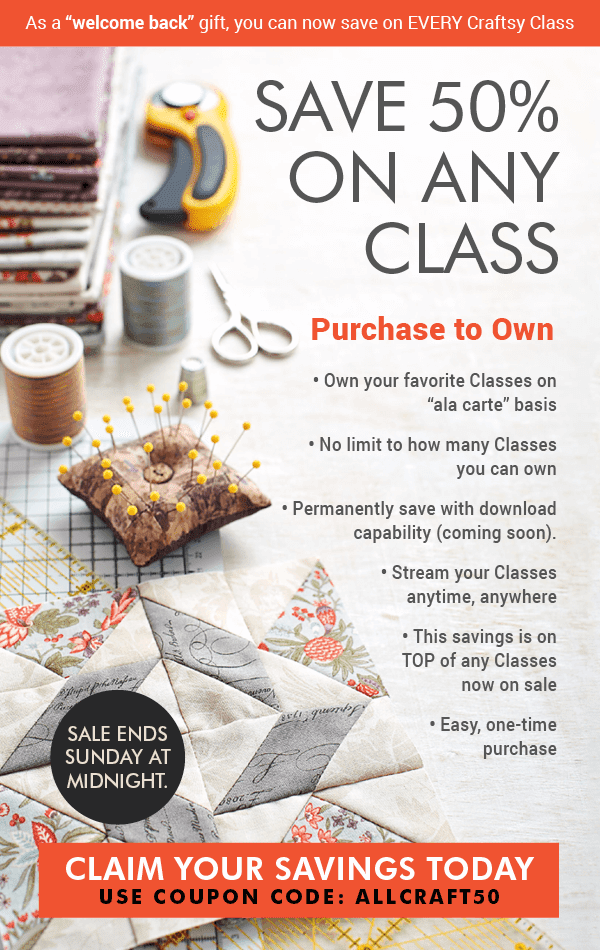
Not only are they having a sale, but do you see the part about downloading classes coming soon? I like that!
I’m still getting over a bad cold (and running around the house smelling everything to make sure I can still smell). Hopefully, I’ll be feeling well enough to sew again soon.
Happy creating!
Craftsy is coming back! They’re hoping on or around September 1st.
Don’t expect all your classes to be there on the 1st though, and because they’re not able to do that, But to make up for that, they’re giving 45 days free access to ALL classes!
Just so you know, I’m not planning on becoming an affiliate again, but I still love Craftsy and know so many of you do too.
Beverly Johnson has a new class on Craftsy. Lingerie Essentials: Boyshort Panty Styles. It is a great class! As soon as it came out, I signed up. I love Beverly’s classes. I have them all and have watched them all too, which I can’t say for all my Craftsy classes.
A few people have told me they saw the above image and thought the class was about making briefs. They weren’t interested in making briefs. Don’t be fooled! Those are boyshorts. They’re a combo brief boyshort. You can see more on them later in this post. I made a pair of these.
I was planning to make boyshorts to go with my January BMS Challenge submission. Before I cut into the very pretty lilac cotton Lycra I had, I decide to make a muslin. My muslin fit so well, I decided they weren’t going to just be a muslin, I had to get some nice lace out and make them into wearable boyshorts. Here they are on my new display. I’ll share more about this display soon. In the first photo the shorts are pinned. In the second photo they’re unpinned. I definitely have more going on in the hip and thigh than this display!
Here they are from the back. Again, pinned and unpinned.
When I held these up, I loved the shape! They reminded me of ’50s shorts. I know they’re higher-waisted than most boyshorts, but they were just too cute to change. They also reminded me of these high-waisted Ooh Lulu Betty panties. I’ve always loved this shape.
I was so happy with these, I did make a pair to go with my bra for the Bra-Makers Supply Challenge. I made the combo brief/boyshort lace-backed pattern Beverly teaches in the class. The combo brief/boyshort is the one shown in the photo for the class too.
Here’s the lilac set I made for the BMS January Challenge. I drafted the bra using the information in Beverly’s Bra-makers Manual Vol. 2, and I drafted the panties from Beverly’s new Craftsy class. I LOVE lilac! I don’t know why I haven’t had a lilac bra and panty set before.
I did decide to alter these panties though. They fit and were fun being high-waisted, but I wanted them to be more traditional boyshort style to see how they would fit. Boyshort styles usually gape at the back on me.
I lowered the waist and finished them with some lilac lace trim. And… they fit.  Below, on this side view, you can just begin to get a peek of the back. This is the combo panty I mentioned earlier. It looks like a brief from the front, but a boyshort from the back.
 Here’s the full back view of the bra and panty.
Oh! All that lace! This is my favorite set I’ve made!
I made a second pair of panties to match this bra using my self-drafted pattern for the panties.  I am so happy with these lovely sets and am looking forward to the next BMS Challenge.
Happy creating!
Craftsy Unlimited Membership is available to give as gifts now!
 Need a last minute gift? Give the gift of Craftsy Unlimited to unlock access to 600+ of the world’s top creative experts, plus new and exclusive content weekly. With thousands of hours of expert-taught videos at your fingertips, you or the special maker in your life will never be without a source of inspiration.

This class by Alison Smith just came out, and I also came across a Craftsy ad for a sale price. I couldn’t resist!
If you’re wondering, I checked to see if this class was part of the Unlimited membership trial, it is.
To make sewing your bralettes even easier, Bra-Makers Supply now has bralette finding kits.
 You can get the finding kits for bralettes here.
After my attempt at Rad Patterns’ Panel Undies, I decided I wasn’t going to try another pattern size. I was going back to my self-drafted pattern, and using it to make my own version of those adorable panties.
Inspiration

I do really think these are adorable. So they were my inspiration.
However, while I’m changing things up, there were a couple of other changes I decided to make.
Personal Preferences – First Change
As much as I love the side panel, I wasn’t sure I was going to love the seams in the back. So, I decided to leave those out. My panty pattern has the sides coming around to the front to give a similar look in the front, but a smooth back.

I’m still using the two tones of beige, although in the photos here the lighter tone looks off white. It’s not. They are closer in tone than the photo is showing.
Here’s the back of the panty with no seams. I think I’ll prefer no back seams for under clothes. That’s a sad baggy-looking bottom in the photo. Thankfully, I fill it out much more.

And on the left front seam, I added a little lace tab.

Personal Preferences – Second Change
Another change I made when making my own version was to use the ‘Burrito Method’ of enclosing the seams on the gusset. The Split Personality Undies do not have enclosed gusset seams. After making panties with an enclosed gusset, I just didn’t want to not do it.
A Second Pair
For my second pair, I made my basic self-drafted pattern. The one that is so similar to my former favorites, Kwik Sew 2286.

However, for this pair, I doubled the lace at the front and added a lace bow just for something a little different.

As well, this pair has a lace tab on the left hip.

For both of these pairs of panties, I used the pattern I drafted using Craftsy’s Sewing Panties: Construction & Fit! You can also find the same information in Beverly Johnson’s Make & Fit Panties booklet.
Happy creating!
It’s time for another Craftsy class review.

This review is for Coverstitch: Basics & Beyond with Gail Yellen.

I’m on my own for reviews at the moment, as Marsha and Naomi have other pressing engagements.
Reviews
This is a fairly new class, so it doesn’t have the amount of reviews as some of the other classes I’ve reviewed. At the time of this writing, there were only 35 reviews, and a few of them were less than favorable.

A few reviewers expressed a desire to have had more information that fit the ‘Beyond’ category.
If you notice the Instructor rating, Gail gets her highest rating there, and I agree! I had a couple of questions and Gail answered really quickly – I’m talking the same day – and her answers were very helpful. Gail deserves that high rating.
Outline

First Thoughts on the Class
I was really happy this class came out. I’ve been purchasing a Janome Cover Pro 1000CP from a friend. It had been staying at my house, and I decided I wanted it. Thankfully, my friend is being very patient in my paying it off.

Seeing as this was a brand new machine to me, I knew nothing about how to work a Coverstitch machine and wanted a class that started with the basics. This class did that.
In the class, Gail shows both the designated Coverstitch machine, and the Serger/Coverstitch combination machine. She goes through how to change the needles on both machines, and how to set the needles for different stitch widths. For a complete beginner, that is great!
Gail also gives us ideas on how to use these different stitches and demonstrates them on a few projects.

In the above collage, all taken from screen shots from the class, Gail shows how to make a tassel, sew a flat fell seam, and install a zipper – all with the Coverstitch machine. I would never have thought of using this machine for any of those. Honestly, I really thought it was just for hemming. So, this was all much more ‘Beyond’ than I was expecting.
Gail also shows how to hem an unbound neckline.

This is a lovely neckline. Hmm, this is a pretty idea to try on my next tee. I know I’ve wanted to hem a few things using the Coverstitch machine. I hadn’t even thought of necklines.
Disappointments?
There were a number of reviewers who expressed they wanted more and there wasn’t enough beyond the very basics. So was I disappointed? Well, no. Looking at the class, I can’t say I am. The class does cover a lot. More than I thought or expected.
There was only thing I wanted to see and didn’t – the foot shown below. My machine doesn’t have a regular presser foot (I have one on order), but it has a Center Guide foot, much like a Stitch-in-the-Ditch foot. I did realize I can take that center guide off, and I have a see-through foot. So, I’m happier with this foot now.

Feet
Let’s go over the machine feet Gail does cover in the class: the regular pressing foot, a curved pressing foot, a see-through pressing foot, and a narrow chain stitch foot. She also covers a belt loop binder, and a down turn feller, and seam guides. She even gives an idea for how to make a seam guide using a Post-it note pad.

I thought this was a neat idea, and tried it twice. The first time the pad moved, and I was also sewing a curved hem. That whole thing didn’t work out. The second time, I really pushed on the pad to make sure it was good and stuck down. I had no problems at all. It’s a great little trick if you don’t have a seam guide. (I want one of those too!)
Recommendations
I do recommend this class. It’s a great class, with a lot of very good basic information in it, and some not-so-basic information too. This class made the difference in me bringing out my CoverPro machine and using it rather than letting it sit like it had been.
What I Made
Well just before I go there let me tell you one really great thing about Coverstitch machines: I learned if you make a mistake, you can very easily rip out the stitches – from the last stitch back to the first. I needed to use that tip. It took me a minute or two to find the right thread to pull, but once I found it – those stitches came out so smoothly and easily! What a nice feature.
So what did I make? I made a very sloppy looking hem! I don’t think a curved uneven hem is the first thing I want to try sewing and showing from my machine. I pulled those stitches out.
I also planned to hem a gorgeous Maxi skirt I wore once and then the hem started coming out. It’s been sitting in a mending pile for the better part of a year waiting for me to learn to use this machine. I got it out and… it’s a blind hem on it! (Rolls eyes!)
I did shorten my favorite pants. I’ve been wearing them too long for over a year, but every time I put them in a mending pile, well, they just couldn’t stay there – they’re my favorite. This time, I did hem them using Gail’s Post-it Note pad idea!

If you have a Coverstitch machine, and haven’t used it, I do recommend Gail’s class to give you a great base to learn how to use your machine.
See below for a coupon for this class.
Happy creating!
P.S. You might want to look at Another Perfect T-Shirt.
It’s time for my Craftsy class review again.

This month, I’m reviewing Sew Better, Sew Faster: Garment Industry Secrets with Janet Pray.

Marsha and Naomi couldn’t join me for this review. Unfortunately, I don’t know when they’ll be able to join me again right now. We’re all still good together, just all busy working on different projects.
Basic Information on the Class.
Janet’s class has quite a few reviews compared to the last class I reviewed. This one has 170 reviewers, and only a couple didn’t completely love the class and give it Five-stars. It has a 4.8 rating. That’s still really good. That’s a lot of love.

Here’s the Lesson outline.

My First Thoughts.
I’ve watched through the class. I bought the class in mid-December and it’s now mid-February and I only received the pattern two day ago. I contacted Janet’s company, Islander Sewing Systems and they sent a second pattern. Unfortunately, as a reviewer, I can only share my thoughts after watching. I can’t give an opinion on the pattern or pattern instructions because there just wasn’t time to even begin a project.

No Pins.
Janet emphasizes that no pins are used in making the class project. I know she’s not alone in her no-pins philosophy. However, I had a neck/arm injury years ago and although I’ve recovered quite a bit, I’m not where I was before the injury. No pins and using my hands more isn’t a selling point for me.
I did try the no-pins a little though. I tried it on the Raspberry Ripple handbag I was sewing. Yup. I tried it. Then I ripped the seam out again because I only caught part of the fabric underneath. Then I pinned it the second time. So, if you have any reasons of your own why you need to use pins, then follow your own wisdom.
I will say though, after watching how Janet does her no-pins on a long straight stretch of fabric, if you don’t have any hand/arm issues, try it! It does look simple, easy and very efficient.
Helpful Class Features
Something I’m finding very helpful in Janet’s class is after explaining each part of the jacket construction, she shows you exactly which pieces you’re working on.
Here’s a screen shot from the class showing the pattern pieces that were pressed at this stage of construction.

That is such a helpful part of the class. I haven’t seen this done in any other classes.
Panties
This class is all about techniques used while constructing a jacket. I’m sure you’re all wondering how panties fit in with this.
Well, when Janet is showing us how she does the inside shoulders on the jacket, I’m thinking panty construction. She gets things twisted around so the seam is enclosed once it’s sewn. It’s the same as when we’re using the burrito method for our panties. Just take a look at how twisted the material is for sewing this seam. I love it! I definitely want a few pins though.

This sewing method also produces a great finish that is just as neat as the burrito method is on panties.
More Burritos
Imagine my surprise when just a little later in the class, Janet is demonstrating The Burrito Technique! She tells us ‘we will know it’s a burrito because of the filling. If we don’t have any filling, it’s just a tortilla.’ It makes more sense when you see it, but it is another great technique to make a really nicely finished garment.
Here’s the photo showing everything all nicely encased in the cuff using The Burrito Technique.

Personal Recommendation
So, do I recommend this class? Even though I wasn’t able to sew along and make the jacket, I do recommend this class. I think Janet really knows her stuff and I learned a lot of great tips and tricks watching her class. Some of them I will incorporate, and some of them I will not. I’m mainly thinking of the no-pins.
Other than that one point where I have personal reasons for not following Janet’s tips, all of her tips were great! The jacket she makes is lovely too.
Happy creating!
 You can find more about it