Sewy Rebecca from the Sew-Along

The Sewy Rebecca is a lovely bra, and I am quite pleased with the results I had on the Sew-Along. I did do three testers, but that was more my experimenting with fit. The cups in my size actually fit very well.

However, anyone who has read a previous post knows, that’s not my only consideration. I was able to make the adjustments I needed to easily fit the cups into the bra’s cradle, so I had no difficulties there either.

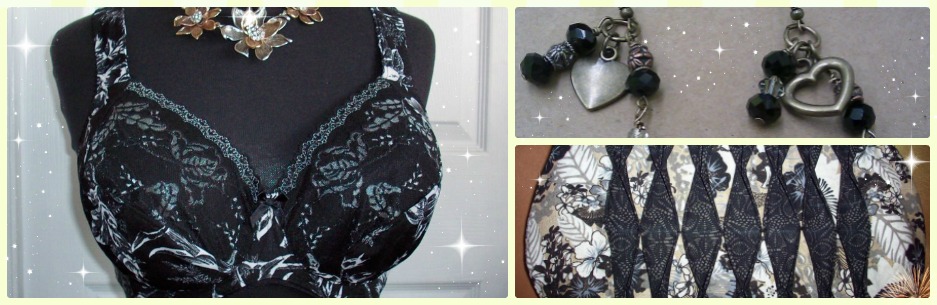
Here’s my finished Sewy Rebecca.

Front view Sewy Rebecca Beige

Here’s the Rebecca on a dressform. But I was also in a bit of a creative mood, so please indulge me. Here is the Sewy Rebecca with a little more flair in the picture:

Creative front view Sewy Rebecca Beige

I made little forms to fit into the cups because my dressform here and I are not the same size. Usually, I put a foam cup into the cups to fill them out for pictures, but I wanted to try something different because the foam cups don’t fit perfectly into the bra cups. I took an idea from the Bean-a-Boob concept and made little bean-filled forms to fill out the cups for pictures.

Here are the little forms I made:

Forms to fill out bras on dress form

I think this pattern is very pretty. The lace upper cups are a favorite of mine. When I’m out looking at bras for ideas, it’s the lace that catches my attention.

Side view Sewy Rebecca Beige

The little forms do a pretty good job filling out the cups, but not perfectly, as you can see above.

And my more creative picture of the side view:

Creative side view Sewy Rebecca Beige

It’s very difficult for me to throw away all those bits of lace that are left over after cutting out the upper cups. And I’m always looking for places to put them on the bra. On this one, I put one on the bridge and two here on the side where the side panel meets the band. I’ve also put it on the straps at the front for decoration, but not on this bra.

And here is the back of the bra. It looks nice enough, but… I’m really not comfortable with the straps that far apart.

Back view Sewy Rebecca Beige

I didn’t catch this aspect of the bra’s fit with a tester bra and I wish I had. I’ll know next time to look for that when making a tester.

And one last creative perspective:

Creative back view Sewy Rebecca Beige

Overall, I enjoyed my experience with the Sew-Along and would gladly jump right into another one. I’m also glad I went back to the Rebecca.

I made the Rebecca once before, but used Lycra. I must say, Lycra is not my friend. No, Duoplex is my friend. Nice, strong, non-stretching Duoplex. I may use Lycra again in the future, but underneath there will be Duoplex.

Oh, just remembering something else on the Rebecca. I didn’t use elastic only for the straps. I made fabric straps to match. So I ventured out on my own for that part of the pattern. They only use the elastic on the pattern, and again, just not a friend to me.

The pattern here is from Sewy.

All the materials & findings are from Bra-Makers Supply.

I think the next bra I make will be the Shelley bra. I added my seam allowance SO long ago and have been meaning to get to it again since that time. However, with the Sew-Along suggesting we make tester bras, it was the perfect opportunity to try a new pattern.

I’m also waiting for some jewelry components. Once I get them I will post pictures of what I’ve made – I’ve had these plans for quite a while, but it’s taken me a long time to find that perfect piece.

Happy creating!

Shelley is coming February 1st!

Now, this might seem a little silly to some, but I’m very excited. I was just on the Bra-Makers web site and saw that the Shelley bra pattern will be available on February 1st. That is very exciting news to me.

Now, the reason it might seem silly is I made this pattern for myself from my Pin-Up Girls Classic pattern & the CD Designer Bras by YOU! So I have a pattern. However, I only have it in my adjusted or altered pattern size. It is a wonderful pattern, and makes such a pretty bra it will be nice to have the real pattern. (that if I use, I have to adjust!) But it will be a wonderful addition to my pattern collection!

PB-3230%20Shelley

This is the Shelley pattern picture from Bra-Makers supply.

Shelley Pattern

The Shelley and the Sewy Rebecca patterns are very similar in that both have lace upper cups and a power bar, but the Shelley has a two-part lower cup whereas the Rebecca only one.

From a few things I’ve either read or heard, a few people have been interested in trying the Rebecca pattern, but are hesitant because it has to come from Europe and/or isn’t in English – I HIGHLY recommend all the patterns I’ve ordered from Bra-Makers’ Supply and this would be no exception. Even though I’ve made it, I’m ordering it!

Happy creating!

Sew-along Test III

I really have to admit I don’t like the challenge of having to alter patterns. It is my reality, so I do need to just get past the dislike of it and do it. But I do ‘wish’ every time I’m going to sew, that I could simply make the pattern as is, or much closer to as is.

My tester of the Danglez bra didn’t go past the tester bra. I decided from my experience with the tester that it wasn’t going to be something I’d love. The band was very wide, and seemed too wide for a smaller frame. The band also sat very low on my body. I could try the cups again but with a different band, and I may do that at some point in the future.

I did decide to tackle the Sewy Rebecca Bra again. This time I used Duoplex for the lower cups rather than Lycra.

Another one of my must-admit-to-self truths is I need the support the Duoplex offers, and Lycra just won’t do it for me – even when it’s been interfaced.

So, I pulled out my Rebecca pattern again, and this time made three testers. My first tester was a complete experiment. I made my normal upper cup and 2 sizes smaller lower cup. That didn’t work, but the lower cup fit perfectly into the cradle.

For my second tester, I tried one size smaller lower cup. I must say I was impressed with the ‘oomph’ it gave, but it didn’t really fit either.

So, for my third tester, I made both upper & lower cups in my size and took in the lower cup with small darts to fit it into the smaller cradle.

Tester bra III front view

Here’s my tester from the front. I used black & brown Duoplex, so it doesn’t look the best, but hey, this is only a test.

I also made the bridge a little bit smaller; so much so that the wires actually cross over one another at the top of the bridge.

Tester Bra III inside view

Here is the inside of the tester. For the tester I also used Vertical wires rather than the normal long wires. I’ve decided I really do like the fit of them better, so will adjust my patterns to be a little higher at the underarm side of the cradle to accommodate them.

Long wire compared to Vertical Wire

You can see here the difference between a 38 Long and the 40 Vertical wire. The Vertical one comes up and in a little more. Even though I did like the fit,  my pattern had already been cut when I thought about trying this.

I must say, I LOVED the experience of a sew-along, and all the wonderful learning from one another. It was like taking a mini-course. I’m actually thinking of printing it off and putting the Sew-Along in a binder to refer to easily when sewing. Amy did a GREAT job! Norma was a tremendous help to all who had questions too, and everyone’s input really made it.

I definitely will make tester bras again in the future – likely every time I try a new pattern, but my next bra is going to be the Shelley again. I have some beautiful fabrics just waiting for a TNT (Tried ‘n’ True) pattern, and I think I’m ready for a pattern & sewing experience that will work out because the hard work’s already been done.

Next the finished Sewy Rebecca, and a few jewelry pieces I LOVE.

Happy creating!

This is a Test; This is Only a Test.

Boy, that takes the pressure off. Knowing this was only a test; knowing I wasn’t going to be making the WHOLE bra before I found out if it would fit. That really took the pressure off.

So, onto my tester bra that I’m sewing for Amy’s Sew-Along.

I’m sewing the DB3 by Danglez. Starting all over was a bit of a stress. I’ve made so many alterations to my Pin-Up Girls Pattern that I can now go to it and know I’m going to get a bra that fits – even the Shelley. (smile)

However, I didn’t know at all how this bra would fit. And if anyone is wondering, I did get the right size. I decided to try some of the alterations I’ve made to the Pin-Up Girls, and things have worked out pretty well.

Adjustment to lower cup for Omega Shape

These tissue paper pictures really don’t show very well, but it does give you an idea of what I’m doing. Here are the alterations I made to the lower cup. I did the same for the power bar. I was hoping this would take enough of the extra out of the pattern around the wire line, and it was pretty close.

showing the adjustments for Omega shape not enough

Here you can see I didn’t quite get the adjustments I needed and still had a little more cup than wire line. I took my pins out and made my power net stretch a bit. I did alter the pattern again though, so next time I won’t have to stretch it all.

front of tester bra

Here is the front of my tester bra. The cups fit well, but I do need to take them in at the underarm – just like my Pin-Up Girls pattern.

For the material, I didn’t use my ‘good’ materials that I’ve ordered from Bra-Makers Supply or Merckwaerdigh. This is some left over Power Net, and some Lycra I bought on sale the other day. I did interface the Lycra to give it more support.

interfacing on the lower cup

This shows the interfacing on the lower cup. I also interfaced the bridge & powerbar for more support.

back of tester bra

This last picture shows the back of the bra. If you look, you can also see the pins at the underarm and center of the bra. Those are areas I want to adjust on the pattern.

I am so happy with this tester bra experience. Trying it out first and knowing I wasn’t going to be ‘completing’ the bra really was a tremendous idea – Thank you, Amy!

Now to upload my photos to the Sew-Along. And soon to come, my completed Danglez DB3.

Happy creating!

This and That Danglez Pattern

I started the Bra Sew-Along with Amy on her blog. That’s been a little more challenging than I like – due in no way to Amy, her blog, the sew-along or the pattern. It’s all my personal fitting challenges.

Starting a new pattern has all the challenges I first faced with the Pin-Up Girls patterns – which I have worked out for the most part. I keep telling myself once I get these patterns adjusted for me, I’ll have a new pattern that fits too. I haven’t convinced myself to rejoice over this yet, but I am ploughing through.

I’m going to sew the Danglez DB3 pattern. I’ve heard it’s a great pattern for those with smaller frames, but larger cup sizes.

DB3_LRG

A sad little side note, Danglez has closed. Just before they did, I just ordered their DB5 pattern. I’ve seen it done on a couple of blogs (Sigrid’s & Novita’s), and it looks lovely.

The first thing I changed on the Danglez was to use the correct cup size. See that Sewy Rebecca mistake I made has helped me! So, one thing adjusted correctly – and I’m sure it will be the easiest adjustment I make.

Last night I was tracing out my pattern pieces, and adding the seam allowances to them all. That went fine. But then I was trying to figure out how to adjust the Cradle to smaller wire size. Well, maybe I shouldn’t do these things at 11 p.m. It wasn’t going very well. And my brain wasn’t going between European & North American sizes very easily.

I came up with what I thought was correct, but wasn’t really sure. I posted on the Bra Sew-Along about how I was having trouble and hoped someone would be able to help.

Sleeping on it must have helped. I had an idea this morning that I think works. I pulled out my Pin-Up Girls pattern in the correct D size for me and traced that over the Danglez pattern.

Changing Cradle to smaller size

Here you can see the two patterns and how I matched up them up. Using a light table, I could see both patterns and where I needed to change the Danglez to fit me. I re-drew the Danglez on a third piece of tissue paper but with the Pin-Up Girls Cradle. I did keep the lines of the Danglez to more closely look like that pattern. So now my Danglez pattern will have the original, one traced copy of the original, and my adjusted copy.

One other change so far, I changed the back of the band so it won’t ride up. The Bra-Makers Manual describes how to do this by giving it a downward hike. I tried to take a photo of that as well, but my camera really didn’t like the white tissue paper, and it turned out worse than the above picture.

So, next week, I’ll hopefully have figured out if I did the Cradle adjustment correctly or not, and may even have some photos of my progress on the Danglez DB3.

Happy creating!

The Shelley – without Seam Allowance

I still have a hard time believing I did this. I actually worked on the pattern, making sure the underarm area was shortened, and the allowance was made in the pattern for the Omega shape – but I forgot to add a seam allowance to the pattern! And it all went together so nicely that I didn’t notice until I tried it on!

All that upset aside, it turned out very well and looks so pretty.

Shelley Bra Full Band Beige Omega Design Front View

Here is the Shelley from the front. I love the lace I used here. All the materials are from Bra-Makers Supply. I decided to do something a little different with the lace and used a little flower I cut out to cover the front seam on the band where it joins to the bridge. I applied it before sewing in the cups or sewing the elastic to the lower edge. I was quite pleased with that little detail.

Shelley Bra Full Band Beige Omega Design Side View

Here is the side view. Do you notice, there are no little gathers at the bottom of the cup? I made some alterations to the pattern and I am so happy with them. I actually took it in at the corners on the bottom so it would fit into the cup perfectly and it did! So, that means no more darts or ‘easing’ the cup into a smaller opening.

Something I’d been wondering – and I’d need someone who has much more technical experience with pattern drafting to let me know if I’m correct or not – if I’m using a D for my wire size, then is the D cup pattern the correct size for the base of my pattern. I’m dealing with two different sizes, so I was just wondering.

My wondering led me to check. and I pulled out the D pattern and compared the pattern I’d made and it fit. So, now I’m thinking I could [possibly] make my patterns by starting with a D and then graduating it up to the F cup I need. Hmm, some more playing with patterns is ahead.

Shelley Bra Full Band Beige Omega Design Back View

And this is the back. I’m very happy with it as well. I based this on a Prima Donna bra I had and took apart to clone. I haven’t done that yet, but did decide to copy the back. I will need to make my fabric straps longer if I do this again. There was no ‘extra’ in that strap.

As well, the hooks are a little wonky (is that a word?). I’ve been having a bit of trouble with my zigzag handling the fabrics for lingerie. I’ve spoken someone in the education department of Elna (my sewing machine brand). They suggested using a walking foot to help with that. I haven’t tried that yet though. I had a few problems with the stitches bunching up on this bra in a few places. I wonder if anyone else is having the same problems?

Even though I left out the seam allowance when I made this, and the cups aren’t quite deep enough as a result, I’m still very happy with this bra. I now have my pattern with adjusted seam allowances, and am ready to sew it again.

Before I do, I’m planning on joining Amy on her Bra-Making Sew Along.

Happy creating!