My first attempt with the Josey Bra came up short. Well, a bit short across the cup anyway. But overall, I knew I was close.
I was thinking about doing a hack, but part way through drafting it, I decided I’d be better off to just do a quick test of the next cup size up.
So that’s what I did. I grabbed some scraps again, and did a quick tester cup. It’s looking good.
Next I measured the bottom of the cup against the cradle. I had to find 2 1/2-inches to remove from the bottom of the cup so the cup will fit into my cradle.
Once that was done, I had a working pattern. It was time to break out a bra kit and try this pattern.
If you’ve followed my blog for any amount of time, I’m sure you can imagine the self-talk that was going on while I was making this bra. After all the tries and trials I’ve had, I kept telling myself to not get excited. That is probably wasn’t going to fit. That this was just going to get me one step closer, and it was fine.
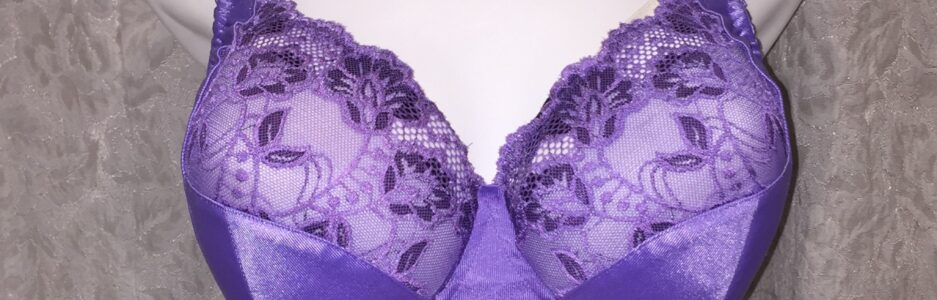
Well, it fits! It fits perfectly! No alterations. No fitting issues. No adjustments. This pattern fits as is, with only the Omega adjustments to fit it into my cradle. The bridge is the correct width for me, the cups fit, and the bridge also tacks all the way to the top of the bridge. I hated to take this off for photos.
I decided to make fabric straps to go with the bra, and I do like them. I may change that up for my next one so they don’t have the lace trim on the inside. Just for a different look.
As well, mine is made of duoplex, as I don’t have a lot of micro duoplex in my stash. I did order some so I can try it.
I was also so excited I immediately dug into my stash looking for some panty fabric to make a set. Oh, these are adorable!
Here’s my whole set.
 I’m a happy bra-maker today, and I’m already planning my next one. However, I also have a dress to make for a family wedding. I’ll have to fit in some time for me too and make a few more pretty Josey bras.
Happy creating!

 It’s very pretty, but it’s a tad too small across the cup.
 Just as the inside of the cup doesn’t cover all of the foam cup underneath it, it doesn’t reach all the way across to where it would meet my bridge.
 I got it. Now to test this against all the wires I have.
 This was so odd because when I traced my root with a wire and compared it to the different wire shapes, this was the closest in size and shape. Below is the photo I took of my root trace over the Orange wires.
 However, after wearing this wire, I can tell you it’s not the right wire for me.
 I didn’t have to see this wire-root comparison to know this wire wasn’t the right size or shape. I knew this wire pinched on the sides. Again, this is not the right wire for me.
 So, of course I needed to see how this wire would compare to my root trace.
  This is about as good as it gets. My only hesitation with this is I’ve heard the wires aren’t always as stable (can break) with washing and wearing after they’ve been bent. I had to bend it a fair amount. So, although this is an option, I still had one other wire to try.
 Hmm. About the same as the bent wire above, but I don’t have to bend anything. It will flex and take my shape.
 If you’re interested in reading more about bending wires, and what can happen, Jennifer (Porcelynne) mentions that in her recent
  Right there where the pink arrow is pointing.
 When I was first looking at wires with my root trace, I could see the 40 wire fit the top of my trace.