Kwik Sew 3300

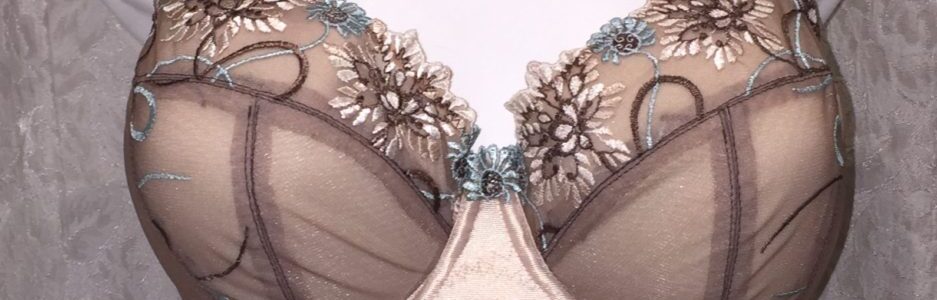
This is such a pretty style. Here is my Kwik Sew 3300:

100_2251

I think it looks so pretty with the black and white theme. The lace was a gift, and the floral stretch lace is from a local fabric store. All other material supplies are from Bra Makers Supply.

It’s pretty, but there were a couple of fitting issues. One really wasn’t a biggie. This bra  had the straps pinned up about 2 inches here in the picture – so I shortened those.

The bigger fitting issue is the upper part of the cup is loose. I could pinch a quarter-inch out of the upper cup. That shouldn’t be too hard to fix on the pattern, and thankfully it doesn’t show when I wear it. This style actually fits similarly to how a foam cup bra fits.

100_2256

You can see here where I pinned the cup.

The steps I took beforehand really helped me to get the cup to fit properly. Here’s what I did for this bra (and some of this is from  past posts, but I’m putting it all together here):

The first thing I did was sew up a muslin for the cups. I did this twice. After looking at the pattern pieces, and picking the one I thought was closest to my size, I sewed up my first muslin. I used some scrap cotton I had left over from a skirt muslin I’d made. On this first one I could see how much I would need to adjust the pattern along the wire line. Remember, I my wear one size bra for the cups, but my wire size does not match that – it’s quite a bit smaller. So that was my first adjustment.

After I altered the pattern I sewed up another cup muslin. Again, I used some left over cotton, but this time it was from one of my moulages. This second one I pinned over an existing well-fitting bra. It was a pretty good fit at this point. But still needed a bit of adjustment. On this second muslin I drew where the seam lines fell underneath it.  Again, dealing with an Omega shape means most patterns don’t fit the way they are.

100_2175

At this point I was pretty sure I had the right size and shape for me. And I was really close.

This bra has a vertical seam, so no upper and lower cup, but instead and inside and outside cup. I was using lace for both the inside and outside cups, so I lined them both with sheer cup lining. That made both cups completely non-stretch to give it the support it needed. I’ve done this before on all lace bras, and it works great. I usually don’t use Lycra because I don’t find it offers the support needed, but using this sheer cup lining would be a great option for under Lycra too.

At this point I was feeling quite confident that this bra was going to fit without any issues. You see, most of my issues have been the bridge and the adjustments I needed for the Omega shape. I haven’t run into this looseness before.

I didn’t use the band that came with the pattern. I used the one I know fits wells. I now have a custom bridge that is working great for me and I wasn’t going to mess with that. As well, I drafted the cradle on my band to fit a Vertical wire and a custom bridge. After all the work to get the band to fit so well, there was no way I was going to try another band! All I was really wanted was to insert the 3300 cups into my band for a different look.

Even though this bra pattern still needs some tweaking, the steps I took ahead of time really were worth all the effort. And if you have challenges with fitting, I really recommend this method of fitting the bra cups. A shout out to Sigrid for sharing this. And after much searching, I realized it was not in her blog, but on Pattern Review. She explained this when she reviewed Merckwaerdigh’s BHST2 pattern. Really a great tip!

Happy Creating!

Gardens and Flowers Popping Up Everywhere – Even on Bras

Oh, does anyone else feel like I do? I have all these projects I want to do, or have committed to make, and it beautiful outside! I don’t want to sit inside sewing. But I do have a few things I have to sew this week, so I’ll have to spend some time inside. I have a second apron to make, and finish the cloned Prima Donna Luna bra.

We moved to our current home 6 years ago. I loved it from the minute I saw it. It’s a charming split-level, and has a big tree out front and two gardens in the front and one along the side of the house, and one in the back. I love to garden. Starting plants from cuttings or seeds is one of my favorite things to do. That just gives me so much more pleasure than buying a plant. But don’t get me wrong – I have no problem buying them too. Another delight is to get a plant from a friend. Every time I see a plant a friend gave me, I think of that friend. That is such a delight.

Our wonderful home with all its gardens was really a delight to me. We moved in right at the beginning of summer, so everything was new and fresh to me. And all the plants were something new to discover. One thing that was not a delight was the previous owner had dug up some of her favorites and left bare spots in the garden. That wasn’t very attractive. So I found new plants to fill those spots.

Another area that was a bit of trouble was the one garden in the front of the house was in the sun most of the day and was under part of the roofing, so it didn’t get any rain. That poor little garden was dried right out. And it didn’t seem to matter how much I watered it, nothing wanted to grow there.

It was that winter I heard about a Naturalization group. They provide information and activities that promote planting and cultivating native flowers. It was then I heard about Zeroscaping.  It sounded like the perfect solution to my difficult little garden.

I dragged my dear hubby along with me to a meeting. And did we pick a great meeting to test out! The members of the group were selling and trading seeds. We didn’t have any to trade, but I bought a bunch. Some needed to be watered and then frozen as if they’d been outside since summer. Some we just waited until spring and then planted indoors to start.

It is a delight for me to walk by that little garden now and see all the flowers blooming there. They’re not as showing as many flowers, but considering where that little garden started… it looks great!

One of my favorite flowers is Small-leaved Everlasting, or Little-leaf Pussy-toes. Even the name is adorable. I have a pink variety, and it really is a charming plant.

Littleleaf Pussytoes, Antennaria parviflora

I put in Wild Blue Flax as well. That one didn’t seem to take at first, but is doing well now.

th902XVPVM

Another one of my favorites is Three-flowered Avens. This one is such a neat looking flower.

F312-25

However, we do have the odd rainy day, and when we had one last week, I quickly went to work on one of my many projects – like the Kwik Sew 3300. I’m about half way through my first bra from that pattern and it’s coming together really well. Here is one cup sewn into the band pinned onto Catherine just to show my progress so far.

100_2249

I did match the lace on the upper cups, but decided not to match the pattern on the lower cups. This being a black and white bra, I only intend to ever wear it under solid dark colors. However, once I sewed that first cup in, I thought the center of that flower really isn’t in the best place. That gave my dear hubby a chuckle. For now, it can stay the way it is. If it fits as well as I’m hoping, I’ll think about pattern placement before I make it again next time.

Happy creating and gardening!

Sewing for a Friend

So what am I working on? I’ve cloned the Prima Donna Luna bra. It’s a very pretty bra, and my friend is so happy to have a good-fitting bra. But the color is not what she would have chosen. I know that too — when you get outside of standard sizes, you don’t always have the same choices, and pale green would not have been a choice she normally would have made. But when one makes bras, we can choose what materials and colors we want.

prima-donna-luna_0162626_fdp

So, my friend came over and brought her bra. And I set her up on my computer to look at Bra Makers Supply’s kits. She looked through and picked a few she liked. And she found more than a few! But we’re starting with one kit and one bra, and we’ll see from there. While she was looking, I was using the pin-method of cloning. I showed her how by putting the pins into the seams, the fabric isn’t damaged at all.

Here’s the kit she picked. It’s very pretty and delicate looking.

Trio%20ivory%20ivory%20pink%20and%20ivory%20lace

As well as a bra, my friend is moving into a new house, and she wanted a new apron that would go with the colors of her new kitchen. So again, we went shopping – this time to the fabric store, and with pattern in hand, we picked some fun colors for her new apron.

The apron is a pattern I bought on Craftsy. It’s a pattern by So Sew Easy. She has a number of free patterns I’ve been looking at, and will try at some point. But the apron pattern is the Reversible Apron – I’ve got you covered!.

After I bought the pattern and we bought the material, my friend decided she didn’t want a reversible apron. She wants two aprons! So although I’ll be using the pattern to cut out the apron, I won’t be following the instructions as they are written, and won’t be able to give a fair appraisal of the instructions, or at least not all of them. I did follow the instructions up to attaching the neck ties, but not after that. And dropping off in the middle of instructions like that, left me to come up with a way to finish the edges. However, up until that point, she did a great job explaining and showing with pictures how to sew the apron.

Here’s the apron I made:

100_2233

I love that front panel. It’s so charming.

100_2235

And the material here with the sparkles is the neckline trim, ties, the waist band and ties, and the bottom band as well. Why shouldn’t a girl be sparkly in the kitchen as well?

100_2238

This picture really shows why the apron is called ‘I’ve got you covered!’ – it wraps around the hips. That is a very nice touch if you ask me. Much better than just covering the front of the body. This apron wraps right around Catherine (my dress form) as Catherine really doesn’t have any hips at all.

And lastly,

100_2239

Faith, hope and love … and musical notes! It’s even got flowers in there. That just about wraps up everything I love right there.  Hmm, just thinking, it needs lace.

Happy creating!

Disappointment… and Success!

My last bra wasn’t even blog worthy, so I decided to make another beige bra. I really do need a couple of lighter bras for summer.

And I wanted lace on the upper cup too. I love lace. I’m still trying to figure out how to incorporate a lace upper cup. The shape of the upper cup curves quite a bit on this pattern, and most upper cups are fairly straight across that upper edge. I did try using lace on one beige bra. I cut the lace following the curved edge and zigzagged over the raw cut edge, but I didn’t love how it turned out. I’m thinking a dart might be needed to incorporate the curve, maybe two. Like this:

100_2230

So, enough of that disappointment, and even the contemplation. Here is my most recent Beige Plunge:

IMAGE_453

I love this bra! It’s so pretty. To use the lace, I cut the upper cups from Duoplex and then laid the lace over that. The Duoplex is from Bra Makers Supplies (BMS), and so are all my other components, except the lace, which was a gift. Thank you again, Naomi. The pattern is from BMS too, but altered to fit an Omega shape and then altered again to make a ‘fake’ demi bra, or plunge-style bra.

The lace is a nice stretch lace, but it was a bit challenging to use at first. I pinned it down, and did a zigzag over the lace, and it moved. I took the stitches out, and tried again, and it moved again. I changed my stitch length, tried again, and it moved again! I thought briefly of not using lace, but instead got out my trusty Temporary Fabric Adhesive (TFA), and sprayed the back of the lace, laid it over the upper bra cups and sewed it. It didn’t move at all. I love TFA for anything difficult like that. It worked perfectly! I’ve used it before and highly recommend it for anything like that.

IMAGE_454

Here you can see the lace overlaying the Duoplex. I may use this technique in a few more ways. I really am happy with this and how it turned out.

IMAGE_455

I loved the look of the lace on the upper cup, so put some on the band too. I wanted the scallops to show, so didn’t cover the whole band. The elastic has a lot of stretch, so it works very well on the band.

IMAGE_456

And the back band. There were no problems here.

IMAGE_457

Here’s a close up of the bridge. How pretty is that? The trim, the lace, the bow? I’m very excited to now have two bras that fit so well. What a struggle this has been.

On my desk next week is to work on the Kwik Sew 3300, sew an apron for a friend, and clone a bra for her. I told her I’m willing to clone her favorite bra so she has a pattern, and sew her up a copy, but I’m very weary of alterations just now, so no alterations.

Happy Creating!