I originally wasn’t going to make the November BMS Challenge – Support Your Man. Men need support too. Show them some love this November by making men’s underwear and see how creative you can get. My son loves his SAXX, and said he preferred them over the Michael Men’s Underwear pattern. He said he did wear the ones I gave him, but would prefer I bought him the real ones.
So. I wasn’t planning on sewing him any briefs this year. However, I read a comment (somewhere I can’t find now) regarding the Men’s underwear pattern. It was saying you could either do the front opening on the underwear OR the sling, but not both.
Right away I was thinking, ‘That’s not right.” I knew you could do both because my son has a pair that has both the front opening and the sling! I had him send me a picture of the front and inside. Let me just say, I’m a brave woman. That pair of SAXX is over four-years-old! He sent the pictures, and that underwear looked like it was over four-years-old.
However, it helped me see what I wanted to see.
Michael Underwear
Here are the Michael Men’s Underwear with a sling and front opening. I’ve lightened this photo to show the detail a little better. These are a basic black cotton Lycra. And you can see the front opening.
Here they are from the inside. The sling is a light blue. I chose that so it would show up better in these photos, and so it wouldn’t be a headache to sew black on black, on black, with black thread.
The key to making these underwear with a sling and front opening is that front piece. The pattern says to cut one. However, as you can see below, I’m not using just one piece – I’m using two pieces. I altered the front pattern to be a front-opening panel. And I cut two front panels. Then one piece is flipped so it becomes a mirror of the other. The two pieces are basted together, making sure there’s an opening on each side, and on opposite sides. Then they can be used as one piece. After basting them, I add the sling just as I would normally add it according to the pattern.
Here are my son’s Michael’s from the side. And here they are from the back. (Again, lightened. The seams just wouldn’t show otherwise.)
 My son also let me know when I made him his last pair of Michael’s that he didn’t like the band. He found the elastic too firm for his liking. Now to be fair, he’s a personal fitness trainer, so probably doing a little more movement while wearing his. So this time instead of elastic, I simply made a band out of the same cotton Lycra.
 I’m sure he’ll find this more comfortable.
One last image. Here are the Michael underwear showing the front and mirrored inside front openings both opened showing the blue sling behind them.
I hope my son likes these ones better than the last ones I made him.
Happy creating!

 They are darling! I didn’t finish the hem on these, as these were only to see how the sizing would be. They fit perfectly.
 You can see, these are a cheeky little panty.
 You might be wondering, ‘What is going on with that waistband?’ Well, tired sewing was happening. Somehow I didn’t realize the whole time I was attaching the waistband that it was inside out, so the raw edges are outside rather than inside. I started to rip it all out, but then decided these were only to see how things fit, and they fit just fine. They can even be worn this way. I have tops I’ve bought that have edges that look like this.
 If these look a tad shorter than the pair above, it’s because these have been hemmed.
 And when they’re hemmed, they’re just a bit cheekier from the back.
 They are really darling. They might not be my everyday panty, but I’ve heard from a few testers say they love them under trousers. Whether these become an everyday panty or not, they will be a wonderful addition to any lingerie drawer.
 Oh these are sweet.
 And that cheeky back view:
 Happy creating!
 This is the new Amethyst pattern.
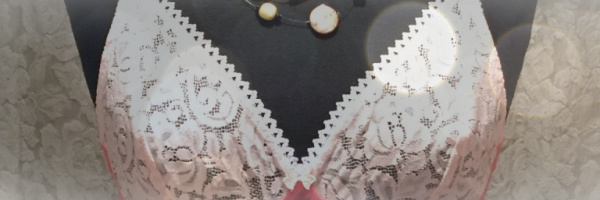
 I thought of a few ways to use lace on the Angie. I’ve seen people use it laid horizontally across the lower part of the cups. I’ve seen people use lace on every other cup piece, and on every cup piece. None of those were what I wanted to do for this one. I didn’t think any of those options would showcase this lace the way I wanted. So I decided to cut out the floral part of the lace, and applique it onto the cups. A little Misty Fuse to hold things in place, a small zigzag, and they look lovely.
 Yes, this lace goes beautifully with the black cherry duoplex. I really like this! You can also see I’ve added a strap tab to this Angie. I like the strap tab addition and will likely continue to use one.
 This is not my bra, and not my photo. It is beautiful though, and shows you can use lace in different ways than just on the upper cup. If you want to see the most stunning lingerie, go look at the post I linked above. The bras are amazing.
 You can see here, although the front is black cherry, I’ve used black for the back band and all the elastics.
 The band has a downward hike to it.

 Most of the Watson’s I’ve made, I’ve fused a stable interfacing to the front cradle, but for this one I’ve used sheer cup lining behind it. (The lining was from my stash.) I love how it looks. You can hardly see any difference between the front cradle and the cups.
 The back band is a dark navy Lycra. It has a lot of stretch, similar to power mesh, which is what I’d used for Em’s Watsons.
 I’m really happy with how this turned out. And I hear Em’s sister is happy too.
 They’re made from cotton Lycra, and have bean-bag-fill (tiny plastic beads) in them. They weigh just less than 1/2 pound each. They’re also very similar to some store-bought ones a family member uses.