You’ve heard me say this many times before, but I loved this lace when I saw it. Do you all have the same problem? I can’t be the only one to fall in love over and over with laces.
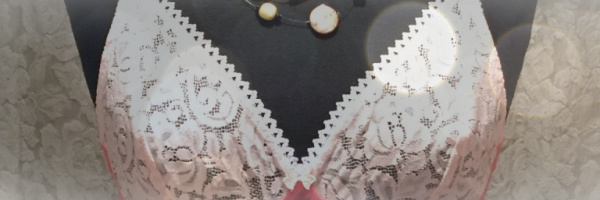
But. I saw this lace and thought it was so beautiful. You can find it at B,Wear. The link is in the photo as well. It’s described as Light Beige with Pink Flowers. The above photo is on a pink background. Below it is on a darker background.
 Oh, it’s so delicate and so pretty.
I did something I’ve never done before. The same day I received the lace in the mail, I had the bra cut out and began to sew it up. I had some copper power net and I found it went perfectly with the leaf outlines in the lace.
Here’s my lovely new Josey bra.  Because this is a stretch lace, I’ve lined the frame and the cups with an ivory sheer cup lining.
 Here you can just see a bit of the copper power net.
 Above is a bit more of a side view. Oh, I love this! The lace is so delicate and so pretty.
 And the back view. I really love copper power net and duoplex too. I wish I could find the perfect cotton Lycra to match copper though. Has anyone found that? Let me know.
One of these days I am going to try another bra pattern. (I do have one cut out to try. Really.) However, this time it was too hard to resist this lace. I used my TNT Josey pattern so I could sew this up right away.
Happy creating!

 I really wanted to make it again, but in colors similar to the above Prima Donna. So I did.
 I love this! I’m really happy with it.
 Here is one last photo of my new Josey Milady. Showing the inside of the bra, and the curve of the foam cup.
 I have to admit, I really love the leopard theme in Prima Donna’s collection. Here’s another inspiration from the same Madison collection.
 This one I think will be perfect for the Josey pattern, or the Shelly pattern, but I’m going to try copying this color combination on Lilypa’s new bra pattern –
  I love this style. I can’t wait to make my own bra using the colors of the Madison above.
 Isn’t that adorable for a couple of cat fans? They were both going to get undies with cats on them.
 I’ve made this pattern before and my son likes them.
 In the past I’ve made a front opening for these briefs, but I was thinking these would be more for sleepwear than daily wear. As a result I didn’t make the front opening this time.
 I think he’ll like them.


 I love the red and black check. For me, this spoke Christmas. So, I made a Christmassy Josey Milady bra.
 I’m just teasing. I couldn’t resist playing a little bit with some photo effects.
 Oh, this is pretty! I’ve added a 3/4s foam cup inside again. It’s my current favorite style, and I find it so very comfortable.
 I love this lace so much, I wanted to use it for the frame of the bra as well. Because this is a stretch lace, I’ve lined the frame with sheer cup lining. I didn’t line the cups as I was using foam inside.
 The back is solid red, but still Christmassy.
 Although I did mirror the plaid pattern along the upper cup, I didn’t even think of trying to match up the plaid on the rest of the bra! No, that would have been quite the feat to do that.
 I love the colors and the pattern so much on this. I knew I wanted to find a matching table runner. And I did.
 And I was able to fit it into my sewing schedule and get it finished quickly too.
 So for the table runner, I chose a fun bright green snowflake print.
 And one last photo.

 I used the lace for the whole cup so it would look more similar style-wise to the PD Milady.
 I love how the lace details lined up on the cup pieces. Trust me, that was a happy accident. I didn’t have that much material for cutting them, so didn’t follow the Dogs on the pattern for cutting those cup pieces. What a happy occurrence.
  Yes, I’m very very happy with how this turned out. I’m sure there will be more Josey Miladys soon.
 Oops, I see the channeling popped out from under the upper band elastic. I guess I’m not quite done this bra yet.

 I did use a different lace, but I think it has a similar enough look to it. I love this!
 This fabric combination is very elegant.
 I couldn’t resist. I’ve already purchased a soft tulle kit for this pattern.
 I love this material!
 I think this makes a lovely Stanton hoodie dress too. I decided for this one (I have others planned already) that I wanted it all one color with a pop of color for the lining.
 I actually didn’t have enough fabric to make the hood lining and the pocket lining the same color. I was using up some scraps. But seeing as the pocked will be laying flat most of the time, we’ll be the only ones who know.
 I love this material for this and I decided to use it for the cuffs and hem instead of ribbing.
 I’m very happy with how my Stanton turned out. It’s going to be wonderful on those really cold -30C winter days! Well, actually, I don’t go out much on those days. It’ll be lovely on the -20C days. (smile)
 It was an easy project. Just cut out the panel, cut out a backing, and cut out the layer of batting.
 We don’t have our tree set up yet, but I did have this little tree so I could take a quick photo and show all of you just how pretty this panel is when sewn up.

 I love all these motifs. It’s called Christmas Spendor by Color Principle for Henry Glass.
 I’ve found a matching table runner from the same collection. That will be my next Christmas project.
 I didn’t add ribbon this time, but have in the past.
 Just add equal folds towards the center and sew them in place. Then narrow the top of the facecloth for the hood by sewing from the side where the folded facecloth meets up towards the top at a bit of an angle. Lastly, sew the hood to the body of the towel.
 I’ve heard from parent who were still using this for the four and five year old children because it was so warm.