Porcelynne just released a wonderful pants pattern called Nicole. What’s wonderful about these is they are for both knits and woven fabrics.
I really enjoy testing Jennifer’s patterns because there’s always something unique about them, always some little detail that I’m not expecting. These pants had that too.
These are a wide leg pant pattern with pockets. However, it’s the pockets that have that little extra detail. They’re not on-seam pockets. They sit on the front of the pant and open just a few inches in front of the seam. They lay perfectly flat and don’t add any bulk! They’re perfect pockets! 
When testing the patterns we give permission if Porcelynne can use our images. Well, I was very pleasantly surprised to see my image used for the pattern. What fun!
Here are my Nicole pants.  I chose a bright fun pattern for summer wear. And I love these.
Here’s the same picture again, but with a nice bright arrow pointing to the pocket opening.  Yes I know that’s really hard to see.
And here I am wearing my new Nicole pants. (which you’ve seen already above on the pattern)  I really do love this pattern, and these pants. I wore them out to go to yard sales after this photo was taken.
Happy creating!
 I have to say, of the three slopers I’ve made so far, this one has been the easiest and quickest to come together.
 The benefit of this sloper is there is a class to go along with it. You can watch Suzy draft one and I find that really helpful. Craftsy also often has deals for joining. And I definitely recommend this class.

 As well there is an

 I realized while going through my sewing resources I also have the


 Here’s a stock photo from the class of the back. I did the back three times and it’s still not coming together correctly.
 This book helped us. It had a few steps included that her class notes didn’t have. So we were off and going.
 I had to cut into some quilting fabric I had because I didn’t have enough muslin fabric. So I have a very pretty sloper now.
 I’m actually so happy with how this fits, and how pretty it is. I’m almost thinking of adding sleeves and buttons to the front to make it an actual blouse.
  Ah, but the back… Here it doesn’t look so pretty. I guess a sloper it will stay.
 I carefully cut along the side of the lace where it meets the power bar.
 There’s the smallest pucker there, but it will fit better. I can adjust my pattern for next time.
 Although I’m sure the zigzag stitch will hold everything, I did sew a straight stitch on the top at the edge so there was no gape where I’d cut the lace.
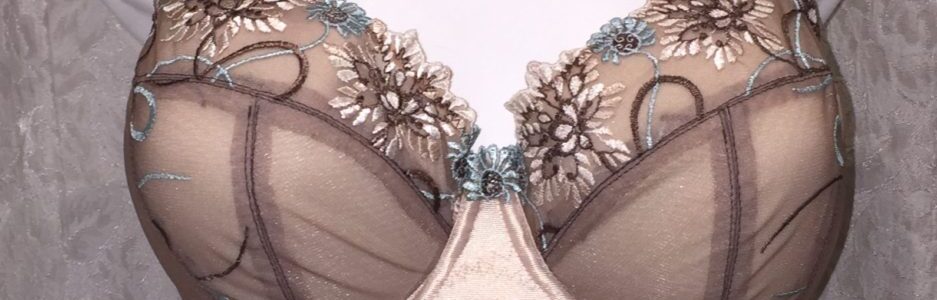
 I’ve shared before how I love the golden color of beige. I think it’s so pretty. So with for this bra, I’ve paired it with a gorgeous golden beige lace.
 I can’t even say what it is I love about this lace but I do love it.
 Do you have a favorite lace? Or even a favorite color you just go back to again and again? Let me know.
 I love the golden hue to beige. I think it’s really quite lovely.
 This lace matches so well with the beige as well.
  I had a small problem when I was making this bra. After I attached the strap to the front of the bra something didn’t look quite right. So I checked the front again. No. I’d attached it correctly. I looked at the back again. Gah! I’d sewn the strap elastic to the inside of the band rather than the outside!
 You can see just the slightest difference in the sewing along the eyes where I had to resew that part after reattaching the strap elastic.
 Oh, isn’t that all so very pretty?
 I am in love. Here’s a close up showing just how pretty this fabric is.
  Just gorgeous.
 If you haven’t sewn with cotton poplin, it’s very easy to sew with it. All the cut edges do end up enclosed, so you don’t have to worry about any unraveling of those edges. You don’t need to finish those raw edges in any way. They are all enclosed in the bra. As with most of the seams in a bra, they are sewn over more than once.
 That little cherries charm was too adorable for me not to use. It’s just so sweet!