Fits Like A Dream

My newest bra fits like a dream, but she isn’t peaches and cream.

For the better part of the last two years I’ve only worn my own bras. I did purchase a couple of bras too, but to be honest, the ones I made fit better – and they weren’t fitting perfectly. Because I was so used to wearing what I’d made, I thought I’d still wear my not-perfectly-fitting bras, but oh no. Once I had one that fit so well, I found the others just weren’t as comfortable. I have a list of things to sew, but one bra just wasn’t enough. So sewing another bra went to the top of my sewing list.

fav

Here’s my latest (and perfectly fitting) Pin Up Girls Shelley. And she fits like a dream.

I love that little pop of color on the power bar and bridge. That’s just fun. And I’m all about lace. So this bra is bringing together lace and a bit of fun and I’m thrilled.

100_2686

Here’s a better view of the power bar. Oh, I love that. This is such a beautiful pattern. There are so many fun things to do with it. Although the power bar looks like Lycra, it has the support of duoplex under it. I did the same on the bridge. The Lycra and lace are from an older fabric set I bought from Merckwaerdigh‘s store a few years ago. Everything else is from Bra Makers Supply.

sewy-rebecca-left-side-view

Here you can see the Sewy Rebecca I’d done with this material. You can also see I made the wrong size. I still have this bra in the bra drawer – it’s too pretty to throw away or cut up. Back to the material,  I don’t have a lot left, so I got creative in the placement of what I did use on the bra. I wanted to save some for panties. Yup, now that I have my bra fit down, I’m going to start making matching bra and panty sets.

100_2688

And the back of my bra. I did the 3 x 3 hook and eye closure again. I’m getting better at getting it done up and undone, and it really does make it more comfortable. Who knew?

100_2689

Here’s part of my stash for panties. That’s some gorgeous cotton/spandex from Bra Makers Supply, and my bit of Lycra left over from the kit from Merckwaerdigh, and some black lace for trim. I also found some pictures online for inspiration. I’m thinking of changing up my panties from the basic pattern I have now. I really love things that are asymmetrical, and love that I found some fun panties with just that look.

One of the best aspects of this journey I’ve been on with trying to find the perfect fit for my bras is the freedom I now feel in altering patterns. I used to feel they were somehow beyond my grasp and I wouldn’t think of altering them. I have no such fear now!

100_2690

And lastly, I’m trying to decide what color bows I want on my new bra. I’m leaning towards the red, or maybe red and black together …

I still have some fitting issues to plan for when starting out, but I did the same thing on this bra – I went up a cradle size from my wire size. This takes care of most of my cup alterations as it’s only one size different than the cup size I’m using. Is that clear?

Let me explain that a bit more. The Omega shape needs a larger cup size than wire. Let’s say I need a 38 wire, but my cup corresponds to a 42 wire. I’m meeting the two half way in between. By using the 40 cradle, the 38 wire will still fit, and so will the 42 cup. This one change eliminated a lot of alterations.

However, I still made a few. I thinned the bra under the cup  little more this time, so I ended up trimming my elastic under the channeling. I lowered the bridge 1/2″ again, and on this bra I adjusted for a flat spot I have. And I put in a vertical dart in the underarm area. I don’t think there are any other alterations I would even want to make on this bra.

Ah… a perfectly fitting bra feels so good.

Happy creating!

Could It Be?

That was pretty much how I was feeling. Could it be that I was one alteration away from my perfect fit? After all this time, and all these tries, could it be? I have to be honest, I was not hopeful at this point. I have wandered around close for so very long, I just thought I’d be close again. But… I got it!

100_2663

Here’s my perfectly fitting black and ivory bra. I used black and ivory because I didn’t have enough bits of either fabric for a bra in just one color. That’s how un-optimistic I was feeling. And I’m usually a the-glass-is-half-full kind of girl. Heck, if there’s water in the glass, why would anyone complain? But too many not perfects had worn me down a bit. So, I had some black duoplex and some ivory duoplex, power net, and lace (all from Bra Makers Supply), and I set out one more time.

You all know how it is, I had one alteration to make, so that really meant two, and if you’re making two, that’s really four. Every time you change one part of the pattern, you have to change the corresponding part. And every alteration I made, I feared I would mess up the fit completely.

But… IT FITS! I could just keep typing that over and over. IT FITS! IT FITS!…

I watched along with Beverly on the Craftsy class again. I love having her right there explaining and seeing how she does this or that. It’s much more fun than just pulling out the pattern instructions again.

One of the little tidbits she shows in the class is the Butterfly Effect done with lace. I decided I’d do that on this to pull together to two colors a little more.

100_2664

This shows the Butterfly Effect up close. It’s a really pretty options for lace. And of course, if you’re going to have butterflies, then you need flowers not bows. So I added a little black rosette to the top of the bridge.

100_2665

I didn’t add the rosette until after I tried it on though. There must have been some hope somewhere inside because I did do all the top stitching on this bra. Oh, but after changing threads a few times, I’d had enough of that. I still wasn’t sure it was going to fit, so… ivory thread showing on black. I’m going to have to say it’s a design feature at this point. The strap trim is something I’ve been saving for a long time – just waiting to use. This seemed like the right time. The pins on the side are to help get the wrinkles out of the bra on Catherine.

100_2666

This shows the back, showing the hooks and eyes, strap elastic, findings and all the elastics that only peek out are all in black.

Another change I made was to go with the triple hook and eye rather than the double. It really does offer more support and I’m surprised how much more comfortable it is. I had wanted to do what I saw in the Prima Donna bras I’d purchases in the past, but don’t think I’ll do that anymore. I really prefer this. I just have to learn how to get in and out of it as easily as the double hooks I’ve always worn.

One of the alterations I made on this was the bridge… and it’s perfect! Simply perfect. It comes up high enough to offer good support, but not too high as to get in the way and push away from me.

All those really nice fabrics I’ve saved in my stash for that elusive day when I had my fit down… get ready! That day has come.

Happy creating!

One More Try

I don’t know about anyone else out there, but having to wear a bra every day, I really am motivated to get the fit right. So, I decided I needed one more try. And that one more try was just the trick.

Using the half-size right in between the size I’d been working with for so long, and the next size up that was too big was brilliant! I woke up at 4:30 that morning and came downstairs to work on my bra pattern. And I have to say, after 2 years of trying, I was not really as enthused as I was say a year and half ago. I’ve had too many bras that weren’t what I wanted. I’m still wearing them, but perfection felt beyond my reach.

All that changed this week. I’ve found my size! Oh what relief. I encourage you, if you are still struggling, don’t give up.

So, let me take you back to my process.

I had what I thought was going to be my size. But I felt rather defeated thinking of the alterations I would have to make to a new cup because I knew the wire and cup size still didn’t match. The good news was this cup size is only two sizes larger than the wire size I need, and one size smaller than what I’d been using.

That got me thinking again; I knew from reading the Bra Makers Manuals that we can go up or down one wire size without changing the cradle. Okay, I was going to go up one cradle size. I traced out a 40 cradle instead of a 38. This now meant the cup I needed, which corresponds to a 42 wire was only one size away. Oh, the relief of that realization! I cut everything out and sewed it up as is – no alterations.

100_2659

Here’s the Pin Up Girls Classic pattern, as is, except I split the lower cup. There are a couple of pins in there trying to (unsuccessfully) smooth things out and get rid of the wrinkles on Catherine. This is my best fit yet. There are only a couple of minor fitting issues at this point. If you’re dealing with an Omega shape, I strongly recommend doing this – go up one cradle size. It will really help as there will be fewer alterations to do, or the ones you still do need to do will be less drastic.

100_2660

This will be one alteration I make to the cup. It gaps a little at the underarm. A tuck in the pattern there will eliminate that for future bras.

And the second alteration I will make to the pattern is the bridge. I made this one bra without any alterations to the bridge – so I didn’t use my custom bridge and it’s just too wide (I knew that) and too high. But just how much too high was it? That led to my second brain wave this week. I took my custom bridge at the full bridge height and drew 1/2″ line down from the top. Then another 1/4″ down and a second 1/4″ down.

Here’s my custom bridge with the first 1/2″ cut off. And that’s the exact amount I need to shorten it.

100_2655

Here’s a closer up picture showing the markings I made on the top of the bridge:

100_2658

I’d already snipped off the first 1/2″, so now I know how much I need to lower my bridge.

There were a couple of other things I’d said in the past I’d share, so I took pictures as I was sewing my bra. Oh, and a side note here, I signed up for Beverly Johnson’s Bra class on Craftsy and I had her explaining the steps as I was sewing. That was such fun. It was almost like having her right here with me.

100_2639

You can see here the bottom band elastic coming up under where the channeling will be sewn on. This just fits, but if it didn’t, here’s how you fix that.

100_2640

Fold the channeling over the elastic so you can see how much you’ll need to trim away. See that pink dotted line? If I needed to trim, that would be my cutting line.

100_2641

And here with the channeling out of the way again. Follow the curve of the channeling when drawing your dotted line (better than I did here) and you’ll have your exact cutting line.

I’m off to make those changes to my pattern and cut out another bra.

Happy creating!

Barb Pants With A Few Changes

I’m going to start off by saying I love the Barb Pant pattern. There are only a few changes I’ve made and I’m really very impressed with it. When I tried them on for my hubby and son, I got ‘Wow.’ and ‘Sweet’, respectively.

There were a couple of changes I made though. There was an excess of material at the center back of the pants. I know that’s my shape causing that. So, one of my changes was to put a couple of darts in the back of the pant, below the waist. For my next pair, I will put the dart into the pattern and then have a nice smooth look to the back of the pant. They don’t look quite as flattering hanging backwards on Catherine.

100_2630

You can see the one dart on the back quite clearly. It has a twin on the other side, but it looks more like a fold of material in the photo. My bottom also fills them out more so the darts don’t pucker at the bottom like they do in the photo above.

This photo also shows the other change I made. After taking off the waistband (which I had sewn on and then overlocked to keep the edges from fraying), I decided I really didn’t like the waistband how it was. Being rather curvy, I needed to take in the elastic on the waistband which produced wrinkles. And it just wasn’t a look I loved. As I said last week, to me, it had a sweat pants look.

So what I did on these is I put the elastic in the back of the waistband only. You can see in the photo above I enclosed it even with a double row of stitching.

100_2624

Above you can see the elastic pinned on to the waistband. I didn’t measure, just made it the length of the waistband – which is a size smaller than the pant size I used. That was one of the other changes I made to the waistband.

100_2628

And now the elastic is all tucked in and secured. I saw this on a pair of RTW pants I own and decided to give it a try. And I really like this.

100_2629

See how much smoother the front of the pants are without the elastic? These are a Ponte and have some stretch, so this method will work for these, but a less giving material probably won’t allow these same changes.

There are a couple of puckers in the above photo at the waistband in the front that a couple of 1/4″ darts in the pattern would fix.

Pinned on Catherine

For comparison, here was the waistband before I took it off and made the changes. I really prefer the smoother front.

I’ve worn these pants a number of times, and they’re really comfortable. The Barb Pant will be on my list to sew again. And I’ll do my best to get a photo of me in them so you can see what they look like on.

Happy creating!

My First Barb Pants… Not Quite Finished

When we were having our early Christmas, I was spending a little time with my son and he asked me if I could just do what I wanted, what would I do? I’d sew!  If only I had time to just sew…

Being a curvy girl means pants and I don’t always get along. Until a few years ago when they came out with curvy styles of pants, they were one of my most dreaded clothing pieces. I hated having to shop for new pants because they weren’t going to fit anyway. Any curvy girls out there who know that large gap at the back of the waistband? However, pants are fitting much better now that manufacturers have realized woman aren’t all straight up and down.

Hearing how difficult pants were, I’d stayed away from them. Even though I’d made maternity pants for myself ever so long ago. I just figured they were ‘hard’, and I didn’t want to even think about it.

However, I needed pants, so I went shopping for a new pair of pants. I wanted a casual dress pant. And I did find a pair. However, they were $60, thin and static-y. I started thinking back a few months ago and how if I signed up for the Style Arc newsletter, I’d get a free Barb pant pattern. I had signed up and had the pattern. So I bargained with my hubby. Instead of buying a pair of pants, how about you let me buy material to make a few pair. He thought it made sense.

BARBS-PANT

Here’s the Barb Pant. The photo is from Style Arc. Click here to take you to the free download.

This free pattern comes as a digital download. That’s not a problem. I’ve worked with digital patterns before. But this time, for some reason, I really didn’t like working from the paper pattern. It was so stiff. It’s possible that because it’s a lot longer than the apron pattern I’d done before, it was just a lot more cutting. For my next pair, I’ll trace the pattern off onto tissue paper for cutting.

Style Arc are also very generously in that they give you three sizes. I wasn’t quite sure, so I ordered what I thought would be closest to my size and then one up and one down from that. And the sizing is spot on.

I sewed up a first draft in some Ponte I have. It was one of those purchases that I wondered about afterwards. I don’t love the color and don’t even know if I’ll ever wear that color. So why did I buy it? Well, I bought it because they didn’t have the color I wanted. However, it was perfect for a muslin of the pants.

Before I got to sewing, I took out my favorite pants and drew off a quick clone of them to compare to the pattern. That helped me right away to know how much to shorten the pants.

I must say, as a first draft, they fit quite well. I did take in the waist elastic as that was too big. But that’s quite normal for me. Another alteration that is still in the works is to take out a little extra fabric at the back, just below the waistband. But other than that, the fit is really good.

Pinned on Catherine

Here are the pants pinned to Catherine – just to show how they’re coming along. This was also before I took the waist in. I’d read Anne of Clothing Engineer had to do the same. You can read about that here. Another alteration I made was to shorten the height of the waistband. The pattern calls for 2-inch elastic, and I know I don’t have that much room. I’m curvy and short.

So, in the photo, my band has some wrinkles before I fixed the elastic, and after taking two inches out, it has more. When the pants are not on, they have a sweat pant look to me. I’m not in love with the waistband as it is. So, I’ve removed it and will re-do that this week.

on Catherine with top

And again on Catherine, this time with the top untucked – like I wear most things. I can’t see that waistband. Even though I will likely wear the pants untucked most of the time, I still wanted a cleaner look on the waistband. So I will make the band 1 size smaller, and the elastic 2 sizes smaller and it should look better.

These still need to be hemmed; next week when they’re done, I’ll put on some Spanx and show them to you on me.

I do have a pair of pants that I don’t use. Again, one of those ‘I don’t like the material’. But I did love the style. It was the waistband that sold me on them. It has a crisscross front. I love little details like that. So out came my seam ripper this week and after I’d removed the Barb pants waistband, I removed the other waistband.

There is still a little more work to be done on these, but they’re coming along a lot better than I had thought.

Happy creating.

Making Your Own Bows

It was a while ago now, someone asked me if I made my own bows. At the time I didn’t think too much about it. I usually bought kits from Bra Makers Supply, and they always come with a bow. So I didn’t think I needed to make my own.

Then I had a weekend with a professional Bra Maker, Jane, and I took a few things away from that weekend. One of them was how I attach my straps – it’s forever changed since Jane showed me a slightly different way. You can read about that here.

The second thing I took away from that weekend, is when Jane said to attach bows to the center front and also over the seams where the straps join the cups. I LOVE that look. So, I’ve been doing that since then.

Well, that means that one little bow isn’t enough for me now. I do have a small stash of bows, and I do mean small. I probably have a dozen or so. And not many of them are the fancier bows – the ones with little pearls on them. You know that moment when you see someone’s stash and envy it? I experienced that when Jane pulled out a large plastic bag of bows. Oh my!

Since then I’ve been looking for bows. I’ve been looking on eBay, and haven’t been able to find the mini bows with pearls, or in colors I’d like. So I kept looking.

A site I came across, which unfortunately has been taken down. However, I had a screen shot of what you start with:

bow 1

To the finished bow:

bow 2

She also suggests wrapping ribbon around the elastic or sewing a pearl on.

Another great source is this video. I used both the fork, and my little cardboard template, and I must say I go back to the cardboard. I find it easier.

These were the exact style I was wanting. I went to the fabric store to buy ribbon to start, and the fabric store is not the place to buy ribbon. Michaels was much more economical. They had three out of the four colors I wanted.  I’ve also been looking at some pretty, and probably more-expensive-than-I-need Swarovski pearls to attach to the bows. I haven’t bought those yet, but they’re saved in my ‘want to buy’ folder.

So now I have an option for making my bows. And just in time for making bows, a very generous gift of ribbon and some lovely lace. I’d mentioned to a friend how I couldn’t find one color, and look what she sent me. I don’t think I’ll run out of ribbon any time soon. Thank you, Naomi.

100_2578

Happy creating!

A Material Mix-Up

A few weeks ago when my dear hubby surprised me and my Mum with an overnight trip to the mountains, we took in a few stores in Canmore and Banff. In one of the stores I visited in Banff, there were some lovely fall jackets and I went straight to them. I’d seen that material before. I knew it.

Just as I was checking out the jackets, a woman came up to me and asked me if I knew about the store. No, I replied. She told me it was Canadian owned, and they only used Canadian materials and the garments were manufactured here in Canada. While all this was being explained to me, I’m looking at the $100 price tag on the jacket. That’s not too unreasonable, but I knew I had seen that fabric before, and it wasn’t $100.

I left the jacket in the store, but made a note to go to the fabric store when I got home. And I did.

I searched for the fabric and found it, but when I measured it, didn’t think it was going to be enough. Off to another store to look for the same material. At that second store I bought what I thought was the same material.

denim

Isn’t that gorgeous? I love it. But… something didn’t seem right. This is a flocked denim and it does have a bit of stretch, but only a bit. I thought the material in the jacket had been a stretch knit fabric, not denim. And the material at the first store, I didn’t remember that being denim. However, I didn’t see anything else in the store that even came close, so I bought it. But there was still a little nagging doubt that this wasn’t the same material.

A day or so went by and then I went back to that first store to compare what I’d bought with what I’d seen there. And sure enough, it’s not the same material. The material I wanted was a stretch knit.

flocked knit

Well, they do look awfully close. And the good news is there’s just enough material. We pulled out a pattern while I was at the store and it’s the exact amount I need for what I’m making. Seeing as it was 50% off I didn’t even think about it. I bought it right away.

side by side

Here they are side-by-side. They are really close, but not exact matches. I still love them both too. So for the flocked knit (left in the picture) I’m going to make another McCalls 6844, this time a little more fitted. I’m also thinking of frog closures or something to embellish the front.

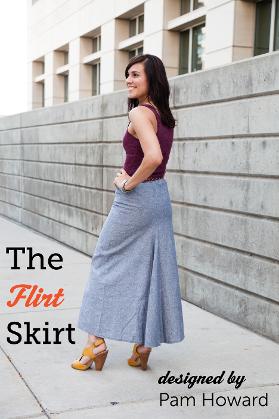
For the flocked denim (right in the picture), I’m thinking I’ll use that to make the Flirt Skirt. It’s a lovely skirt. Heres the link for the pattern on Pam Howard’s website.

8937_workshop_1

This photo was from the Craftsy web site showing the skirt. They had offered kits and a workshop. I was thinking of making the skirt in a knit, but now might do it in a woven. I also have some lovely black Ponte and dark gray too. Either of those would make a great skirt to go with the McCalls cardigan.

So I may have had a bit of a mix-up with my materials, but I have plans for both of them.

Happy creating! And it’s Thanksgiving day today in Canada. Happy Thanksgiving!

Merry Christmas!

Well, that probably seems a little odd seeing as it’s not December. And I’m sure a lot of people thought it was odd. But we did just have Christmas!

My Mum came for a visit, and I haven’t seen her for seven years. I decided I would surprise her and we’d have Christmas. We bought gifts, wrapped them, put the tree up, and bought everything for Christmas dinner. And boy, was my Mum was surprised! And delighted!

100_2504

My Mum loves Christmas, so she loved it all. She loves getting gifts and giving them too. As soon as she saw the gifts, that was it, we were going shopping. There was no way she was going to receive gifts and not give them.
We all had such a good time. I think the fun of surprising my Mum made the whole event so much more fun than usual. Everyone had such joy.

100_2506

Here she is opening her first gift. Doesn’t she look happy? She was just like a kid!

We had such a fun-filled week. My dear hubby surprised both my Mum and me with an over-night trip to the mountains. We hit Canmore, Banff, and Lake Louise. All in a day. But it was great! One amazing thing about our over-night trip was we stayed at the same resort my hubby and I had stayed at for our anniversary – and we were put in the same room! It really was great.

Then when we got back and my Mum saw the cardigan that I’d made. The McCall’s 6844. She loved it. ‘You can make me one of those, can’t you?’ You know how Mums have a way of asking that’s really telling you – that’s what I was hearing there. She was telling me to make her one. So I showed her a couple of knit options from my stash and she choice this one.

100_2569

I wish this picture showed the sparkle that’s part of the material. It’s lovely. I was kind of wishing my Mum had picked the other knit I offered. But she loved this. What’s a daughter to do?

100_2571

And here it is all done. I think it is such a lovely pattern. It comes together so easily and it fit my Mum perfectly. I did shorten the sleeves again. I never thought I had short arms at all, but I had to shorten the pattern for myself and for Mum. Other than that, the pattern was good as it was.

100_2572

The peplum on this cardigan is so flattering on all shapes. I’m curvy and it ‘hides’ a bit on me; but my Mum is really straight and it gives her more of a fuller looking shape.

100_2574

And the back. I really love this cardigan. The shaping is so lovely. When my Mum tried it on, she loved it. My oldest dear son said he really liked it too – just like early Christmas at our house – this cardigan is a hit!

Here is my Mum modeling her new cardigan.

100_2576

100_2577

She wasn’t the happiest model – she doesn’t like having her picture taken. But I told her everyone would want to see it on her. Thanks Mum!

Happy creating!

‘My’ New Serger

I can’t even begin to tell you how excited I was to bring home my friend’s serger. And then to be told she wasn’t in any hurry to get it back; that I could just keep it at my house; that she’d never used it even. Thrilled would be a good place to start.

I found a great tutorial with really clear instructions on how to oil your serger, and where to oil it. It was much clearer than the manual’s instructions. You can read it here.

The machine really sounded terrible when I serged that first test swatch. Imagine the sound of metal grinding against metal. That was pretty much how it sounded. Once I oiled it, it did sound better. However, my second test swatch still sounded rough to me.

My plans to finish the scarf for my Mum went out the window, as well as a camisole I wanted to make for my Mum. At least as far as using the serger for those projects went. So the machine was packed up and put in the trunk of my car to make a trip to the repair man.

The trip to the repair man was good news on one hand – there’s nothing wrong with the machine. It is usable. He said it could use a tune up, but the blade is still sharp and it was working as it was. The not great news is he said this model is a noisy model and it vibrates a fair amount. He said it also sometimes skips stitches. Hmm, as I said, not great news. So, it’s back home with me, but also still sitting in the box awaiting its fate. I’m not feeling quite as thrilled.

So to finish one of my projects I decided to use my overlock stitch on my sewing machine to sew up the camisole. It turned out so nice.

Cami for Mum

This is a lovely shaped camisole pattern. It’s Kwik Sew 2286. And it actually has shaping to it – it curves in at the waist.

The material I used is a burnout knit. I was wishing I had more of it. I only bought a 1/4 of a meter when I first bought it a couple of years ago, as at that time I was only planning on using it to cover foam bra cups with it.

Black burnout knit on beige cups

Here’s an older photo of a foam cup bra I made when I first started making bras, and I used the burnout knit to cover the cups. This was the burnout knit over beige foam cups from Bra Makers Supply. Such a pretty material! You can read about the bra on my blog here.

100_2492

And here’s how the material is over my hand. This will be a fun and flirty camisole, but not likely one to be worn showing. It’s a little too transparent for that I think.

As for the scarf clone? Well, I’m still contemplating doing the hem by hand AND contemplating oiling up the serger again and giving the rolled hem a try. I haven’t decided yet how I’m going to finish that one yet. I’m encouraging myself right now even, that I as I type this; I have the serger here, and it does work… I just might be leaning towards the serger rolled hem.

Happy creating!

A Pirose Clone (Look What Came to Stay)

I really wanted to make a copy of one of my favorite scarves – The Pirose scarf. I have two of these, and just love them both. However, they are rather expensive as scarves go. Then I saw a Sewing with Nancy episode: Sew Amazing Scarves. You can read about it here. And she was talking about the O Sew Easy scarf. Well, that’s pretty much the same as the Pirose. I decided I’d make a clone.

Here’s one of my originals.

Pirose

I really love this scarf. And I often wear it just like this – on the diagonal. I find it a fun and flirty this way to wear it. I cut out my clone after making a pattern, and then tried a few ways to finish the edges. Nancy says you can just overlock it with a serger, but I prefer the original finish on it – a serged rolled hem done with woolly nylon thread.

Here’s my clone.

Pirose copy

The edges are still unfinished as of yet. But not because of lack of trying on my part. I went to the fabric store and bought some woolly nylon to try in my sewing machine. I’ve read a few times that the bobbin is the problem area using woolly nylon in a sewing machine. That was not the case for me. For me, the upper thread kept breaking. I started entertaining ideas of a hand-sewn rolled hem, but didn’t act on that.

Then I decided to call a friend – and just like on the TV show, I hit the jackpot! My friend, whose husband happens to be a Producer, had a serger I could borrow.

How does the hubby fit in? Well, he produced a sewing show for a few years, and the machines went with him when the show was done. Doesn’t that sound like a dream come true?

I went to pick up the serger and my friend said she wasn’t in any hurry to get it back, but I could just keep it at my house. She said she didn’t even know how to use it!

Serger

Here’s the newest member of my sewing family. I can tell you, I’m really hoping it lives here for years! This is a Janome 1110DX.

My friend and I continued to chat and she said she had another machine I might want to take too. I asked her what it was and she said it was called Cover Pro. I’m sure my mouth fell open. I could not believe what I was hearing. Not only was I going home with a serger, but also a cover stitch machine? Really, I hit the jackpot!

Here’s the other newest member of my sewing family. This is a Janome CoverPro 1000CP. This one I’m buying from her so it can stay forever.

Cover Pro

Oh, I am such a happy sewer right now! Or is it sewist? I read on another blog a suggestion for sewster. That sounded fun. Regardless, I’m really happy!

I found the manuals online and printed them off so I have a hard copy to help me through any things I don’t remember. I haven’t had a serger for years. And the one I did have years ago had problems. I remember taking it back to the dealer to be fixed at least three times. And the last time I had it in, I mentioned I’d had the same issue repaired already. They looked it up and sure enough, I had taken it in more than once. At that point, they told me I could exchange the machine for a new one! That was amazing, but by that time I had really fallen out of love with the serger. It came home with me, and sat. I finally sold it to a dear young woman who was getting into sewing.

Back to this serger, I cleaned it out, and started it up and ran a test strip of material through it. Boy, it needed some TLC. I got some oil and oiled it. It does sound a bit better, but I’m still concerned about how it sounds.

Hmm, I’m not sure when that scarf will be finished at this point but I’m really looking forward to learning all about and using these newest members of my sewing family.

Happy creating!