I finished sewing up the very pretty Yvonne kit from Bwear. And I’m very happy with it. This is again with the few tweaks I’d made to my pattern, and I’m so happy with those tweaks as well.
 This is such a pretty kit, and I have enough fabric to make another bra – all I will need is another finding kit. Honestly, this is a very generously supplied kit.
Sewing this up, I had an idea to redo something I’d done for a BMS Challenge back in 2018.You can read the whole post here. Below you can see I split the upper cup. 
I really liked this design feature and I’m not sure why I haven’t done it more often. That is on the Ruby pattern, but I’ve been using the Freja pattern lately.

You can see from these images the upper cups are shaped differently. The Ruby has a straighter upper cup. However, I think this would be worth trying after all it’s just adding another seam.
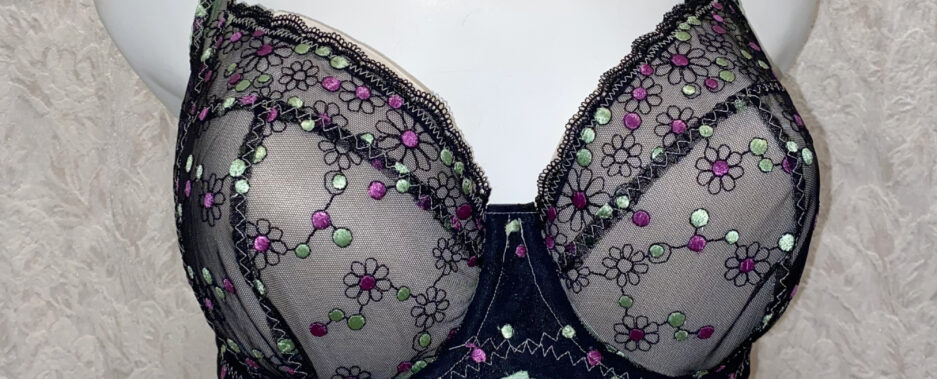
With the lace edge, this will look amazing! The bra will be mostly the floral design lace with just the edge of the upper cup lace. It will give it a completely different look.  Isn’t this fabric gorgeous! And the cradle is the same floral lace fabric. I really like this kit.
  Here you can see the bra from the side. Hmm, makes me wonder if there is floral power net out there…
I have one more bra to show you this year, and then I want to be a bit more proactive with some projects that have just been waiting for me for 2026.
Happy creating!
 So I started over. I measured everything again, and my bust and waist measurements were a bit smaller this week.
 There are still a couple of changes I plan to make. My bust measurement came out to a half number, and I think I’ll round up for my next one rather than use the half.
 I’m thrilled with how it turned out, but the pattern needs some tweaking.
 I’ll be making adjustments to my pattern right away so I can make another Angie’s Twin. Honestly, this bra gives some great lift and shaping.
  My next project I won’t be sharing any time soon. I’m testing a pattern that will be released later this year, but I do hope to be back to my blog before the end of January with some things to share.
 This is a kit I bought last year and I just love it! It’s a teal color with ivory floral lace. It was a kit of the month in January or February, and I’d been saving it.
  I used some of the lace along the power bar. I love this look. The solid color behind the lace just gives it a really different look. The upper cup is sheer, but the power bar is detailed as well.
  The kit came with ivory power net, and an ivory findings kit.
  The ivory looks lovely with this teal color, and of course the lace is ivory, so it all goes together very well.
  This kit didn’t come with a bow, but it needed a bow! You know me – it has to be bow worthy. I’m going to need to stock up on bows.
 This is the Margareta, again. And I’m thrilled again.
 I adore this color! I have looked for a cotton Lycra the same color. I did find some that’s a bit darker, so I think some matchy-matchy will be next on the sewing table.
  The power net in this kit has a sheen or glimmer to it. It is very pretty.
 So far this pattern is winning the favorite pattern for me. We’ll see what happens when I revisit the Freja, but for now I’m thrilled to have a great fitting pattern.
 This alteration did help, but I took a critical look again, and realized I could do more. I could take more out.
 I did finish those channelings at the front and sides and took photos for all of you.
 I adore this kit as well. It’s from B,wear. You can find it
 So, if you’re not completely happy with how your bra is fitting you, take a critical look and make one adjustment at a time.
 I don’t know that I love the jacket. It’s the embroidery I love! It gave me ideas to do something similar. As well, the $300 price tag was a definite no-love.
 It looks a little washed out, doesn’t it? Well, not for long. I also love this style, so was happy to play with it.
 I wanted a big pot to make sure the jacket would be submerged.
 Oh! I’m so happy with this! SO HAPPY! It turned out beautifully.
 I think they both look great! I was kind of thinking one might not look as good, and that would be the one I’d do some embroidery on, but I can’t decide now. I love how both of them turned out.
 I made a lace-edged cup again, and kept the scallops along the bottom as well. I even cut out a little lace butterfly to add as a detail at the center front.
  Em doesn’t need support in a bra, but she needs comfort. So again for this Watson, I’ve used the stretch lace throughout the bra – including for the back band.
  There was a little bit of lace left over, and I thought it would be just enough to make Em a pair of panties to go with her new bra. A girl needs her matchy matchy after all.
  These are the Clover Briefs with lace at the upper edge. I cut out a second little butterfly to add at the center front again.
 It all still coordinates well, and I think the set looks adorable. Em loved it. And yes, she got it a bit early.
 Or like this:
  But it shouldn’t have looked like it did.
 Carefully cut off the scalloped part, and you are left with a perfectly usable thin strip of elastic. Perfect for along the upper cup.
  Yes, that worked just fine.
 I love it! I may just do this more often. However, I do hope the next time I do this I’ll do it when putting the bra together – rather than doing it after the bra is finished. I love the strap detail.
 Isn’t this so pretty? Yes. I wanted a bra like this.
 This lace! It’s so pretty.
 I love the sheerness of this. The original used sheer cup lining under the lace. But I had used some of my lace for Em’s bra. I couldn’t recreated it exactly. As well, I am using a different pattern.
 Overall, I’m very happy with my new Freja, but…