My attempts at drafting my own bra haven’t been 100% to my satisfaction. My hubby says I want perfection. He’s not wrong. I’d settle for snuggled up beside perfection.
Drafting First Steps
I decided to go back to the Bra-makers Manuals and go over some of the steps in there for checking fit. The first thing to look at is the frame.
I decided I’d start over with my frame. The frame was fine, but I wanted to add some elements from the classes I took at Central Sewing, as well as some other design elements. This was a perfect time to re-do my frame.
Years ago, I cloned a Prima Donna Deauville bra I had, so I took some elements from that too. I gave my frame a wider cradle. I also gave the band a downward hike. It still has the lower bridge, and lower underarm. Here’s my drafted cradle and the tester frame. This was pretty good.
One change I made. Do you see how little material there is there in the cradle to attach the cup? That 1/4-inch might be fine when making a bra, but it didn’t seem like much for the tester. I added another 1/4-inch. I also added a little more room under the arm.
For my tester frames, I use bits and scraps of whatever I have leftover from previous makes. Left over bits of elastic are especially great for a project like this.
Take Two
The second new frame I made. This one is good too. And it will be much easier to use with the added material in the cradle.
I also gave myself a clear visual by sewing a seam line where the cup would meet the cradle. That’s the ivory stitching you can see in the above photo, and the one below.
I took a photo to show the difference between when the wire is in, and before it’s in the frame. That’s quite a difference the wire makes.
How Does It Fit?
I’m happy to say this frame fits perfectly. My next endeavor will be to work on cups adjusted for my Omega shape.
Here’s the frame on my new display. It fits better on me. Everything is exactly where it is supposed to be. The bridge is right up where it needs to be, not pushed down, not coming away from the chest wall. The wires are just right too.
That’s the first stage of fitting a bra. Once the frame is correct, it’s time to test the cups.
Next Steps
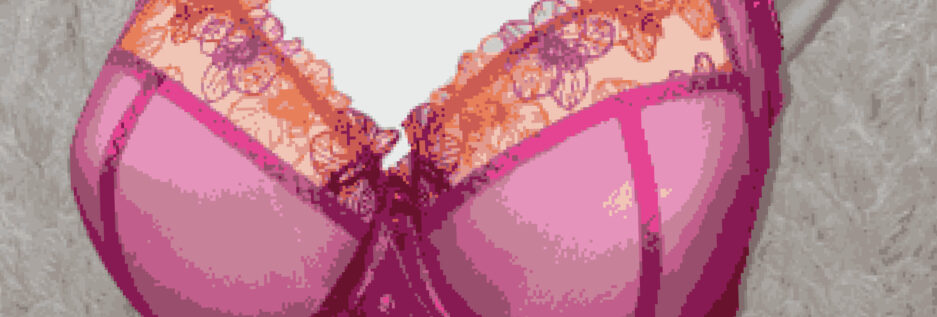
After making a few adjustments to my pattern, I sewed up a pair of cups. I incorporated that adorable S-curve for the power bar.
I mentioned I’d sewn a seam in the cradle to follow. (I did this because I’d added that extra 1/4-inch.) I also sewed a 1/4-inch running stitch along the bottom of the cup. When it was time to sew the cups into the cradle, I just matched the two lines of stitching I’d done. So easy! How is it fitting? In all honesty, this probably would have been fine if I’d made it into a bra. It fit better than any RTW bra I’ve had. But I figured why not go for the brass ring. Seeing as this was still only a tester, I still made a couple of changes to my pattern.
I thought the cup might be a smidge small, so I clipped into the cross cup seam. Yes. I could add 1/8-inch there, so I did. I know an 1/8-inch isn’t a big deal, and like I said, if this had been a finished bra, I would have been happy with it. Since it was still a tester, I improved my pattern. Another adjustment was deciding if I wanted to lower the upper cups to meet the bridge, or raise the bridge a bit. I pulled out the custom bridge I’d drafted a few years ago, and decided to incorporate that into the frame. That means the cups won’t need to be lowered any more than they are now. The bridge will come up 1/4-inch to meet them. I’ll have to overlap my wires, but I’ve done that before.
 Once again, I’m going for that perfectly matched cradle and cup at the side seam, and once the upper band elastic is added to the underarm of the cup, I’m going to have it!
  Yes, I’m happy with how this is all coming together.
Following Up
One last comment on the frame – a number of posts ago when writing about Tester Frames, I mentioned how hard it was to sew the cup into the frame once the frame was completed. Well, I took the wire out and it’s not hard. It’s not hard at all. The wire was what made it so difficult. Leave the channeling open for the wire, slip that wire out. It makes a big difference.
Happy creating!

 Margreet took us through the steps of designing a bra, and part of that was testing the cups in a frame. You can read about it

 It wasn’t pretty, but it was completely functional for its purpose – to see if these cups would fit. And they did.

 That’s the same skirt, same tie, same pockets, same zip in the back. The top is a little different, but that’s it. What a wonderful pattern!
 I bought a lovely stretch velour for the top, which is closer to the original dress’ design which is a knit top. I also bought a gorgeous rich black and red brocade for the skirt.


 Do you see how the 42 Extra Long wire is the same length as the 44 Long wire? My cup size matches a 44 Long wire. I normally wear a 40 Long wire. Using a 42 Extra Long wire to draft my cradle size, I’m able to make my cradle match my cup size perfectly.
 The Fourth Draft
 You can see the cups are a little more rounded over the apex, and the bridge is a little lower.


 Such a thoughtful gift.
 There were only a couple of changes I still wanted to make to this. I wanted to add a bit to the underarm area for more coverage there – just a half-inch. I wanted to round the cups a touch at the apex. And I wanted to lower the bridge a half-inch as well.

 Happy creating!
 So for my drafting I will need to use two wires. The first wire (the one that fits me) will be for the cradle’s draft. The second wire (the one that correlates to the cup’s size) will be the one I use for the drafting the cup.


 My hubby is so cute. He tells me this looks like a summer dress. I told him it is a summer dress!


