Sewy Rebecca Revisited

This week I’m looking at my Sewy Rebecca pattern again. I do really like the pattern, so wanted to revisit it. However, the hard part was I felt like I was starting all over again with fitting. I’m not, but I’ve had too many ‘doesn’t quite fit properly’ experiences to not be a bit gun shy.

So, the first thing I did was compare the muslin I’d made a few months back to my correctly fitting Shelley bra. I pinned the muslin over top of the bra on Catherine.

100_2837

You can see here, the size I’d traced off and sewn up was too big. I wasn’t sure of my size, so actually graded up one size from the largest to make sure I was getting the proper depth of cup. I’m glad I did. I could see I really would be fine with one size down. Also, I traced around the muslin in pencil to show where the seam lines are underneath.

100_2839

You can see the lines here at the underarm, and in the first picture at the top and bridge. I also traced the bottom of the cup where the seam is for the cradle. That gave me a clear indication of sizing.

Once I was finished I took the muslin apart and trimmed off the seam allowance. Then I laid those pieces over the pattern pieces to compare those. Again, I was pretty sure I had the correct size. And one last comparison – I measured the wire line length and the cross-cup seam length and they both match up too. I was ready.

For the band, I laid my Shelley band over the Rebecca pattern to find the size. I really did use my whole pattern as a sloper to make the new pattern fit.

I adapted the Rebecca bridge to the right height for me, and added in the correction to the pattern for the flat spot I have. I also made the cradle smaller to fit the smaller wire I use. So the last change I need to make was to adjust the larger cup to fit into the smaller band.

Before I cut into my good material though, I sewed up another muslin.

sewy on fav

There. Almost all the wrinkles are gone. There are wrinkles on the dress form’s bra though, so this is looking perfect. Now to pick out some material.

I’ve bought some lovely material over the last couple of years that I’ve been saving for that day when I had my fit down. It was time to break some of it out!

I picked a gorgeous Black Cherry kit I’d bought from Bra-Makers Supply. I loved this kit and was really looking forward to using it. I’m not disappointed.

100_2854

One of the first things to happen was a set back. I went to press my seams and one little touch of the iron scorched my material. I don’t know how my setting dial on my iron was turned to the hottest setting, but I adjusted it and got out my seam ripper. I had some lace on that band and I still wanted to use it.

100_2863

Next I want to show you what the Omega shape means – in practical terms, it means the cup is bigger than the cradle. Do you see those edges do not meet? As this was still a bit of a test run – even though I took a lot of preliminary steps – I didn’t do any alterations to the cup pattern. I will take in the wire line of the cup’s pattern on the next one I do. On this bra I did a gathering stitch along the bottom to ease those two parts together.

100_2860

You can see here the gathers inside the cradle. But with some serious steam after the cup was sewn into the band, you can’t see the gathers at all.

100_2866

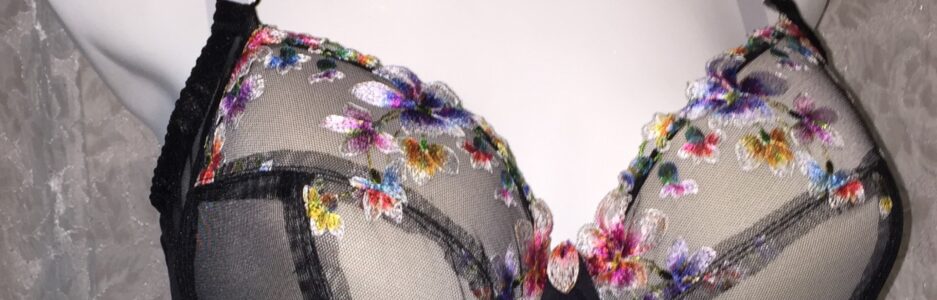
And here’s my Sewy Rebecca. I love this color. I love so many things about this pattern. It looks as neat (almost) on the inside as it does on the outside. I really love that. As I was sewing, that was what excited me the most.

100_2858

Here’s the cup before it was sewn into the cradle. All the seams are enclosed. The cross cup seam is enclosed between the lace and the lining. The power bar seam is enclosed between the duoplex and the lining. It looks so very neat inside. I’m quite excited about that.

100_2868

Here’s the bra from the side. That little piece of lace was unpicked from the scorched section I showed you earlier. I’m really pleased I took the time to do that. I’m loving that little detail. As well, the steam really did make those gathers disappear. You can’t see them.

100_2869

And here’s the back. The findings kit isn’t available in Black Cherry, so I used black. The cotton isn’t available in the Black Cherry either, so next week black cotton and lace panties to match.

Happy creating!

A Beige Shelley Set

I’m pretty sure I’ve used that title before, and will likely use it again. I really like my basics and I like the Shelley pattern by Bra-Makers Supply. Here’s my most recent Shelley:

100_2808

I need to make some proper-fitting foam inserts for photos. I don’t like all the wrinkles! However, as a bra, this is my best yet. I love it. It’s kind of funny because I saw this lace on the Bra-Makers Supply (BMS) web site, and ordered it right away. When I got it, I was putting it with my other laces, and lo and behold, there was another order I’d placed before for the same lace. Yup. I know I like it when I do that. It wasn’t the first time, and I doubt it’ll be the last. I did that with a Merckwaerdigh lace as well.  It’s good to know I really like it.

For this Shelley, I did what I did for the last couple of bras I made. Rather than making alterations to the cup to make the larger cup fit into the smaller cradle (Omega shape), I went in-between the sizes. The cup corresponds to a 42 wire, the cradle I need is a 38. I used the 40 cradle. The wire still fits. In fact, BMS say with their patterns you can go up or down a wire size if you need. That makes it perfect for me. The fewer alterations, the better because one alteration leads to another and another.

I thinned the area under the cup even though I used the larger elastic. You can see that here:

100_2813

Beverly, The Fairy Bra Mother, did a very informative blog on how to do this and I’ve been doing it since. You can read her wonderful instructions here.

I also lowered the bridge, adjusted for a flat spot I have and added a vertical dart to the pattern to take out a little excess under the arm.

It’s so wonderful to have learned to do this, and from now on I can have perfectly fitting bras. That is tremendous!

Another sparkly idea that came from Beverly was to add some Swarovski crystals to the bra. Pure brilliance. So, I added a little bling to the bra too. This bra has bows and crystals.

100_2811

I attached these sparkling little delights on the bridge just above a ‘floating’ piece of lace. I say it’s floating because I only sewed the sides of it into the seams of the cup and cradle. I used the Swarovski Hotfix Crystal Tool to attach the crystals and love the result. The only change I’d make here is one that will make it a bit easier for me – attach the crystals before inserting the under wires. However, as much as the tool seemed to want to wobble a bit, the end result looks nice and straight.

The back is quite basic.

100_2812

There is a small pucker where the hooks and eyes meet the band, but it’s not the very large wrinkle showing in the photo. That was just me not catching that the band wasn’t on Catherine (my dress form) perfectly straight. I was fighting a cold and forgot to check to see if the band fit properly into the hooks and eyes. I think there’s a 1/16″ little tuck there because I  didn’t want any edges sticking out.

Now, for matching panties.

You’d never have known it by following my blog, but I do love matching bra and panty sets. For a long time I was on a quest to find cotton because I love my cotton panties. Once I found my source at BMS, I was working on getting my bra fit down. All the materials for my bras and panties come from BMS except the elastic lace I used on the waist bands – that came from Frog Feathers on Etsy.

Here’s the first pair of panties I did:

100_2818

I love these. Nice soft cotton and matching pretty lace. Who could ask for more? I used my favorite Kwik Sew 2286 pattern and altered it. I did go up a size because the cotton just didn’t have the same stretch as some other knits I’d used in the past. The alteration I made was a simple one. Rather than cutting the front on the fold, I traced the whole front out and then cut off the one side of the front. I added a seam allowance to both sides creating two new pattern parts.

I did run into a bit of a snag not having thought it all through enough. When I was adding the lace to the waist band, I realized I didn’t want to cut off the scalloped part at the top of the lace. So I just ended the elastic lace where the other lace started. Next time I will add the elastic lace to the band before sewing these two parts together.

100_2820

Having that little blip happen helped me with my second set of panties though. Here’s my second pair:

100_2817

Yup. I love these too. It’s the same base pattern, but on this one I traced the front out and laid my lace over it. I wanted the scalloped edge at the top. So with the lace on top of the pattern, I drew a line where the lace ended. Then I traced that part again and added a seam allowance. For this set, I added the back waist elastic first. That wasn’t going to work for the font though. For the front I added a bit of left over upper band elastic. It’s hidden behind the top of the scallops.

100_2821

Here it is from the inside. I didn’t want to leave the front without any elastic, even though the lace is a stretch lace.

100_2819

Here they are, my two new matching panties.

Happy creating!

Long Line Watson and Some Bling

I had such hopes my Watson was going to be perfect this time. The good news is my hopes aren’t completely dashed. My Watson isn’t perfect, but it’s not that far off.

100_2798

Here it was beginning to take shape. I’d made two changes. The last time I’d made it, I made the largest size, but it was a bit small in the cup, so on this one I graded the cup up and then put some gathering stitches along the seam line and aligned those gathers at the bottom of the cup where it crosses the cup seam. Those little gathers are hardly noticeable and then I didn’t have to change the cradle at all.

The other change I made was to ‘beef’ it up a bit. I lined the cups with power net. It does offer a fair amount more support than the last one.

100_2804

I have no idea why the front looks off-center like that with the foam cups in, but it doesn’t look like that without them. However, it does look a lot more deflated.

100_2806

There, all deflated with wrinkles and puckers. However, the center front isn’t off. It now looks fine.

100_2801

Here in the side view, you can see it gapes open a bit where the cup meets the cradle. It does that when it’s on me too, so I may need to shorten the underarm length on the pattern there. However, the more exciting part of this photo, which I don’t know that you can see there is really is more support to the cups with the power net added. It does give them more of a firm shape.

100_2802

I didn’t do anything different on the back. In fact, I was a bit lazy. I often do the elastic along the band separate from the straps, but they’re all one this time. I also used band elastic again. I have it on hand, so used what I had. Especially as this bra was still a test.

100_2803

On this side of the bra you can see where I put a pin. I didn’t have any sewing pins with me in my bedroom, so just used a safety-pin to know how much I’ll want to remove from the pattern. That’s an three-quarters of an inch fold there, so a fair bit to remove from the pattern, but I also have to remove from my Pin-Up Girls patterns there too.

So, will I make the Watson again? Well, if I do, I won’t use the power net for the cup next time. I may try a mesh instead as it’s a bit lighter, or I’ll double up on the Lycra. The single layer of Lycra just isn’t supportive enough for my size. An inside power bar is another option I’ve thought about to add more support to the Watson.

Lastly, a dear friend had her 50th birthday this week. She wears a Medical Alert bracelet but only has the one bracelet. I asked her if she’d like a second bracelet that can inter-change with her ID tag. She loved that idea – something with bling she said. Out came the Swarovski crystals and some lovely small hematite beads. She was so happy to get some more bling. What girl doesn’t love some bling?

100_2796

Happy creating!

Lots of Plans, Not A Lot of Sewing

I mailed my Mum’s cardigan to her early last week, and she got it by the end of the week. She said she loved it, that it was precious, that she wouldn’t need a spring jacket now, and that I’d done a beautiful job. That is always so wonderful to hear.

A little history, my Dad didn’t contribute very much at all to our family. My Mum was the one who provided for us, made sure we had the clothes and food we needed, and for me she sacrificed a lot and made sure I had music lessons too. Even though things were always a challenge, my Mum would take family in if anyone needed help. My Mum was a great example of a strong woman. So, for me, it’s a pleasure to be able to give back to her and please her. When my Mum said she wanted a black cardigan, I made it the next day.

This week, I have little to show on my blog – just a few projects I’m planning. My week seemed to be spent running around to appointments. I did have some fun on all those errands – with a couple of visits to the fabric store. I bought two beautiful prints and felt quite pleased I’d resisted a third print.

100_2783

I love both of these and think they both make adorable bra/panty sets.

As pleased as I was with these prints, that third print stayed on my mind for a day or so. I went back to the fabric store and found the print again – but on sale this time: buy one get one free. I did like that.

100_2784

This is a delightful black and beige polka dot Lycra. Can you see why I really couldn’t resist?

I feel very ready to start the Watson Sew-Along now with not one, but three beautiful new Lycras from which to choose. This week we were to gather our supplies, and look at Bra Fitting Alterations.

Happy creating!

For My Mum

My Mum was saying she’d been watching The Shopping Channel and saw a cardigan the same as I’d made her, but in black. She said it was $150, and wanted to know if I could make one for her for less.

I can hardly imagine a little peplum cardigan costing that much, but I assured I could do it for a lot less than that. And I did. It’s an early birthday present for her. My Mum will be 89 this Spring, but I thought she might want to wear this before it warms up too much.

 It was the same McCalls pattern I’ve made a couple of times now, in fact the same style even, so I didn’t need the pattern. I also have some Ponte material.

Once again I’m revisiting McCalls 6844. I think I’ve made most of the sizes now. I had originally made a size Small for my Mum. This time she wanted a size Medium. She wants it big enough to wear things under it. So, my Mum is getting her way. I made her the size Medium – even though I seriously doubt she needs it that big.

The only other change I made this time was to use the serger. My hubby helped me re-thread it (again) and I oiled it (again). The repair man did say to oil it well, so three times is well, and it hums away now. It’s actually hummed away well enough to do a few projects with it.

So here’s my Mum’s McCalls 6844:

100_2768

I dressed it up a bit with a pretty scarf just to add a bit of color. Black on black against beige really doesn’t show much.

100_2769

I really love the shaping on this cardigan. It flatters, well, it flatters me and my Mum and we’re pretty different when it comes to our shapes. She’s always been very thin-hipped, and I’ve been curvy for as long as I can remember. This cardigan flatters both of our shapes.

100_2773

Even the back has a nice shape to it.

I loved having the serger working and making such quick work of this. Every time I’ve sewn it before I not only double-stitched it – where I’d sewn the regular seam and then a second one 1/4″ away from the seam allowance. Then I did a zigzag over the trimmed edge. That was a lot of work. Serging my way through this project made it seem super quick and easy.

One last comment. I made the size Large last time I made this for me and it fits me loosely, which is what I wanted. However, I’ve wondered about making myself a more fitted version as the envelope photo shows a more fitted cardigan.

M6844_xfull_2

So I thought before I send this off to my Mum, I’d give it a quick try on to see what changes I might want to make to a size Medium. And I did try it on, but I didn’t get a photo of me in it! I had another parcel going to the post off that day, and wanted to get them both sent off. Let me just fill you in here on my thoughts.

The first material I used had a lot of stretch to it, and if using a knit like that, I could easily go with the size Medium. However, the Ponte doesn’t have as much stretch and it felt snug in a few places like the arms and across the bust and hips. I could probably make the Medium/Large cross if using Ponte.

Did you notice I have a new badge on my blog? Amy, from Cloth Habit is starting another bra sew-along – and it starts today! I can’t wait. I had so much fun on the last one she did.

Happy creating!

My First Watson

The Watson bra pattern from Cloth Habit is showing up all over the place on blogs. And it is an adorable pattern. I also seem to have an addiction to bras and bra patterns, so I had to try it. I also think Amy (of Cloth Habit) is wonderful. I admire her sewing, and participated in her bra sew along two years ago (can it really be two years ago already?). So when Amy said she was releasing a pattern, I wanted to try it.

The Watson bra pattern isn’t something I’d tend to think about for me. I need support, and this isn’t a support bra. However, it was too adorable for me not to try, and I do wear leisure bras around the home from time to time. The other aspect that was making me hesitant was the material used for the Watson. I usually use duoplex and power net. When I do use Lycra, it over those other very supportive materials.

An interesting aside to this is last year I’d read about a French lingerie company and how they didn’t make structured bras, only soft cupped bras. Their philosophy was a woman’s natural shape was the most attractive shape. I dismissed it at the time thinking that definitely wasn’t for me, but I notice more and more soft cupped bras are appearing in both RTW and patterns. Amy may be right on trend with this.

Here’s my Watson:

100_2764

I really love this. but it’s not perfect. This was one of those projects where I had to fight over ever step.

I chose some fabric I had left over from a Merckwaerdigh kit I bought a few years ago. I made a bra from this too, but it just seemed too much of something. I don’t know if it was too much pink, or what, but I didn’t wear it. You can see it here. The Watson in this material? I love it.

100_2765

Here’s the side view. I put my oft-used foam cups in to fill the bra out. I really do love this material for the Watson.

100_2766

And the back view.

It really is an adorable bra. I do think I’ll try the longline version next.

There’s a little fabric left after making this, and a fair amount of the bright pink lace. I’m thinking of making Merckwaerdigh’s E-SH20 panties, View A.

merck
100_2767

I think that will make a really cute set.

Do any of you follow Erin from The Sewing and Life Adventures of Emerald Erin? Erin has set a sewing challenge for herself – a bra a week! She said for a year, but then amended that the first three month of 2015. She is also open to having others bra makers send their photos to her and she’ll post them along with her own. That just sounds fun! You can check out her blog for all the information, and here’s the email to send your own bras to her: bra.a.week@gmail.com

One last comment; I had a phone call from my Mum. She wants another cardigan. She saw something on the Shopping Channel that looked the same, but cost $150. So now she wants one in black. She also wants a size bigger, which I question, but I’ll make it for her. I was planning another McCalls 6844 for me, so I guess two more are on my sewing list.

Happy creating!

That Just Didn’t Seem Right

I bought another panty pattern, and this time I thought I was being so smart by buying one with three options in there. Kwik Sew 2100. It has a Bikini, Hipster and Brief option. Great!

il_570xN.592293674_1cw6

So I looked up my size, and then looked at the pattern. That can’t be right. At least that’s what I thought. I remember when I was just going to make panties again after not doing any for years, and my sewing pen pal, Naomi, warned me they’d look huge when I was cutting them out, but this?

A picture is worth a thousand words, right? You tell me. Do these look the same size?

100_2706

That smallest line showing to the right side of my traced Kwik Sew 2286 pattern isn’t even the size I need. I need a bigger size? As well, I’m looking at the Hipster pattern, and my KS 2286 doesn’t even come up to the Bikini line. The KS 2286 doesn’t list itself as a Hipster – simply a panty – but it compares really well to some RTW Hipsters I have – that’s why I like it so much.

100_2708

The above picture shows a little more clearly just where the sides of these two patterns are ending.

100_2709

This shows the cutting lines above the traced pattern piece. It’s not even the same height as the bikini option.

And one last photo:

100_2712

Here is the KS 2286 traced pattern over the traced KS 2100 traced and cut out. That’s quite a difference. Both patterns say they are designed for stretch knits. I think I’ll look at my 2286 pattern again.

100_2707

And wanting to play with the KS 2286 a little more,  I altered the pattern to a more asymmetrical front along these lines:

purple

Aren’t they adorable? So I changed my KS 2286 to look more like these.

I wish you all the happiest of holidays, and a joyous New Year!

Some Matchy Matchy

I do like matchy matchy. Maybe it’s an indicator of my age, but I do like things to match. So, now I have my first (two) great fitting bras, it was time to make something to match.

I couldn’t find any ivory cotton, but did stock up on black, red, beige and pink. So, going forward I’ll have a nice choice of basics from which to choose. My most recent Shelley bra was mostly black, but had some red and ivory in it as well. So I chose red and black for my panties.

100_2694

Here’s my first pair. It’s a modified Kwik Sew 2286, which is basically a hipster. I copied the lace inset from Kwik Sew 2908, but I prefer how the 2286 sews together – no seams showing on the inside. The crotch seams are hidden between two layers of material and then when the lace is sewn on – you don’t see an exposed seam. The 2908 has the front and crotch as one piece, and then the back is sewn to that. It looks similar on the outside, but on the inside you can see the seam very clearly. In the past, I’ve made 2908 and modified it to do the seams the same as the 2286.

100_2692

And the set pinned on Catherine. They look long, more like a high cut here, but I’ve made them before and they are a hipster. My only disappointment is I’m not in love with this as a set. The lace is the same on the panty as the bra, but it doesn’t pull together quite as much as I’d wanted. I don’t think there is enough red in the bra to pull it off. However, it’ll still be a second choice option for me.

100_2696

Here’s the second pair I made. I like this one a lot better. I think it pulls together with the bra without any problem.

100_2695

Here it is pinned onto Catherine. That looks like a set. That’s much better. I really am happy with this set. This will be my first choice to wear.

100_2697

Here are both panties with my bra. It’s very fun to have my first set. The materials are from both Bra Makers Supply, and Merckwaerdigh‘s Etsy store. The panties are mostly cotton from BMS with that little accent of lace/Lycra from Merckwaerdigh’s.

Next I’m going to have to play with my pattern to make an asymmetrical pair – and I think I’ll go with the black & Lycra for that one.

Happy creating!

Fits Like A Dream

My newest bra fits like a dream, but she isn’t peaches and cream.

For the better part of the last two years I’ve only worn my own bras. I did purchase a couple of bras too, but to be honest, the ones I made fit better – and they weren’t fitting perfectly. Because I was so used to wearing what I’d made, I thought I’d still wear my not-perfectly-fitting bras, but oh no. Once I had one that fit so well, I found the others just weren’t as comfortable. I have a list of things to sew, but one bra just wasn’t enough. So sewing another bra went to the top of my sewing list.

fav

Here’s my latest (and perfectly fitting) Pin Up Girls Shelley. And she fits like a dream.

I love that little pop of color on the power bar and bridge. That’s just fun. And I’m all about lace. So this bra is bringing together lace and a bit of fun and I’m thrilled.

100_2686

Here’s a better view of the power bar. Oh, I love that. This is such a beautiful pattern. There are so many fun things to do with it. Although the power bar looks like Lycra, it has the support of duoplex under it. I did the same on the bridge. The Lycra and lace are from an older fabric set I bought from Merckwaerdigh‘s store a few years ago. Everything else is from Bra Makers Supply.

sewy-rebecca-left-side-view

Here you can see the Sewy Rebecca I’d done with this material. You can also see I made the wrong size. I still have this bra in the bra drawer – it’s too pretty to throw away or cut up. Back to the material,  I don’t have a lot left, so I got creative in the placement of what I did use on the bra. I wanted to save some for panties. Yup, now that I have my bra fit down, I’m going to start making matching bra and panty sets.

100_2688

And the back of my bra. I did the 3 x 3 hook and eye closure again. I’m getting better at getting it done up and undone, and it really does make it more comfortable. Who knew?

100_2689

Here’s part of my stash for panties. That’s some gorgeous cotton/spandex from Bra Makers Supply, and my bit of Lycra left over from the kit from Merckwaerdigh, and some black lace for trim. I also found some pictures online for inspiration. I’m thinking of changing up my panties from the basic pattern I have now. I really love things that are asymmetrical, and love that I found some fun panties with just that look.

One of the best aspects of this journey I’ve been on with trying to find the perfect fit for my bras is the freedom I now feel in altering patterns. I used to feel they were somehow beyond my grasp and I wouldn’t think of altering them. I have no such fear now!

100_2690

And lastly, I’m trying to decide what color bows I want on my new bra. I’m leaning towards the red, or maybe red and black together …

I still have some fitting issues to plan for when starting out, but I did the same thing on this bra – I went up a cradle size from my wire size. This takes care of most of my cup alterations as it’s only one size different than the cup size I’m using. Is that clear?

Let me explain that a bit more. The Omega shape needs a larger cup size than wire. Let’s say I need a 38 wire, but my cup corresponds to a 42 wire. I’m meeting the two half way in between. By using the 40 cradle, the 38 wire will still fit, and so will the 42 cup. This one change eliminated a lot of alterations.

However, I still made a few. I thinned the bra under the cup  little more this time, so I ended up trimming my elastic under the channeling. I lowered the bridge 1/2″ again, and on this bra I adjusted for a flat spot I have. And I put in a vertical dart in the underarm area. I don’t think there are any other alterations I would even want to make on this bra.

Ah… a perfectly fitting bra feels so good.

Happy creating!

Could It Be?

That was pretty much how I was feeling. Could it be that I was one alteration away from my perfect fit? After all this time, and all these tries, could it be? I have to be honest, I was not hopeful at this point. I have wandered around close for so very long, I just thought I’d be close again. But… I got it!

100_2663

Here’s my perfectly fitting black and ivory bra. I used black and ivory because I didn’t have enough bits of either fabric for a bra in just one color. That’s how un-optimistic I was feeling. And I’m usually a the-glass-is-half-full kind of girl. Heck, if there’s water in the glass, why would anyone complain? But too many not perfects had worn me down a bit. So, I had some black duoplex and some ivory duoplex, power net, and lace (all from Bra Makers Supply), and I set out one more time.

You all know how it is, I had one alteration to make, so that really meant two, and if you’re making two, that’s really four. Every time you change one part of the pattern, you have to change the corresponding part. And every alteration I made, I feared I would mess up the fit completely.

But… IT FITS! I could just keep typing that over and over. IT FITS! IT FITS!…

I watched along with Beverly on the Craftsy class again. I love having her right there explaining and seeing how she does this or that. It’s much more fun than just pulling out the pattern instructions again.

One of the little tidbits she shows in the class is the Butterfly Effect done with lace. I decided I’d do that on this to pull together to two colors a little more.

100_2664

This shows the Butterfly Effect up close. It’s a really pretty options for lace. And of course, if you’re going to have butterflies, then you need flowers not bows. So I added a little black rosette to the top of the bridge.

100_2665

I didn’t add the rosette until after I tried it on though. There must have been some hope somewhere inside because I did do all the top stitching on this bra. Oh, but after changing threads a few times, I’d had enough of that. I still wasn’t sure it was going to fit, so… ivory thread showing on black. I’m going to have to say it’s a design feature at this point. The strap trim is something I’ve been saving for a long time – just waiting to use. This seemed like the right time. The pins on the side are to help get the wrinkles out of the bra on Catherine.

100_2666

This shows the back, showing the hooks and eyes, strap elastic, findings and all the elastics that only peek out are all in black.

Another change I made was to go with the triple hook and eye rather than the double. It really does offer more support and I’m surprised how much more comfortable it is. I had wanted to do what I saw in the Prima Donna bras I’d purchases in the past, but don’t think I’ll do that anymore. I really prefer this. I just have to learn how to get in and out of it as easily as the double hooks I’ve always worn.

One of the alterations I made on this was the bridge… and it’s perfect! Simply perfect. It comes up high enough to offer good support, but not too high as to get in the way and push away from me.

All those really nice fabrics I’ve saved in my stash for that elusive day when I had my fit down… get ready! That day has come.

Happy creating!