I had learned about Creative Bug a few years ago, but really didn’t take advantage of the classes on there. Madalynne has a few classes on there. Gretchen Hirsch also has one – the Tap Pants class. Aren’t these just darling?
I had a very old culotte slip I wanted to replace. I thought this class would be the perfect jumping off place to replace that sad well-worn slip.
For my slip, I decided that I would use some special fabric I had. Lilypa had brought in some gorgeous stretch silk. I felt confident that I would get a well fitting slip because the class take you through drafting your pattern from your measurements. Isn’t that lovely? When I first saw it, I just had to have some. And I thought this project would be perfect for this material.
 I love them! One thing I didn’t realize when I bought the material is the map isn’t all ‘right side up’. The continents are both right side up, and upside down.
 So if you see this and fall in love, be aware of this.
If you’re making a smaller garment, you may be able to get everything right side up. Otherwise, this is just the design. I made a mistake that was quite upsetting. I couldn’t believe I did it really. One of the class suggestions was to use pinking shears to keep the edges from fraying. Well, I love my rotary pinking blade and use it often to trim seams on panties. I just love the look.
So I happily grabbed my pinking rotary cutter and trimmed all my seams with it. Then. Somehow. I didn’t feel I had more fabric under one of my seams. I cut through the back of the slip!  There’s nothing to be done about it now.
I’ve found a supplier for tricot with rave reviews. I plan to make a few more of these but can’t make them all out of silk.
Happy creating!
 However, before I started work on fitting a new pattern, there was the
 As soon as I heard about that class, I said to my husband that I would have loved to take that class. He said, ‘Why don’t you take it?. Sign up.’ I jumped on that opportunity!
 I got it. Now to test this against all the wires I have.
 This was so odd because when I traced my root with a wire and compared it to the different wire shapes, this was the closest in size and shape. Below is the photo I took of my root trace over the Orange wires.
 However, after wearing this wire, I can tell you it’s not the right wire for me.
 I didn’t have to see this wire-root comparison to know this wire wasn’t the right size or shape. I knew this wire pinched on the sides. Again, this is not the right wire for me.
 So, of course I needed to see how this wire would compare to my root trace.
  This is about as good as it gets. My only hesitation with this is I’ve heard the wires aren’t always as stable (can break) with washing and wearing after they’ve been bent. I had to bend it a fair amount. So, although this is an option, I still had one other wire to try.
 Hmm. About the same as the bent wire above, but I don’t have to bend anything. It will flex and take my shape.
 If you’re interested in reading more about bending wires, and what can happen, Jennifer (Porcelynne) mentions that in her recent
  Right there where the pink arrow is pointing.
 When I was first looking at wires with my root trace, I could see the 40 wire fit the top of my trace.
  Above is a cradle that fits a 38 wire drawn in pencil. Then the pink is the cradle that fits a 40 wire. The darker dotted line is the blending of the two.
 However, when they are layered one on top of the other, then you can see the changes more clearly.
  It won’t take long to get this sewn up. I’ll share my progress next week.
 When I saw the wire, I realized why it was hurting so much!
 One has an orange end, the other a white end – but no color on it at all. All my wires have a bit of color on the tip, so I have no idea where the wire might have come from.
 I may try these in my draft next.
 The good news on version III is I have the bridge width for the bottom correct now. The top on this needs to narrow a bit though.
 This is my drafted frame and the cups from B, Wear’s Angie pattern.
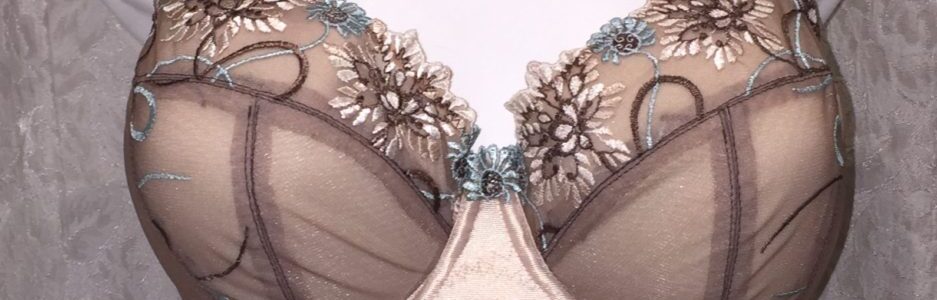
 Something I really like about the Angie pattern is how rounded the cups are. They give such a nice shape when wearing the bra too. However, using the smaller wire size and narrower frame, the rounder shape didn’t seem to be fitting into my frame as well.
 The back is fine. The band is too. It was comfortable, and stayed in place. However, I’m very disappointed this is not wearable.
 Here’s the square I’m blocking right now. It rolls under, and it isn’t actually square.
 After it’s all pinned it’s square. Then I spray it really well with water and leave it to dry. I really am enjoying this. It’s wonderful to unpin each square and see how nice it looks.
 For my first draft, I knew to widen the lower part of my bridge. However, when I’d made the bra, I posted a comment in the Bare Essentials support group that no mater what bra I’d ever made, it slides down a bit after I wear it. I’ve worked on my wires, and changed those. I’ve adjusted patterns, and drafted my own. Yet still, I was dealing with this.
 Using the sheer cup lining really helped. I needed to add another 1/4″ to the bottom of the bridge. For the first time, my wires stayed just where they were supposed to stay.
 I also made a mistake when finishing the upper cup. I’ve corrected this on the paper pattern.
 I’ll be honest. I bought one of these after reading it would help to do a root trace. It didn’t help me with that at all. Not one little bit. At least it didn’t help me at all.