Momentary Discouragment

Discouragement 

Last week I had a moment; a melt down. I was discouraged. I felt I couldn’t make bras, especially bras I’d drafted. I was giving up!

My size recently changed somewhat and the only bra I had left that fit was my navy Shelley. All my other bras didn’t fit. And both of my drafting attempts just weren’t perfect. I was discouraged.

That momentary discouragement lasted the better part of a day. All it took for me to get back on track was a trip to the local bra store.

Beauty

While there I saw such beauties as this Cassiopee Bra by Empreinte.

Isn’t this pretty? There are no cup seams to this lace bra. It’s molded lace! It was a marvel to behold.

No Turning Back

However, I  know too much now. After trying on ill-fitting uncomfortable bras, I knew I had to keep going. As well, two wonderful bra-making friends encouraged me and told me I was so close I couldn’t give up.

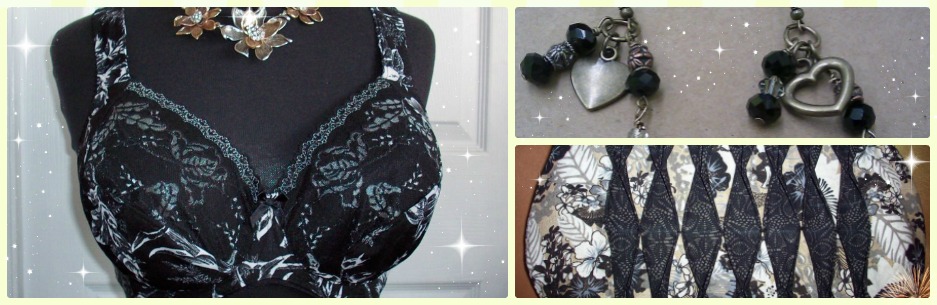
The bra store did hold one surprise for me. The Felina bra.

I tried on this bra and was so surprised. The bridge sits just a bit lower – the same as the bras I make. The wire was hitting in the right place too. It was so comfortable, I bought it and wore it out of the store!

I wore it all that day and could hardly believe how comfortable it was. How could this be? I knew my wire size had changed recently – don’t ask me how that happens! I’m the same cup size, same band, no change in my weight, but my wire size changed. My wire is closer to my cup size now. I’m still an Omega, just not so pronounced. But finding a RTW bra that would fit? How could this possibly be?

Wires

My husband and I were out at a function all that afternoon, but as soon as I got home, I had to find out what was going on with this bra’s wires. I just couldn’t believe a RTW bra could be comfortable. All of the other bras I tried on were not, and they weren’t comfortable because of the wires. The wires were too high under the arm, or too high at the front, or just too big. So how were these wires comfortable?

Imagine my surprise when I put a 40 long wire over the channeling of the bra… And. It. Fit! Perfectly!

Well, you have to see this too!

I’m still wondering how a cup that should take a 44 wire clearly has a 40 wire in it.

Perseverance

So, am I going to give up making bras? No! After trying on a whack of them, and only finding one that fit most of my wants for a bra, I will still be making my own, and going back to the drafting table too to fix that cradle issue too.

Did you catch that little comment above? “… one that fit most of my wants…” This bra is great, closer than any other bra I’ve ever bought, but it does have a couple of things that keep it from being perfection. The cup material has stretch. That makes it very comfortable, and it will fit more women because of that stretch, but it’s not as great for support. The other imperfection is the straps are elastic. They are a firm elastic, but still. Elastic isn’t the best to support a larger cup either.

In the meantime, I need a couple of pair of panties to go with my new bra, and I just happen to have some lovely indigo cotton spandex from Bra-Makers Supply.

Happy creating!

P.S. You might want to read A Spy in the Changeroom.

How I Adjust Photos for my Croquis

Here’s a photo tutorial on just how I adjust my photos. Warning. This post is a little bit technical.

The first thing I do is find an image for something I like. Here’s one I found.

This is Vogue 9202. It’s best to find an image that is straight on so it will paste over the croquis, which is also facing straight on.

You can see from the above screen shot, I save the image. I save all my images as JPEGs, as I find that the easiest image to use.

Once saved, I open my Photoshop program (I’m sure there are other programs that can do the same thing, or look for an older version of the program – it doesn’t have to be the newest. Mine isn’t new.)

In the above photo, I’m selecting the Lasso Tool. You also want to select the Magnetic Lasso Tool next.

In this next photo, I’m part way around the dress with the Magnetic Lasso Tool (MLT).

That might be a little hard to see, so I’ll enlarge this one.

Those little dotted lines and squares show the part being saved, and what will be cut out of the photo. It only takes a minute or two to do all of this so far.

The next thing I do once I’ve gone around the entire image with the MLT is I go to Edit, and Cut. Below is what remains. An outline of the image. This is the background that is left over. The image itself has been cut out from it.

Select the Move Tool (just because it’s easier to use at this point).

Now, I go to File, select New and then Blank File. That’s going to be my new photo without the background – the one I can now use to paste or layer over other photos.

Here’s the new blank photo ready to have the dress pasted onto it.

With this blank photo, I go to Edit, and select Paste.

There. My dress is back. This looks pretty much the same as the first image I opened in Photoshop, but it will behave very differently! As well, I cut the back neck away from the dress.

If you’ve done this with me, you’ve done the work and now comes the fun!

I open my croquis now. It won’t close the other photos I have opened in the program.

You can still see the new dress photo without a background, and the original dress photo with only an outline left, and my croquis all at the bottom of the screen.

Now I simply click on the dress and drag it up over my croquis.

You can see it doesn’t fit yet. All you can see of my croquis is an elbow and wrist peeking out from behind the dress. That’s okay.

I click on the dress photo and a small box appears around it, which I can adjust in both height and width.

Above I’ve adjusted the top. You can see the box in the photo. The dress is still too big, so time to make another adjustment or two.

There. I’ve brought the bottom up to about the right length for me. Still too wide though.

Now to adjust the side. I try to adjust it so the width of the dress is covering my hips. They’re my widest part, so I want to see how this will look covering that part of me.

There. That gives me a really good indication of how this dress will look on me.

Just one more click outside the dress area, and I see the final results. The box is gone.

If there’s anything I still feel needs adjusting, I can simply click on the dress again, and that same box will show up allowing me to make adjustments. This new image can now be saved.

It’s not perfect. If you look closely, you’ll see the shoulders are too big on my croquis, however, the croquis proportions are right. I can see what this dress will look like on my figure – shorter than the image on the pattern cover, and wider too. At this point I can see if I like it or not, and decide if I’m going to try the pattern or if it’s a pass.

I hope this helped. Let me know if you try this, if you have Photoshop or another program that you use to do something similar.

Happy creating!