Collage Quilt Ideas

Hello! I didn’t forget to post last week, I was getting over being ill and then working on two patterns I’m testing. The Sloper is taking a bit of a break. As well my friend who’s been working with me on our slopers has been very busy with family. So we are both taking a bit of a break there.

I bought this Laura Heine collage quilt pattern a few years ago. It’s a lovely Laura Heine pattern, and I do love it. However I had different plans for it when I bought it. I wanted to make something else.

What I was thinking was to use this but change the setting of the little town. I wanted to use the town in Italy of my biological father’s family. I’m still thinking of a way to do this.

After doing some searching on the internet for a photo that might work, I came across this great image. This is really great, but it’s not the same small town. So I could probably use this image to make a collage quilt, but using a random image kind of defeats what I was trying to do.

Laura Heine also has a Spanish Row Houses pattern. If I’m just going to use a random town, that would work too. So, as you can see, I’m still not decided on just what to do here, and how I can make Over the Roof Tops a little more personalized for me.

I’ll be back soon. Happy creating!

We Got Your Back – BMS January Challenge 2019

The January Challenge for Bra-Makers Supply is We Got Your Back. The idea is to ‘make creative, unusual, or off-the-wall crazy backs for your bras, swimsuits, corsets or underwear. Yes, this month we are looking at bra backs and how to make them pretty and even more supportive than they usually are.’

Thinking about this challenge, I knew just what I wanted to do. A while back I received an email from Booby Traps about Bare Bax, a company that specialized in interchangeable bra backs. Not only that, but bra backs that are meant to be seen. I loved this idea!

Dual Reasoning

As well as participating in the challenge, I had another reason for wanting to make a bra with a fancy back – a gorgeous sweater my hubby gave me. Isn’t that a great back right there? I was thinking of wearing a camisole under this, but a bra with a fancy back might be more fun. A pop of color, that doesn’t look like a bra back might be just what I’d like behind this sweater.

My Challenges

The one challenge about my Challenge entry is I need my band to provide the support for my bra. So, rather than just use lace for a pretty back, I’m thinking lace backed with power net. The lace will still be all that’s seen though.

Another challenge I’m facing is I can’t get hooks & eyes in the same color I’m using for my bra. I’m making a lavender bra, but the 5 x 3 hooks and eyes don’t come in that color. Even hook and eye tape doesn’t come in lavender. I’m going to have to dye my hooks and eyes – a first for me. So, since I’m jumping into dyeing, I’m going to dye some elastics while I’m at it.

Dyeing

 My adventure into dyeing went pretty well. I had everything set out, including the bit of power net I wanted to match. Honestly, those findings weren’t in the dye two minutes before I looked at the hooks and eyes and thought, ‘They need to come out. Now.’

I turned around to grab my spatula handle, and they were already darker than I wanted!I realized just how quickly these findings will take color. However, the BMS Challenge for January was coming close to an end, so I decided these will do nicely.

I found dyeing very interesting. Look at the one ring and how it took color differently. One is noticeably darker than the others, but they were all in for the same amount of time.This has me thinking, I might want to do some timed tests with bits of elastic and such and record the results after say 1 minute, 2 minutes, 3 minutes…

Back to the Challenge.

My Fancy Back

  Here’s my lovely lavender bra, with a removable lace back.I’ve used 5 x 3 hook and eyes on each side of the bra to attach this back. I can take this off and use another back in the future (When I get another back made.)

As well, I’ve adjusted the height of my lace for my back. You can see how much I shortened the height of my lace by cutting and matching the pattern on it.

Here are the hooks and eyes that connect the back to the bra. And if you look closely, you can just barely see the seam in the middle of the lace. 
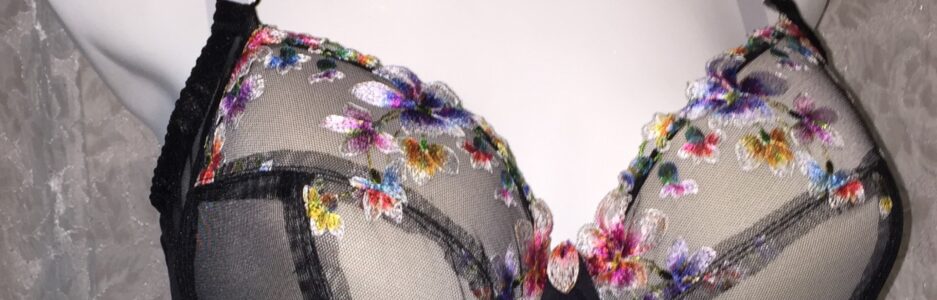
Below is my bra from the front. It doesn’t look any different from a normal bra.Lastly, here’s my bra under the sweater on my display.What a subtle but lovely little pop of color peeking out!

Happy creating!

Panache Inspired

Inspiration

Recently I read an article by Who What Wear saying Boyshorts are going out of style. That won’t be terrible for me. Boyshorts aren’t the most flattering on me. I think they’re adorable, but they just don’t suit a curvy shape as well as they suit a less curvy shape. That’s probably why they’re called boyshorts.

The article showed a few up-coming styles and there was one I really liked.

The Panache Lingerie Quinn High Waist Brief: Oh! These are lovely.

I started looking for patterns that had similarities. Here’s what I found.

First, Daydream Patterns Nora Knickers.

This pattern has lace attached at the leg. It’s great because it attaches the lace the same way for the back. The front is different, but could probably easily be adapted to be the same as the Panache panties.

Another pattern I thought of is the Ohhh Lulu’s Betty High Waist Panties.  It’s quite a similar shape, and I’ve always adored the look of these panties..

Here are the three panties together.The Panache is in-between these two patterns, but is a bit closer in shape to the Betty. If you haven’t taken Beverly Johnson’s panty class on Craftsy and aren’t comfortable drafting your own pattern, either of these patterns would get you close.

My Master Pattern

I have taken Beverly’s class, so decided I would make my own Panache-inspired panty. I pulled out the master pattern I made using the Craftsy class Sewing Panties: Construction & Fit. I usually make Hipsters with my pattern, even though on my dress form they look like briefs.Although these come up to the form’s waist, they’re hipsters on me.

Pattern Adjustments

The first thing I did was add back the 2-inches I’d removed from the pattern’s waist height when I made them into Hipsters. The pattern is again a brief. Loving hipsters as I do, I decided to go with a brief rather than a high-waisted panty. We’ll see how much I love briefs before I try high-waisted.

Next, I added a seam to the front/side. I’m keeping the side seam too, but going to move it back to the side. My ‘side’ seam is moved forward so it doesn’t show. The purple line shows where the side seam would normally sit.

You can see in the photo above how the seam is moved to the front of the panty and not sitting right at the side.

The Panache panty has a back seam as well, but I’m not adding that. The only time I add a back seam is if I’m short on material. Otherwise, I prefer no seam for the back.

Next, I decided how much lace I wanted, and then added the lace detail to the pattern.

Here’s my pattern ready to get cut out.  Lastly, I added seam allowances to those new seams, and traced off my new pattern pieces.

I’m all ready to make my own Panache Inspired briefs.

Happy creating!

Momentary Discouragment

Discouragement 

Last week I had a moment; a melt down. I was discouraged. I felt I couldn’t make bras, especially bras I’d drafted. I was giving up!

My size recently changed somewhat and the only bra I had left that fit was my navy Shelley. All my other bras didn’t fit. And both of my drafting attempts just weren’t perfect. I was discouraged.

That momentary discouragement lasted the better part of a day. All it took for me to get back on track was a trip to the local bra store.

Beauty

While there I saw such beauties as this Cassiopee Bra by Empreinte.

Isn’t this pretty? There are no cup seams to this lace bra. It’s molded lace! It was a marvel to behold.

No Turning Back

However, I  know too much now. After trying on ill-fitting uncomfortable bras, I knew I had to keep going. As well, two wonderful bra-making friends encouraged me and told me I was so close I couldn’t give up.

The bra store did hold one surprise for me. The Felina bra.

I tried on this bra and was so surprised. The bridge sits just a bit lower – the same as the bras I make. The wire was hitting in the right place too. It was so comfortable, I bought it and wore it out of the store!

I wore it all that day and could hardly believe how comfortable it was. How could this be? I knew my wire size had changed recently – don’t ask me how that happens! I’m the same cup size, same band, no change in my weight, but my wire size changed. My wire is closer to my cup size now. I’m still an Omega, just not so pronounced. But finding a RTW bra that would fit? How could this possibly be?

Wires

My husband and I were out at a function all that afternoon, but as soon as I got home, I had to find out what was going on with this bra’s wires. I just couldn’t believe a RTW bra could be comfortable. All of the other bras I tried on were not, and they weren’t comfortable because of the wires. The wires were too high under the arm, or too high at the front, or just too big. So how were these wires comfortable?

Imagine my surprise when I put a 40 long wire over the channeling of the bra… And. It. Fit! Perfectly!

Well, you have to see this too!

I’m still wondering how a cup that should take a 44 wire clearly has a 40 wire in it.

Perseverance

So, am I going to give up making bras? No! After trying on a whack of them, and only finding one that fit most of my wants for a bra, I will still be making my own, and going back to the drafting table too to fix that cradle issue too.

Did you catch that little comment above? “… one that fit most of my wants…” This bra is great, closer than any other bra I’ve ever bought, but it does have a couple of things that keep it from being perfection. The cup material has stretch. That makes it very comfortable, and it will fit more women because of that stretch, but it’s not as great for support. The other imperfection is the straps are elastic. They are a firm elastic, but still. Elastic isn’t the best to support a larger cup either.

In the meantime, I need a couple of pair of panties to go with my new bra, and I just happen to have some lovely indigo cotton spandex from Bra-Makers Supply.

Happy creating!

P.S. You might want to read A Spy in the Changeroom.

2017: The Year of Finishing Things

I don’t make many resolutions, but as I began my sewing year this year with messes all around me, I made one. I’ve decided that this year I’m going to finish a lot of the unfinished projects that are all around me.

Let me give you a few examples of what I’m going to work on.

Footstool

Our footstool is often used and looked like it. The top had split along all four seams, and my wonderful hubby suggests I make a new cover for it.

I got as far as cutting the old top off.

Then after another month or more, I tried some material on it to see how it would look.

I even cut out material to make a band all around it. All I have to do is sew it. Yet it sits there, with half my pins in it.

It’s been sitting there for two or more months just waiting for me. Part of the problem for that is I’m not 100% sure just how I want to finish it. The other part of the problem is I want fresh and new projects all the time.

Purses

Do you remember when I’d met a sewing friend a year or so ago? She had made her own handbag, and I complimented her on it. She also gave me three handbags that she’d cut out and interfaced! All I have to do is sew them! But I haven’t yet.

They’re all cut out! And interfaced!

That is one of my UFO projects I’m going to do this year. In fact, I’m not packing them all back up and putting them all away again. I’m keeping one of them out to sew up.

Pants

More specifically, hemming pants. I have a favorite pair of pants that I love, but hate to wear because they’re too long. Every time I put them on, I thinking I’m ruining them because they need hemming. Pretty much weekly, they make it to my mending pile, only to be taken back out again.

We won’t even bother going into mending…

Enough!

Craftsy Classes

I love Craftsy, and unfortunately I have a lot of classes I haven’t watched yet. I’m changing that. Once a month, I’m going to review a Craftsy class. Since I’ll have to watch them to review them… You get my logic here. I win, and hopefully, you win too with the reviews. I’ll say here, although I am an affiliate with Craftsy, any class I review will be my honest opinion.

Let me go back to those favorite pants for a minute. And while I’m there address something else – my CoverPro machine. One of the reasons I hadn’t hemmed my pants was because I have this wonderful CoverPro machine and I wanted to use it to hem the pants. But… I didn’t know how to use it!

So I bought a Craftsy class on that. Coverstitch: Basics & Beyond. I’ve watched it, and hopefully, with my new resolve to finish some UFOs, I’ll use the class info and my machine to hem my favorite pants. I think there’s another pair of pants and a skirt in that hemming pile too. Yup, it’s time to get around to this.

So, I’m trying to plan out my sewing and blogging for the year. My goals so far are to do a class review once a month. I was thinking if I also do one UFO each month, that leaves me two weeks to play with new things, which are much more motivating for me.

So, we’re into our second week of January. Did I start? I did! I repaired a blouse I’d bought. It’s a stretch knit, with chiffon below the hem. As pretty as it looked, the chiffon had no stretch but the rest of the top did. Here’s the photo from the website. There’s a link in it too.

Well, because it didn’t stretch at all at the hips, it wasn’t fitting very well. I opened those seams and did an overlock stitch along them. There! The first of my mending pile/UFOs done. The chiffon is now vented giving me that little bit of extra room where I needed it.

Do you have a UFO pile? How about your Craftsy classes? Are you getting through them? Did you make any sewing resolutions this year? I’d love to hear!

Happy creating!

A Dress Form Cover

One of the many projects I plan to make is a dress form cover. I love Catherine, but we’re not the same size.

This is something I’ve looked into a bit, but haven’t found that perfect solution yet. I think a lot of the dress form tutorials and classes are all great for sewing, but not perfect for bra-making. From what I’ve seen, most dress form covers result in more of a uni-boob look, which would not work at all for bras.

Here is the first one I found, which I still think is so beautiful! Mary uses the sloper she made from Suzy Furrer’s Bodice Sloper class.

completed me

This image is from Cloning Couture‘s blog post. Isn’t this professional looking? I do love this! If I decide to simply to cover my dress form for sewing clothes, I’ll do this too.

I had similar thoughts about the Craftsy class Customize Your Dress Form. This class takes you through exactly what to do, step by step. I watched this class when Craftsy had their October pass in 2015. I thought it was really great, but again, it wasn’t addressing my desire to have the bust defined. That definition is an important part of bra-fitting.

14154439

So, I kept thinking about how I could adjust my sloper so I could have that bust definition I wanted.

Let me take a side road here and show you why I haven’t been 100% happy with any solution I’ve seen yet. This is the bra dress form Beverly uses in her Craftsy classes; Naomi, of Barely Beige also has one. This dress form is called Ashley. There’s no uni-boob happening here.

sewing-bras-designer-techniques-craftsy-taught-by-beverly-johnson-beverly-feature-image

How am I supposed to be satisfied with anything less than bust definition on my dress form after seeing this?

I recently came across a blog post by Sew Chic Pattern Company. They have a three-part post called Copy your Figure: A Dress Form Tutorial.

 Laura does do a dart to give bust definition, but I’m still thinking it won’t give me as much definition as I’m wanting.

bust-dart

Here’s a photo from her blog. This is getting closer.

I know from making my own sloper that mine doesn’t give enough bust definition the way it is now.

moulage done

Here’s the one I made. There’s a small dart there on the sloper, but…

So what I’m thinking is do some draping with fabric to see what size of darts I’d need, where I’d need them, how many darts I’d need. I might need to play with it a bit, but I think it can be done.

Has anyone made a dress form cover with more bust definition? What did you do? How did it turn out?

Happy Thanksgiving & happy creating!

A Little Upcycling

I love to find a new use for something. I love to go to thrift shops too. I really like a good bargain.

Here’s my latest find. It’s an old wooden spice rack that will now happily serve as a thread holder. And look at how much more room I have! The little plastic thread box I had was full. This is much better.

spice-rack-with-dress-forms

How do you like my little toy dress forms? They add the perfect touch of whimsy to my thread rack.

Recently, I was inspired by reading Emerald Erin’s blog. She was going through her closet and working towards a capsule wardrobe. That is something I’ve been thinking about doing too. I have a full closet, but open the door and feel like there’s nothing in there.

After reading Erin’s post, I went through my closet. The problem was, although there were things in there I really had no problem getting rid of, there were some things in there I really did. Even though I never wore them, I loved the material. I didn’t want to get rid of them.

I set them aside. I had three piles on my bed. Pack away. Give away. I don’t want to give away.

3-piles

I was not going to put that third pile back in my closet or pack it away. Then I thought of what I could do. Upcycle!

I have Betz White’s class on Craftsy. Here’s a link to take you to the class on Craftsy.

project-upcycle

As well, I just bought a new pattern. (ClubBMV has too many sales!)

I’m sure I can use some of this material towards something like this:

m7413_a

Or maybe more like this:

v9057_a

This second pattern is used in the Craftsy classes The Ultimate T-Shirt and The Artful T-Shirt. Both of these classes are by Marcy & Katherine Tilton.

In the photo for the Artful class, they show this same T-shirt with a lot more piecing.titlecard

I’m thinking there must be a way to use some of these materials I love so much and make something new.

tops-and-skirts-use

There’s one other thing in that hard-to-give-away pile: a silk skirt. The blue floral material? That’s silk. I’ve been holding onto it for years. I think I wore it once, maybe twice. This is going to make a few lovely bras.

Time to get cutting out. Have you upcycled anything? How did it turn out? Do you love it? Will you upcycle again? What’s your favorite thrift store find? I’d love to hear.

Happy creating!

Pinterest Find and More

Kantje Boord

Do you remember a few weeks ago I posted about my hubby’s trip to Germany?

I’d mentioned some gorgeous material from Kantje Boord. Gorgeous material I’d seen a few years ago. Gorgeous material that Sigrid made into a lovely bra. Gorgeous material that I didn’t order.

pak00709

When I initially wrote the post, I couldn’t find a photo of the bra, even though I knew I’d saved it… somewhere. This week, I was adding a photo to my Pinterest page and there it was. The bra Sigrid made.

9144448502421b060da0a429d50f2d33

Isn’t that lovely? Do you follow Sigrid? I really enjoy reading about her makes.

After seeing how pretty this bra is again, I’m having a second thought or two about not ordering this, while telling myself, ‘I will not be tempted by Lycra.’ Sigh. I’ll have to see when my hubby’s work takes him to Europe again.

Do you follow Sigrid’s blog? Have you been part of a sewing swap before? What ideas do you have for sewing swap gifts?

Happy creating!

Canada Cups Posts for Sunday, September 18th, 2016

picmonkey-image-banner-2016

Here is our wrap-up post for the tour. What an incredible week it’s been! Don’t forget to enter the give-away and come back for some wonderful prizes.

Sunday, September 18

  • Linda, the instructor from the newest Corset-making class and owner of her own Corset business, is doing our wrap-up on Farthingales.

14339952_10210984887124239_819227118_o

All of the talented bloggers on this tour have done a fabulous job!

bloggers

If you’re looking for any of the past posts, here they all are.

Follow the magical tour to see what we all have under our clothes

Canada Cups Logo Draft

Sunday, September 11

Monday, September 12

Tuesday, September 13

Wednesday, September 14

Thursday, September 15

Friday, September 16

Saturday, September 17

Sunday, September 18

  • Linda, the instructor from the newest Corset-making class and owner of her own Corset business, is doing our wrap-up on Farthingales

Whoohoo! It’s giveaway day today!

Monday, September 19

Have you entered the giveaways yet? Today’s your last chance.

Tuesday, September 20

Giveaway winners announced on all the blogs:

Life of a Fairy Bra Mother, Little Heart Threads, Glitter in my Coffee, Michelle’s Creations, Mrs. Weaver’s Finest Unmentionables, Braphoria, Gracious Threads, Élégantine!, Shelaine’s Designs, That’s so Venice, Sprouting Jubejube, Flying by the Seam of my Pants, The Wild Stitch, Farthingales Corset Blog

After September 20

  • Come back to visit all the blogs for followup posts. It’s always fun!
  • Craftsy class discounts expire at midnight Sept. 30

Happy creating.