Hello. I’m sorry it’s been so long since I’ve posted. I had an odd after-affect from a cold. I had so much pain in my one hand, I could hardly do anything with it. It’s slowly improving, and I’m hoping to get back to normal soon.
I have many sewing plans so need my hand 100%! So, what have I been doing? I’ve been testing the re-designed Eve bra.

Jennifer and I agreed the regular Eve cups did not fit me. So I tried the Vertical cups. They are part of the Eve Classic Bra pattern – which is now available. It has the regular cup, Vertical cups, and Demi cups.
Jennifer and I agreed that we were close, but think the Demi cups will be the best fit for me.
I’ve cut out my first pair and they were too small. I have the next size all sewn up and will be putting those into my fitting band right away.

Let me tell you a few things that impressed me with the Eve cups.
I was using a 38 wire, but to help with side coverage, we made my cradle a 42 wire length. What amazed me over and over was how the cup fit into this cradle WITH NO ALTERATIONS!!!
Honestly, this was amazing to me. Stunning in fact. After the many years of so many alterations to get a cup to fit in a smaller cradle, this really did amaze me.
Jennifer has designed all these cups to fit into different cradles. For example, a D cup that would fit a 38 wire cradle, and a D cup that fits a 40 wire cradle, and one that fits a 42 wire cradle, and so on. The same for the E cup, and the F cup, and so on up and down the cup size range. All designed for each cup to fit different sizes of wires/cradles. All with no extra work on your part.
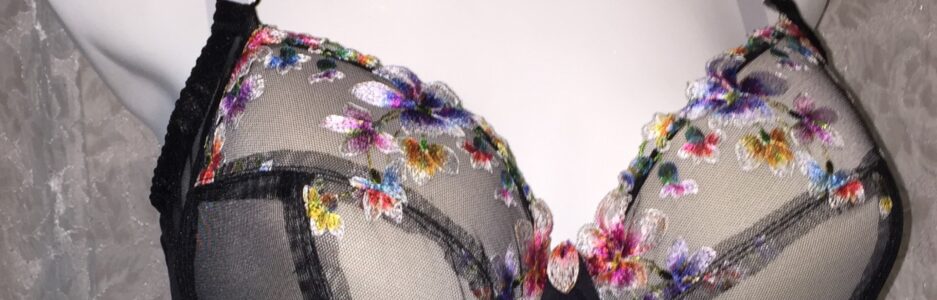
Here take a look:  Do you see where the cup joins the side seam? There isn’t a dart in the cup. There are no gatherings along the wire line. No, this cup is simply designed to fit into this size cradle.
That might not seem like a big deal when most patterns’ cups fit into the cradle – but that doesn’t work when you are an Omega! No, that means adjustments. But not with this pattern.
If you’re wondering, I could have used a cup that fit into a 38 cradle too – but I really don’t get enough side coverage and support with that.
I don’t know of another bra-maker/designer who has done this for each cup size! There are hundreds of cups.  I promised to tell you something else about the side of this bra. Do you see where that red line is? That’s where my wire ends. Normally, if the side of the bra was raised up this much higher than the wire, the side seam would be flopping over. Not here.
The reason is Jennifer had me sew a strip of channeling as close as I could beside the wire channeling, Then insert a piece of boning there. It worked perfectly. It gave me a little more side coverage which I need, and I can’t feel it there.
I am honestly very impressed with the redesigned Eve cup pattern. If you have problems fitting your bra cups into your frame like me, or even if you want an incredibly designed cup, really, give these a try.
Happy creating!
P.S. I’ll be back soon.
 I have a lovely black and red lace on my cutting table so thought I’d make something that would coordinate with that.
 This is clear to see, I used a fabric band for the waist instead of FOE. This is quite easy to see.
 This is harder to see (although I overexposed it) I also used fabric bands instead of FOE at the leg opening. I wanted something just a little softer, and thought I’d experiment.
 Isn’t that a lovely side view?
 Another very pretty view of that lace.
 I made the full-length Luna option. I used a beautiful turquoise cotton Lycra, with some coordinating lace on the inner cups.
 My Luna is a bit big for me, but I’d rather have loose for sleeping than tight. However, my mind is full of ideas for how to change this up.
 One of the reasons I hadn’t tried the Jessica pattern is I have to make adjustments to my bra cups so they’ll fit in a smaller frame. Omega: larger cups, with a smaller frame and wires.
 This is what I tried, and I have to say, I was pretty close. I still need to take in the underarm a little, but other than that, I got a great fit.
 Well, maybe it’s not so clear. Here’s a close up.
 You can see I just have a little bit folded under there. Probably 1/4″ x 2 removed from the underarm there and it will fit absolutely perfectly. Not bad for a first time testing the pattern. And isn’t that purple elastic so pretty with the navy?
 This is a great adjustment when you don’t want the cup size to be smaller, but just the amount of fabric in the underarm area. This works perfectly!
 I really am happy with this. I didn’t think I could make a cup with only one seam work for me.
 On the bra for the BMS challenge, I used the burn-out mesh on it’s own. On this one, I’ve used it over power net. I wasn’t looking for sheer on this bra.
 It’s so fun! When I first started sewing bras, I experimented a little and I tried using Lycra and mesh over power net. It gives a wonderfully supportive feel. It adds support, but it isn’t too much like two layers of power net would feel. This isn’t too much. It feels a little more supportive.
 When I tried this on to see how the adjustments I’d made were, it fit so perfectly and was so comfortable, I didn’t want to take it off for photos. I did, but there was no way I was going to put on my old bra. I need to sew a few more too. I was down to a RTW stretch-cup bra when my size changed.
 You can only find this used now. It’s been discontinued. Although the description on Etsy calls this a bikini, it fits like a hipster on me. And this has been my TNT pattern.
 I used Beverly Johnson’s Craftsy class to draft these, and they’re similar to my Kwik Sew favorite.
 Oh, I love this too! I might have to get some more of this material. It’s a cotton Lycra from
 These are my 2nd Sigrid panties. My first were the test pair, which I didn’t finish. The very big difference between my waist and hips made that pair unwearable. Whenever I’m testing a pattern, I make it as is the first time to see how things go together. Often that means things will not fit that first time though, but it gives me a good idea of the pattern.
 You can see a bit of the gathering at the waist on the back more than you can on the front.
 If it does run a bit, the three-step zigzag will help it not fray too much.
 But they are different.
 The panty having no side seams is a really nice feature.
 And here is the back.
 The seam isn’t that noticeable to look at. Using the lace option, it would become a feature too. And I’ve made panties before with a back seam and I didn’t notice the seam when wearing them either.
 The lace wraps around from the back to the front, but there’s also that adorable little ring holding the back together.
 Oh, I like that lace wrapping around to the front. It’s a very pretty detail.
 I do like this lace and cotton combination together.
 They are such a lovely panty, and I had fun making them.
 These are adorable too. I made them in the reverse of the color block I made my first ones.
 Although the bands for the waist and legs are easy, and do look nice, I still prefer lace trim for finishing my panties.
 And from the back.
 Well, I can say, I definitely don’t like how the bands are flipping up in the photos. Good thing they don’t do that when they’re on me. I’ve got more to fill them out than my display.
 And the back view.
 Oh, they are sweet. And it’s nice to see panties that fit my display perfectly.