An Interview: Mrs. Weaver’s Finest Unmentionables

Welcome to something a little different on my blog. As part of our Canada Cups Cross Your Heart Relay blog tour, 2016, I’m interviewing a Professional Bra-Maker.

picmonkey-image-banner-2016Did you see my post the other day when I said why I’d become an affiliate with Craftsy… I really do think Craftsy is great.

Today,  my post is featuring Mrs. Weaver of Mrs. Weaver’s Finest Unmentionables. I think you’re going to love this personal look into the life of Mrs. Weaver.

Who is Mrs. Weaver?

Mrs. Weaver is actually the married name of Karin Triel, a small Dutch woman married to a tall Canadian man. A bra-maker, teacher, independent designer and corset-maker in Calgary.

When did you start in the bra-making business? And when will you (shudder!) quit?

I’ve been working in Canada ever since the lovely folks at immigration gave me my work permit, which is around 15 months ago. As for quitting, I’ve never thought about that…yet!

That’s good news, Mrs. Weaver! What made you choose Canada?

 Lol, I married a big, handsome Canadian who brought me here. He promised me it wouldn’t be too cold…

How did you get involved in bra-making?

When I was 13, I already had an E cup.There was nothing pretty to fit and would end up with ugly beige bras. I would sabotage them until they broke, forcing my parents to buy me another (which inevitably turned out to be equally ugly). It wasn’t quite bra-making, but it was bra-breaking. One thing led to another, and the rest is history!

When did you make your first bra?

I probably had my first go at it in my early 20s – as part of a bikini. It wasn’t terribly successful. I had many years of tinkering and messing about with patterns. Later, I finally got the opportunity to train with Beverly Johnson and that’s when the magic really started to happen.

b74dd3_ce3ca13b75e94ea98b1b5949cc6c65d4

Mrs. Weaver’s Thermal Valentine. View her original post here.

Do you teach?

I teach classes in-person in Calgary. I am teaching Professional Classes and have just launched an online class for those women who can’t get to Calgary. Everyone from total bra beginners to seasoned sewists, from Saskatoon to Sao Paolo is welcome. It’s so exciting to help start people on their own bra-making adventure! I also make custom bras for women who can’t find comfort, fit and pretty in ready-to-wear – every woman deserves those things from a bra! Making them yourself is the best way to achieve this.

Before I move on… did you catch that? Mrs. Weaver has just launched an online school!Braphoria-Home-Header

What are your future goals?

There are lots! I want as many women as possible to discover the joy of a well-fitting bra or corset. I hope to teach more, grow the number of professional bra-makers currently working with me, expand my online classes and take LOTS of fabulous women with me on the European Tour in March of 2017. Basically, I want every woman to know they have options, can learn the skills and can have gorgeous lingerie – regardless of their fitting challenges.

There’s another big announcement right there! The European Tour in March. I hope you’re checking Mrs. Weaver’s blog for all these very exciting happenings.

Tell us more about where you see your business going?

I see my business continuing to expand, with the Braphoria Online School offering more classes and learning for those who can’t get to Calgary. In-person classes are definitely the best, but online offers such  great opportunity to let more women continue in their bra-making adventures.

What are your businesses plans locally? Nationally? Globally?

Locally: I plan to continue to expand in-person teaching offerings and add more professional bra-makers to the Mrs. Weaver family to provide gorgeous custom unmentionables.

Nationally: I plan to travel more and teach across Canada; I have a lecture scheduled on Great Bra Fit at the Creative Stitches Expo in Calgary (September 23-24, 2016); as well I will be an exhibitor at the Love to Sew Expo in BC in November.

Globally: I plan to take women on my European Lingerie Tour in March of 2017 where as well as workshops with me and Beverly Johnson, I’ve arranged for world-class seminars and workshops at the London College of Fashion, and a specialty class in latex in Amsterdam; I also plan to travel back to Europe and Australia for Custom and Teaching work, and to set up distribution for my kits in other countries – to reduce postal charges for my customers.

trip-map

All of that sounds amazing! You can read more about the tour here. And I’m sure customers overseas are thrilled to hear there will be purchasing options closer than Canada.

Mrs. Weaver, what do you absolutely love about the business?

I love the look on a woman’s face when she realizes beauty and comfort aren’t just for ‘other people’. The opportunity to make her feel good about herself, to feel beautiful.

b74dd3_aa7044cff46e4893b5078abd7c5222eb

Here’s a glimpse into Mrs. Weaver’s Parlour where her clients begin to experience that feeling of being beautiful. You can read more here.

What do you despise?

Nothing really, although it’s always very sad when women come in apologizing for their bodies with statements like ‘this is probably the worst you’ve seen’ , or ‘I hate my boobs’. Negative body image is desperately sad especially when all women and all bodies are intrinsically beautiful.

Well said, Mrs. Weaver! Do you see any lack?

I think there is a lack of understanding among women that options like sewing your own lingerie, or custom-made lingerie are available to them. Most women believe ugly, uncomfortable or ill-fitting lingerie is simply their lot in life and it’s not true. We wouldn’t wear a pair of shoes that hurt our feet or caused blisters, yet we’ll accept a bra that pokes us, straps that fall off our shoulders, or bands that roll up – that’s just crazy.

What trends have you seen?

Bralettes are big right now, that’s definitely a trend. I’m also seeing women wanting more luxurious materials and less moulded cup bras. 

b74dd3_1ebed9388c254db58019b1758efd56fe-mv2_d_4032_3024_s_4_2

Speaking of more luxurious materials, here’s one of the kits available from Mrs. Weaver’s new store.

What is the difference between RTW and custom-made?

The biggest difference is custom-made is made just for you and your unique curves. We’re not putting a square peg into a round hole, instead we are designing the garment to work with your body. Most women find comfort is the biggest factor, with many stating it almost feels as though they aren’t wearing anything!  

What about the difference between custom-made and self-made using a pattern?

Self-made using a pattern is a big step up from ready-to-wear and is a great starting point. However, if your own breast shape is different from the shape used for the pattern (or you don’t like the style) you’ll be faced with alterations which can be tricky to master. You’ll also not have the skills required to create a whole range of bras. Every time  you make a different pattern, you’ll have the same learning curve as before – with alterations being almost inevitable.

With a custom bra, a professional bra-maker assesses fit and makes all the alterations before designing a style to address all your wishes. If you have very specific fitting challenges such as a significant size difference between your left and right breast, or mastectomy/lumpectomy a custom bra can be a faster way to a great fit. Some professional bra-makers like myself provide a custom drafting service for home sewists to help you resolve your fitting challenges more quickly.

14188456_1747057922216038_5839284844325194795_o

Here’s another example of stunning luxurious material.

What is the difference between the ever-growing number of patterns out there?

There are some great patterns out there! The thing to remember is every pattern is based on one person’s body and that body is unlikely to be the same as yours. Some patterns are better for a smaller bust, others for a fuller bust; some work better for women who are still self-supporting while others will better support a bust that’s no longer very firm. Do your research before you buy – find reviews, establish what type of bust the patterns are best for.

Why did you decide to do online classes instead of another pattern?

With every new pattern you’re potentially back to square one. With my online class, you learn how to change your existing pattern into something new. As long as your existing pattern fits well, you can transform it into so much more!

That concept makes so much sense to me. Thank you! Where can we buy your kits and classes?

You can find them at www.braphoria.com or via www.mrsweaversfinest.com .

Can you tell us why you think bra-making has become so popular now?

I think it’s because in a time when the media is trying to tell us we all need to be the same, the subversive, rebellious, stubbornly individual hearts of women have decided that ‘I don’t need to be the same, I just need to be me’. 

How long do you see this trend of making our own bra/panties/lingerie continuing?

I think it will only continue to grow – as long as women have access to patterns, classes and supplies, there will be interest. 

I know I’m so happy with this trend of making our own lingerie and hope it stays around for a very, very long time.

How do you reach your target market?

I use Facebook, my blog, newsletters, and personal interaction.

Do you use technology?

I’m rarely too far from my laptop. However, for my drafting, the only technology I use is a pencil, a ruler, and a set of compasses. My grandfather was a draftsman, he once said you could ‘feel’ what you were drawing with a pencil much better than with a computer.

How do you get the word out?

Word of mouth mostly, although social media, my website and newsletters are really good. Being featured in Vogue earlier this year was fabulous and there’s going to be another piece in the media about Mrs. Weaver and Braphoria soon. 

How exciting that Mrs. Weaver is getting all this press attention. Congratulations!

I would like to thank Mrs. Weaver for taking the time to allow me to interview her.

Happy creating!

14339952_10210984887124239_819227118_o


Tour Schedule Itinerary

Follow the magical tour to see what we all have under our clothes

Canada Cups Logo Draft

Thursday, September 15

bloggers

And congratulations to all our bloggers on a wonderful tour!

Happy creating!

Canada Cups Posts for Tuesday, September 13th, 2016

picmonkey-image-banner-2016

Here are the tour posts for today. Don’t forget to enter the give-away!

Tuesday, September 13

A big thank you to all of our bloggers! You’ve done an incredible job.

bloggers

And I’m sure we’re all thankful for the sponsors! Thank you for making our tour so much better.

14339952_10210984887124239_819227118_o

Canada Cups Posts for Monday, September 12th

banner-improved

Just to save you a little time hunting and clicking to find the tour posts for the day, here they are. And don’t forget the give-away and discounts!

Monday, September 12

Happy creating!

Announcing The Canada Cups – Cross Your Heart Relay Blog Tour

Over the last week, I’ve posted a couple of teasers for our upcoming tour.

picmonkey-image-banner-2016Well, the wait is over. The tour starts today!

Welcome to the Canada Cups – Cross Your Heart Relay blog tour, 2016!

The tour begins with the incredible Fairy Bra Mother herself – Beverly Johnson. Pop over to the Fairy Bra Mother’s blog for a great kick-off post!

Fairy Bra Mother’s blog

Happy creating!

Canada Day Blog Hop – Jalie Sewing Patterns

Tomorrow is Canada Day. Happy birthday, Canada!

For my stop on the Canada Day Blog Hop, I’ve used a pattern from a Canadian pattern company that’s new for me. Although I’ve heard of Jalie Patterns, I had yet to try any of their patterns. Thank you, Jalie, for providing me with your 2568 Camisole & Panties pattern for our blog hop.

jalie-logo

First, I’d want to say, I had a little difficulty finding the sizing for Jalie’s patterns on their website. It’s not prominent, but it can be found. You know all those sayings about reading the instructions first? Well, the sizing information was with the instructions. I could have made things easier for myself if I had started with them. So if you try Jalie’s patterns, don’t search all over their website for sizing – it’s with your pattern.

For anyone who’s wondering, I found Jalie’s sizing spot on. First, I found my size on their sizing charts and marked my multi-sized pattern, then I pulled out my knit sloper to compare. It was so very close, it might as well have been an exact match – my bust and hips on my sloper hit exactly where the sizing charts put me. That’s good! However, I was wondering about the neckline and if it would be too big. I wasn’t sure, so I decided to follow the sizing guidelines. My reason for wondering is I’m a S, M, and XL all wrapped into one. Jalie doesn’t use the sizing S, M, L… Their sizes run from an F to a FF (looking at the Panties). So it’s a completely different way of sizing. Everything is explained clearly, so just follow what they’re saying and you’ll get a great fit.

Jalie’s patterns are multi-sized patterns – 27 sizes in all. Before you faint when looking at all those sizes, take into consideration there are Children, Women’s and Plus sizes all on one PDF pattern. Being multi-sized with so many sizes, there are at times some dizzying lines to follow to cut out your own size, but it’s all doable.

Jalie pattern piece

You can see from this piece of the pattern there are a lot of lines coming together at that one point. I’m used to Adult multi-sized patterns with only four or five lines.

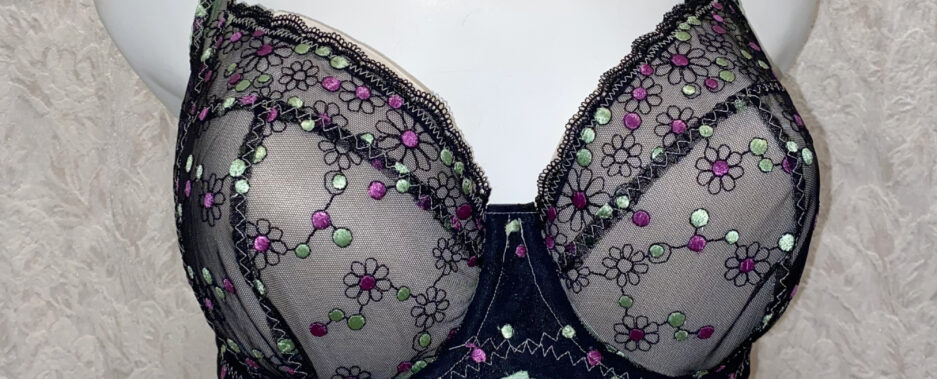
So, how did that neckline fit? It is loose. However, I made this camisole into a nightie, so I’m not minding that it’s looser in the neckline. For a camisole, I would make a smaller size for the neckline and adjust for the bust.

wider lace at neckline

Above you can see the neckline in the pre-sewing stages. I first looked a thinner lace (below), but decided on this one, which is the same lace I used for the hemline.

Lace for neckline

This thinner lace has no oomph at all. The thinner lace was used for the armholes and leg openings.

Here’s my lovely summer nightie:

Nightie 2

To make this I simply added six inches to the bottom of the camisole pattern. It was very easy.  As I mentioned, I added some lovely lace to dress up the hem a bit more too.

Now onto the panties. I chose the low-cut Hipster panties from the pattern. The pattern comes with four different styles of panties to make and match the camisole. There are low-cut Hipsters, high-cut Hipsters, Bikinis, and an all-lace Hipster option.

Hipsters

These panties are super cute. Overall, this is a very sweet camisole/panty set.

Set

In celebration of our blog hop, and Canada Day, and everything Canadian, all of Beverly Johnson’s classes on Craftsy are 50% off! Yes, just follow this link and you can get any of Beverly’s bra-making classes, or her swimwear class – but only until July 3rd. ‘Only in Canada, you say?’ Well, we’re not talking Red Rose Tea here. These Craftsy savings are for anyone! (Sorry if you missed our discount. I’m sure there will be more savings in the future.)

And speaking of the Fairy Bra Mother, if you missed it, pop over to Seam of my Pants to read Marsha’s interview with her here. It’s a great interview! (Why didn’t I think of interviewing the Fairy Bra Mother!!!)

As well, don’t forget all the deals I mentioned when our blog hop started. You can find all the savings being offered on Happy Okapi here.

Happy creating!

a Rafflecopter giveaway


Canada Day 2016 Blog Hop Schedule

Be sure to visit each of these brilliant blogs this week for more on our
outstanding Canadian designers and suppliers:

And, of course, to enter our giveaway for some sweet-like-maple-syrup prizes.

June 24: The Tour Starts HERE at Happy Okapi

June 25: Celine guest posts on Happy Okapi; Marsha @ Seam of my Pants

June 26: Fiona @ Tangled Blossoms Designs; Carla @ Half Dozen Daily

June 27: Sherry @ Thread Riding Hood; Reece @ Happy Okapi

June 28: Nicky guest posts on Seam of my Pants

June 29: Daniela @ On the Cutting Floor; Reece @ Happy Okapi

June 30: Michelle @ Michelle’s Creations

Canada Day–June 31*: Ula @ Lulu & Celeste

July 2: Marsha @ Seam of my Pants

July 3: Keshia @ Sand Dollar Design Studio

July 4: Wrap Up @ Happy Okapi

July 6: Giveaway winners announced

* Yes, we know!


Pattern Testing the Minimalist Wallet

I was given the opportunity to test a new pattern, and I jumped at the chance to do it. It’s The Minimalist Wallet Pattern. The pattern was released on Sew Modern Bags.

I wanted to try this pattern because the designer wanted to see it in leather and I had just scored that great leather stash. Now I had the opportunity to use some of it. Win-win

pattern

This pattern is very easy to make, and working with the leather was delightful. It is so soft. It cuts so easily. It sews really easily too. I did use a leather needle, which I’m sure helped a great deal. All in all, it was great to work with leather. The only part about working with leather that wasn’t a delight was using Wonder clips. They have little teeth in them, and those little teeth were showing on my leather! I ended up using office clips. They still left a little bit of a mark, but it didn’t look like little bite marks.

Here’s the wallet. I added a second snap to the closure tab. I’ve seen that before and liked that option. When your wallet is full, use the outer snap; when the wallet is less full, the inner snap. It keeps your wallet from feeling like the closure is loose fitting.

wallet-closed

Here’s the wallet from the inside:

inside-no-cards

The wallet has eight card slots. Each of the four you can see with the little crescent cut into them has one behind as well.

Here’s the wallet showing the billfold. Bills, receipts, shopping lists all fit in here easily.

bill-fold

The only real problem I ran into when making this was using the snaps. I actually had two problems with the snaps. The first one was the outer snap that’s attached to the body of the wallet simply would not attach. I went through four snaps before I gave up on reinforcing it as the instructions say. There was just too much thickness there for it to work with the leather. It’s been behaving just fine now without that reinforcement.

A second problem I had was entirely my fault: I attached both of the snaps at the same time – the one on the body and the one on the tab. The instructions say to attach the one to the outer body and nothing at that point about the tab, but I didn’t read the instructions. As things quickly began to not make sense, I started reading the instructions again. I threw out the first tab I’d made and cut out another tab and started sewing again where I’d veered off. There were no more problems from that point on.

I don’t think the first problem I had with the snaps was an indication of the pattern though. The pattern is designed for Kraft Tex. The Kraft Tex may be thinner than leather, and the reinforcement needed.

Happy creating!