Taking Advantage

I took advantage of the Craftsy two-week trial Membership. Have you?

A new lingerie class came out. I bought it as it wasn’t part of the Membership. However, the next day it was. At first, I thought, ‘Well, I’m sure I’ll want to have this class anyway.’  This was a class I started to watch right away. Then something unexpected happened. I quickly went through the class and then returned the class the same day. I thought you might want to hear some of my thoughts on the class.

The class, Lingerie Essentials: Bralettes with Alison Smith was a bit of a disappointment for me, and I really didn’t want it to be a disappointment.

I have most of Alison’s classes and I love them. I love her style of teaching and all the details she includes in her classes.

 Basic Class Information

It was too soon for there to be any reviews for this class at the time of this writing. The class had only been out for a few days.

Here’s the lesson outline.

First Thoughts on the Class

This class may be great for a beginner because Alison does take her time and explain a lot about the materials, how to handle them, cut them out, and sew them – all in great detail.

She also explains about the difference between measuring for a bra and a bralette. It was about here, I became disappointed with the class.

What could possibly be disappointing? Well, the class comes with a pattern. The pattern Alison has designed for this class is for a B/C cup. She does show how to grade up two sizes, or down a size, but that’s it. I’m still outside that size range; and disappointed.

As well, the pattern does go to a 42, but I don’t need a bigger band. The larger cup/smaller band fit was never addressed.

Here’s a screen shot from the class showing how to grade up two sizes from the B cup. Unfortunately, there was no mention at all what to do if you fall outside that range. I knew then, this class just isn’t for me.
 Here’s the bralette on a model.

Looking on the Bright Side

My disappointment over the pattern being said, there were positive aspects to the class. So, if you’re a B/C cup, or even a D, you may just love the class.

Alison shows how to make the bralette a few different ways: Unlined lace, lined lace, and stretch jersey, shown in the photo above. I really liked the different ideas she covered with information on each material.

Alison is a wonderful teacher. She has a calm manner, and explains everything very well.

Alison does show some great ideas for how to use lace to embellish your bralette, and I did like that. Isn’t this lace detail on the back lovely?

 The last lesson in the class shows how to make some matching knickers and suspenders (panties and garter belt). Both of these patterns are included in sizes S – L. Alison does say you can make the patterns larger, but doesn’t give a lot of detail on just how to do that.

Here are the knickers Alison makes in the class.And here are the suspenders.

Personal Recommendations

Alison is a lovely teacher. I really like her style and think she has a lot to share with us. If you’ve never made a bralette, this could be a great first class to learn some basics.

As well, if you aren’t an A, B, C, or D cup, then the bralette pattern will likely be disappointing.

I bought this class and returned it. I was disappointed. There are other lovely bralette patterns out there with a fuller range of sizes, like the Sweet Sixteen pattern I just made.

Here’s the size guide (from Beverly Johnson’s blog) for the Sweet Sixteen bralette pattern:It goes up to an M cup! And the band goes up to a 38, but it fits loose, so probably more like a 40 or 42 band. So, conservatively that’s a range of 28 A – 40 M! That is a size range!

If you’re taking advantage of Craftsy’s two-week free trial Membership that’s available when you first sign up, then I’m sure there are things to take away from watching this class.

 Happy creating!

Canada Cups – Coming Unwired in a Bralette

Hello! Welcome to my stop on the Canada Cups – Coming Unwired blog tour.

This tour is all about soft cupped bras in their many forms, whether it be bralettes, camisoles, or actual soft cupped bras – all designed by Canadian Designers. For my stop, I’m making a bralette from the Pin-up Girls Sweet Sixteen Bralette Collection.

The Pattern

Beverly Johnson is the designer of this pattern. Beverly owns Bra-Makers Supply here in Canada, and is one of our amazing sponsors! Beverly was willing to provide a pattern to a reviewer, but I’m such a pattern hound, I already had a copy of this pattern. Rachelle of That’s Sew Venice gladly accepted that offer though, so we are both making the Sweet Sixteen bralette pattern. You can read Rachelle’s post here.

A Few Details About the Pattern 

Beverly says, “Most would not say “support” and bralette in the same breath, but oddly enough, this one can be very supportive. With the options this pattern offers, this bralette could become your new breast friend! The typical ready-to-wear bralette is only available in smaller sizes..not ours!”

It’s because this pattern offers both support and a fuller range of sizes, that Rachelle and I both wanted to make this bralette. Just so you know, there are 72 sizes included in this pattern.

A little later in the post, I have some ideas to share with you about making this bralette more supportive.

Another Sponsor – Club Tissus

Another of our fabulous tour sponsors right here in Canada is new to me: Club Tissus. They very generously offered the tour bloggers a discount and free shipping to try their merchandise for this tour. Thank you, Club Tissus!

My thoughts were, ‘A deal on lingerie supplies?’ I went to their website right away.

My first impressions were, well, it was all in French. I do know some French, but am not familiar with French material names. Then I found the box in the upper left corner that allows us to switch from French to English. (Whew!) That was better. I had no trouble navigating their site after that.

I bought this gorgeous mesh to use for the cups.

I found everything I needed to make my bralette there except neckline trim elastic. I had some of that in my stash.

Living across the country, mine took four business days to arrive. That’s still really good. I did have one mistake with my order, and after emailing them, they had the right item in the mail within a day.

Set Backs

I had a couple of set backs with my plans for my first bralette (okay, there were three all together) – which is not something you want to happen when a sponsor has donated your material!

My first was mistake with this material wasn’t a mistake, and I should have stuck with it. I simply cut out cups from the material – no matching, just random cut outs. But no, I decided I could do better and I tossed those cups out. (Remember this bit for later.)

Then I decided to use the colored part of the mesh. I didn’t like that once it was cut out and sewn. It was too multi-colored. Those went in the garbage.

Next, I was going to match the patterns. It turned out I wasn’t able to match the print exactly for each cup. No matter where I laid my pattern pieces on the remaining fabric, I could not get a match. Unfortunately, I had already cut out one half of the bra and matching pattern designs takes a lot more material than not matching.

I let that idea go, and just cut out another set of cups – I was right back to what I first did, except it’s three cuts into the material later. I was on my way.While sewing the cups, and then top-stitching them, my machine decided to eat my material and made a big knot! As I gently tried to unpick the knot… I made a hole. 

Sadly, there’s no repairing that, and by this time, I didn’t have enough of this mesh to make new cups. I had to start over.

Take Two

  Thankfully, I was able to make this beautiful bralette with a stretch lace cup, and power net for the band from materials in my stash.

Oh, I love these colors together. This is the Platinum duoplex, power net, and strap elastic from Bra-Makers Supply. The lace is some gorgeous lace I found at Fabricland in Ontario. I really love these together.

I couldn’t find a 4 x 3 hook and eye in Platinum and I didn’t like it in black, beige or ivory, which were all I could find. So I lowered the back where the straps attach to use a 3 x 3 hook and eye.

 Here’s the side view. So very pretty.

 How does it fit? It fit quite well after I shortened the back band.

Here’s the band I cut out based on what I thought were my correct measurements. After re-measuring, I was an inch smaller than I thought. However, I ended up shortening the band to that red broken line. That’s more than just the inch difference. So if you’re making this pattern, which is a great pattern, just know the band fits big.

Once I had the band shortened, it was perfect. I’ve worn this for full days, and it’s very comfortable.

Support 

Using only stretch lace for the cups, I wasn’t expecting this to be the most supportive, but I would say it’s actually better support than any other bralette I own.

I thought of some options to make this pattern more supportive: Lining it with foam, which is an option mentioned in the pattern, but not my preference. Other options could be to line the lace cups with sheer cup lining, or some firm stretch mesh, or even duoplex. All of these would make this very supportive.

PHDs

  There are always the Projects Half Done. This was one of them. A lovely camisole pattern.  I bought the material for it; a gorgeous cotton/silk blend, and this lacy material I thought went well with it. I received the High Neck Camisole pattern from one of our wonderful sponsors, Lingerie Secrets.

As it turns out, I’m actually glad I didn’t get this completed because just before the tour started, I found an even better lace in my stash!The lace is a cotton lace too. I like this so much better than the original material I bought for this.

Thank You

I  want to express my gratitude to these wonderful sponsors for our tour! They’ve donated patterns, fabric, and findings to our bloggers, and have gone above and beyond and donated prizes for you – our readers.

Tour Discounts (These discounts have ended.)

  • Funky Monkey Fabrics is offering a 10% discount for the duration of the tour. Use code: CC10 for 10% off store wide until October 22nd. Not valid on already discounted full bolts.
  • 20% discount storewide at Fabric Please. Use code CANADACUPS.
  • 10% discount from Central Sewing Machines (email your order directly to Muriel@centralsewing.com to receive the discount)
  • 10% discount from Midnight Mountain Fabrics. Use CANADACUPS10 for the code
  • Free shipping from Club Tissus on all orders over $100. Use code: livraison100

 Come back here for our wrap up to enter into a draw for one of the prizes! Just look at these prizes!

Happy creating!


Tour Schedule

Hang with us as we reveal our inner secrets. 😉


// Please note that none of these post links are available before the scheduled date. If you click on one too early, you will get an Error 404: Page not found. You know about those, right? //

Sunday, October 15


Monday, October 16


Tuesday, October 17


Wednesday, October 18


Thursday, October 19


Friday, October 20


Saturday, October 21


Monday, October 23

  • Giveaway winners announced on all the blogs:

Little Heart Threads, Glitter in my Coffee, Michelle’s Creations, Mrs. Weaver’s Finest Unmentionables, Gracious Threads, Élégantine!, That’s Sew Venice, Sprouting Jubejube, Flying by the Seam of my Pants, Filles à Maman


Sewing Plans

I always have a long list of things I want to sew, and since my sewjo has taken a late-summer vacation, I’m organizing some of my plans. At least I still feel I’m doing something and making some progress this way.

Another Watson

Em has told me so many times that she loves the Watson I made her. She’s hinted she wants another one. She’s told me her favorite colors. She’s mentioned she wears the one she has all the time. So, I have one cut out for her in this adorable polka dot material. I think she’ll like this. 

You might recognize this material from a previous Watson I made.

I love this polka dot material.

A Camisole for Me

  I found this gorgeous cotton-silk blend. Oh, it’s sumptuous. That’s really the only way to describe it. To make this even better, I found it in the clearance section at my local fabric store. That was just a bonus!

I also found some lovely lace material. Together, it will make a very pretty camisole.

This being such lovely material, I may look at some actual lace I have too and decide then. I just need some sewjo again. 

A Handbag for a Friend

   A dear friend of mine has been living in the US for the past year. She saw my Canada 150 bag, and said she’d love one too. I don’t have any of the original fabric left, so found some that was perfect for her. Her hubby used to be a Mountie. I think she will really love this! 

Aren’t those Mounties adorable?

Drafting Ups and Downs

You know, sometimes, I fuss too much.

My fourth draft (second with Karin) only needed small adjustments. I don’t know why I simply didn’t make those small adjustments to the pattern. Instead I went back and re-drew everything. I didn’t get the same results.

As well, I ran out of duoplex from my stash. I still have a couple of kits, but I wasn’t going to cut into those. I had to take a break from my drafting.

On that day, with no bits of duoplex left, and a draft that wasn’t what I wanted, I was ready to throw in the towel. For the better part of the day, I was defeated. I was giving up. I couldn’t sew. I couldn’t draft. I might as well delete my blog. I’m sorry I wasted all our money. Blah. Blah. Blah.

That’s when my hubby came to my rescue – he calmly told me I was doing well. Look how far I’d come. Then he told me to go ahead and order some more duoplex to keep going. He is my hero.

Future Plans

 Well, I do plan to finish all of these projects, including sewing up that fourth drafted pattern with a few adjustments. As well, I have a Spring/Fall jacket I want to make, and a Agnes top with sleeves. I have the material for both of these as well.

All of these projects are just waiting for me to get my sewjo back. I hope my sewjo doesn’t take too long a vacation.

Happy creating!

The Fifth and Final Draft

This bra is my fifth and hopefully my final draft at this time. I hope it’s… well, I hope it’s perfect!

My Fifth Draft

  I really went back and forth before I sewed this bra – Should I sew it with the water-soluble (WS) thread, or just sew up a bra. If I use the WS thread, even if this bra is perfect, I will be re-sewing it. I really didn’t want to do that. I just want to sew a bra. However, I finally decided to just sew up it as another tester with the WS thread.

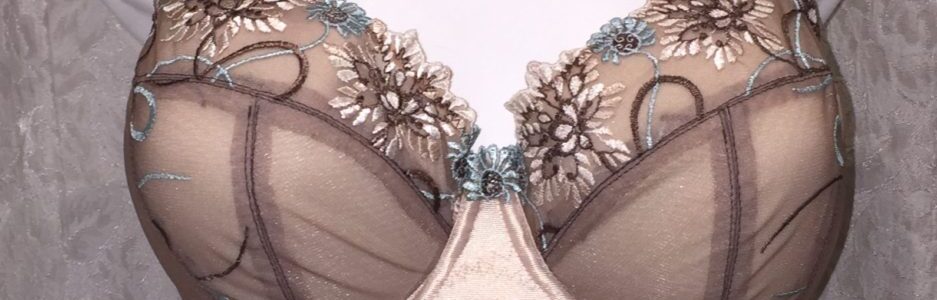
This looks better than the other two, but you can see it’s still not finished as nicely as a bra I want to keep.

A wonderful little tip I heard after I’d sewn my first bra with WS thread is to use the thread in the needle only, and regular thread in the bobbin. Water will still dissolve the upper thread, and the seam will come apart just fine. I’ve also heard to just dab the seam with water, which would save a lot of the drying time, and ironing.

Changes

 My band was a bit too big. Well, an inch too big to be exact. I’d recently lost a little bit of weight, and of course my ribs being one of the smallest parts of my body, that was where it showed first.

So before I sewed up another bra, I re-drafted the pattern for my cradle and band with my new measurements. I didn’t mind re-doing it all either. I really want to get drafting down pat, so a little extra practice isn’t a bad thing as far as I’m concerned.

 More

I re-drafted the pattern for my cups, again too – just for more practice. In fact, I spent the better part of a day drafting over and over. I made three drafts of both the cups, and the cradle and band by time the day was done. 

One other change I made while I was re-drafting my cup pattern was to lower my strap placement.

In addition to the changes I’ve mentioned above, I made my usual adjustments: a custom bridge, lowering the upper cup to meet the bridge, and adjusting for a flat spot.

One thing I’m not having to adjust is the difference between my cup and cradle caused by being an Omega shape. Let me tell you what I’m doing differently.

A Different Change

I’d heard before that you can go up or down one size in the cradle from the wire size you’re using. So if you’re using a 40 wire, you can use a cradle made for a 38, 40, or 42 wire.

It’s the same if you’re using a 40 cradle – you can use a 38, 40, or 42 wire. You can go up or down one size.

I’m doing that with my drafting. I’m using a 42 extra-long wire to draft my cradle – that’s one size bigger than the wire I normally use. It just happens to be the same length as the wire my cup size normally uses. Does that all make sense?Do you see how the 42 Extra Long wire is the same length as the 44 Long wire? My cup size matches a 44 Long wire. I normally wear a 40 Long wire. Using a 42 Extra Long wire to draft my cradle size, I’m able to make my cradle match my cup size perfectly.

The Conclusion?

 Somehow the band is still a bit too big! I’m having to fasten it on the middle eyes, but that’s a small adjustment. As well, when I lowered my strap placement, I achieved a bit more Va-va-voom than I want. A few tweaks to my pattern and I’m sewing up a real bra next!

Happy creating!

A Few Alterations

My third bra draft was pretty good. In fact, it would have been wearable except I used water-soluble thread. That little fact alone would make it good for one wearing only. Well, the water-soluble thread and the fact that it was slapped together…

It fit pretty well. That’s what I’m really trying to say here.

There were only a couple of changes I still wanted to make to this. I wanted to add a bit to the underarm area for more coverage there – just a half-inch. I wanted to round the cups a touch at the apex. And I wanted to lower the bridge a half-inch as well.

Changes

While I was making those couple of changes I listed above, I decided to change the style of the bra too. I added a power bar. So  now it’s the same style as the Pin-up Girls Shelley pattern with a split lower cup and a power bar. Shelley has been my favorite pattern, so it only makes sense I make something like that. 

Making these changes were such much easier than the actual drafting of the cups. That was much more of a challenge.

 Leftovers

After soaking my bra, all the threads dissolved, and I was left with bits again. This is great as I can re-use most of these bits. It’s just the cups I need to cut fresh. I found the band too big as well, so have adjusted that. It’s all ready to go for a second sew. 

Stay tuned for my bra-drafting. I’m hoping only one more draft and I’m cutting into some gorgeous lace again.

Seize the Day

Remember how I couldn’t put a bow on Em’s Watson because she didn’t want to take it off once she’d tried it on? Well, I had my chance. The circumstances surrounding this? Well, I don’t want to know. I do know the bralette was on the floor and got stepped on… That was already more than I wanted to know.

It seems little plastic rings can’t withstand being stepped on. I had to repair the bra. I replaced the rings and sliders with metal ones from a little second-hand bra I bought. I also added the bow! I had no intention of missing that opportunity.

Happy creating!

A Third Bra Draft

My third bra draft really was a success!

A Few Differences

There were a few things I did differently this time. One of the changes I made was to use water-soluble thread – and it came in handy! I realized very quickly I had mis-measured my cradle for the elastics. A quick little soak in some water, and it was all bra bits again rather than a partially-sewn bra meaning I’d have to start over or unpick the whole thing.

 I was not expecting to have a bra when I was done. I was simply seeing how my draft fit and what changes I needed to make. That is a very freeing feeling.

My Pattern

I made a diagonally seamed bra with a split lower cup. Nothing fancy for this bra – I only want to see the fit.

My ‘Kit’

  The same attitude I had for the pattern, I had for the kit. Nothing fancy, just bits of this and bits of that. Not all the bits were even matching, but they worked for their purpose.

In this little pile of a kit, I have beige Duoplex and Power Net, some beige and some white bottom band elastic, white upper band elastic, white strap tape, and blue trim! I’m really not expecting this to look good.

As well there’s the YLI Wash-A-Way thread. If you haven’t tried it, it’s great! It works perfectly for testing a pattern like this.

A Hot Mess

Honestly, the sewing on the bra looks terrible. Well, not the sewing really. It’s more the techniques or lack there of. It’s a mis-match of colors, and I didn’t do a lot of the things I’d normally do to ‘neaten’ things up. Just look at the bottom band elastic.

 Normally, I trim the elastic under the channeling – I like a thinner band running under the cups. Not this time. This time I’ve simply folded the channeling over the elastic and pushed it out of the way.

It’s looks so bad.

 While we’re talking about the bottom band elastic, I used two colors because I didn’t have enough of one color to do the full band. I used a great technique of piecing together bits of elastic. I saw Monica Bravo do on a YouTube video. It’s quick and it really doesn’t show at all from the front. You can view the video here.

You can see I wasn’t trimming anything, not even threads. This was a quick sew to see how things were going to fit. That’s it.

Does It Fit?

I have to say I am so surprised by the outcome of this drafting experience. First off, I never thought I’d be drafting my own bra pattern from measurements!

Secondly, I made a very wearable bra! Well, it would be wearable if I hadn’t used the water-soluble thread! But it fits. There are a few tweaks I want to make, but it fits.

The whole time I was sewing this, I kept thinking how I’d never sewn/thrown a bra together like this. There are bits hanging or sticking out everywhere! The upper band elastic is hanging out of the side of the cup because I didn’t finish the straps; on the other side it’s hanging down the back at the hooks and eyes. The channeling is sticking out. It really is a mess to behold!

There’s not a top-stitch to be found, and barely a back-stitch present. I sewed it just enough to hold it together to try it on… well almost. I did pull on the strap a bit too much and pulled it off! I had a pin handy, so was able to continue in the trying-on/evaluating process. 

Adjustments

  There are only a couple of adjustments I want to make. I plan to add a little more coverage to the underarm area – probably a half-inch will do. I want to lower the bridge by about a half-inch as well. Rounding the apex and adding a power bar will complete this. I’ll also likely do another test run. Then I should have a perfectly fitting self-drafted bra and pattern. What a feeling!

Happy creating!

My Last Canada Bag

I loved my first Canada 150 bag. I used Emmaline Bags’ Miss Maggie pattern.

I even enjoyed making a second and third Canada bag similar to my first bag.

I still wanted to have a Canada 150 bag just for me. So, this is my last Canada 150 bag. There will only ever be four of these made by me.

Things I Love

There are things I love about this bag – the pattern is free. (Have to love that.) The snaps bring it in, giving it a great shape. I really like the strap anchors, especially the Long Johns. This photo shows both the shape and the anchors.

I also love the bling I used like the sewn label, the leather maple leaf, the leather tassel, and handmade hanging tag.

In making these, I found I really liked the two-toned look of the second bag. I found the two-tones made it pop more.

Possibilities and Changes

I do want to include a zipper pocket inside as well as the slip pocket inside.

I’m thinking of changing the side snaps so they’re permanent by using rivets to create that shape. They won’t unsnap, and we’ll have to see if I mind that or not.

Canada 150 Take Four

So, after a little though of just what I wanted to include, here’s my final Canada 150 Miss Maggie bag: 

I went with a solid pattern because I didn’t have enough material left over from my other bags to do the two-toned look.

 I added a Sewn label, but just to keep all the bags individual, I put it in the bottom corner of the bag. I made a leather tassel. The first bag had 1/8″ fringes, this one has 1/4″ – again, just to add little touches to make them all different. This tassel is longer too.

Of course, the Handmade hanging tag. I love some bling.

I really love a back pocket, whether it’s a slip pocket or a zippered pocket. But I decided not to include one on this bag so as not take the focus away from the Long John Strap Anchors.

I saw a wonderful blog tutorial on Chris W’s Designs’ blog – Jazzy Straps. I loved Ellen’s straps. Mine aren’t as vibrant with contrasting colors, but I still love how they turned out. I took the regular 20″ length of the straps and added another 10″. The length is perfect for me for a shoulder bag. 

On the inside of the bag, I’ve made a slip pocket (not shown) which is included in the pattern, but also added a zippered pocket. I used the tutorial from Emmaline Bags for that. You can find that here. Just look at all those maple leafs!

I did add rivets to bring the sides in and secure them on this bag. I’m super happy with that part of my new Canada 150 handbag too. As well, I included a magnetic clasp for a closure.

Something all four bags have had in common is the bag feet I’ve used for them. I love these little feet. So much detail, but they don’t get seen very much. I kept forgetting to show them too.

Such a pretty detail.

All the hardware for my bag (except the feet) came from Emmaline Bags. The feet I found on Etsy but the store no longer has these. I’ll have to look for them again somewhere else. They are adorable.

If you follow my blog, you might be wondering if Em’s Watson bralette fit her.

Was it Bow-Worthy?

Em’s Watson fit her perfectly. However, it will remain bow-less.

Em said she wasn’t going to take it off after trying it on. She said it was more comfortable than the very-well-known-big-name bralette she’d been wearing! That made me feel really good. We already have her next one in the planning. Not only that, but now her Mom wants one too. However, before Em or her Mom get a bralette, I have some bra drafting/sewing to do for me.

Happy Creating!

A Watson for Em

What would you do if your boyfriend’s Mum made bras? Would ask her to make you one? Em did.

First Make

For my first bra-making venture for Em, I thought a bralette would be best. She really wanted a bralette too. So which pattern to try?

I have to be honest here. I have struggled so much with bra-fitting for myself, that I wasn’t looking forward to making a bra for someone else. I found the very thought daunting, and kept putting it off.

Once I started sewing though, well I really love sewing bras. With each step of the process, I admire how it’s coming together and looking more like a bra.

My first make for Em was the Cloth Habit Watson.

I was debating a bit whether I’d make her the Watson or Pin-up Girls Sweet Sixteen Bralette.

I decided to make the Watson because I’ve made it before. She also really liked the long-line version, so that’s what I made.

Hoarding

Remember I mentioned in a previous post how I had to order new wires because I hadn’t kept different sized wires? I had them a few years ago and gave them away? Well, a year ago I gave someone my Watson pattern because it really didn’t fit me and I thought I wasn’t going to make it again. Guess what I had to buy again because I don’t hoard enough? Yes. I had to buy another Watson pattern! I am going to start hoarding all things bra-making.

Much Better Now

 Sewing the Watson was much a much better experience this time than the two times I made this pattern in the past. The big difference is Em actually fits in the pattern’s range. I was just outside it and had to size up and make adjustments. She’s also young, with all the benefits that go with youth. Need I say more?

Sewing this pattern again, I do have to say I really like it. It’s a lovely pattern, with tips in the instructions that are both thoughtful and helpful. While sewing, I had the impression that this is a charming pattern.

Em’s Watson

 Seeing as I don’t know if this is going to fit Em either, I wasn’t breaking into one of my nice kits. Nope. It was scraps and left overs, little bits from here and there. Despite not using a kit, it came together quite well.

Here’s Em’s Watson from the front: 

I used some lighter-weight coral mesh that had been a gift, peach stretch lace which I think also had been a gift, and white elastics from one of my first purchases from Bra-Makers Supply. I didn’t have any smaller rings and sliders for the straps, but have a few kits from Merckwaerdigh and they have smaller findings. I know I won’t be using the findings from those kits for me so pulled them out. They were perfect.

I found an adorable little butterfly bow in my bow stash that is almost a perfect match for the peach in the cups. It’s not sewn on yet. This has to fit before it’s getting a bow of any kind.

 Here’s the back: 

Here’s a side view: 

I am really happy with how it came together. Now I have to wait.

Does It Fit?

  I have to wait a few days to find out whether this fits or not. Oh, if you think the wait is bad when sewing a bra for yourself and wondering the whole time if it will fit… This is worse. At least when sewing for ourselves, we can try it on right after we snip those last threads!

 Happy creating!

P.S. You might want to look at the first Watsons I made. My First Watson, and Long Line Watson and Some Bling.

Another Two Canada Bags

My Canada 150 bag made a bit of an impression. In fact, my original bag is now residing in California, USA with a Canadian woman. I think everyone will know she’s a Canadian now.

I’m going to be making another one for myself soon – it’s all cut out on my cutting table.

However, before I got to sewing my own, I had a special request from my son’s girlfriend. She has some really dear friends in Colombia who just happen to love her, her family, Canada, and all things Canadian. Could I please make two more bags? I couldn’t refuse.

Canada Bag Version Two

I don’t like doing the same thing twice, so I wanted to mix things up a bit. These bags may all be similar, but each is unique. That was just what Em wanted for her friends too.

Here’s the front of Version Two:

I’m still using the Emmaline Bags’ free Miss Maggie pattern. I’ve used the Long John strap anchors, attached a bit of bling – the Handmade tag – and cut out a red leather maple leaf.  Since this bag has the Long John strap anchors, I decided to reduce the size of the maple leaf by 20%. This bag also has the side snaps to bring it in and give it a defined shape, a magnetic snap closure and bag feet.

Here’s the back of the bag. It has a divided slip pocket going across the back of the bag, and some fun Canadian quiz material.

The inside of the bag is the same for both bags. Off white material with red maple leafs, and a slip pocket.

I used the lining material to make the straps as well. I just couldn’t resist those maple leafs! Em told me these women are Colombian and like lots  of color and bright things, so that helped me decide to make one set of straps brighter.

Canada Bag Version Three

Here’s the third Canadian Miss Maggie from the front:

  I really like this one! For this bag, I wanted it to look different so I used the pattern instructions to add a seam in the front, and used that to feature both of the materials I was using. I also added a red leather maple leaf at 100%, a brass Sewn label, the Diamond strap anchors, added a magnetic snap closure, and bag feet.

I made a mistake attaching these anchors. I didn’t know it, but I was coming down with a doozy of a summer cold. So what did I do? I placed the pattern piece upside down when I was marking where the anchors were to go! As a result, I struggled a bit to get them in, and then really had to fight to top stitch around them. I’m not thrilled. However, they’re in the bag, and there’s no moving them.

Here’s the back of Version Three.

You can see on the sides, I’ve added the snaps to the side of this bag as well, but have left them unsnapped. I want the bags to both have their own unique look when they arrive at their destination.

 I hope they’re both loved and cherished.

Along with a fourth Canada 150 bag, I’m back to drafting again this week. I’m really looking forward to it.

Happy creating!

Two More Agnes Dresses

Last summer I bought some gorgeous floral material to make my favorite Flirt Skirt to wear this summer. I still haven’t done that. I have, however, made two  more dresses from the hallå agnes swing top & dress pattern.

This first material has the design as the red top I made, but in blues and I made it as a dress. Here’s the front: 

This dress comes together really quickly with serged seams, and serging used to attach the neckline and armbands.

I had thought I’d change how I attached these bands, but decided to make another change I’ll tell you about below.

Here’s the side view: 

 Here’s the red top just as a reminder to see the print on it.

I know my hubby loves blue on me, so I think this blue dress will be his favorite.

This forth agnes is a dress too, in black, white, with little bits of yellow. 

The yellow isn’t very visible in the photo, so here’s a close up:

I think four agneses is a good place to stop for now. I really do love this pattern, and am living in this dress this summer.

One Change

Although, I’m loving all my hallå agnes dresses and top, but there’s one little element I wasn’t loving. The seams are all serged on these dresses and the top. That’s great. The seams all looks nice and neat this way.

However,  once these were washed, I found the seams at the neckband and arms were flipping or folding in half. It wasn’t visible from the outside when I was wearing it, but I could see it when I was putting the garment on. I didn’t like it.

Here you can see how the seam has folded up:

My fix for this was to use my coverstitch machine. It worked beautifully too. I’ve finished all my dresses this way now, and no more flipping or folding seams.

One of the things I did to help line up the stitching was to use the markings on the presser foot. That first grove was my guideline. It worked out really well.

Drafting Again

My new wires are here and it’s time to start drafting again! I’ve done a few drafts now, and that’s led to a couple of questions. I’m one or two answers away from drafting, what I hope is, my perfect bra pattern.

Happy creating!