2017 Wrap-Up

I don’t usually do a wrap-up post, but this year I started out saying I was going to finish some unfinished projects, so I thought it would be fun to look back and see how I did.

2017’s UFOs

 I started off the year mentioning a few things on an ever-continuing sewing list I just wasn’t finishing. I did finish a few of them.I don’t want to cover everything I did this year – just a few highlights.

January, February, & March

In January, I worked on my personal croquis. This is something I’d wanted to do for a while, but had put off. I don’t know why I put it off for so long. I love it! It’s come in handy so many times, especially to digitally try on clothes to see how they’ll fit. 

January also saw me work on the Raspberry Ripple bag, which I finished in February.

In March, I drafted my first bra using the Drafting information in the Bra Makers Manual Vol 2. Although it looked okay, it didn’t fit properly. I hadn’t splayed my wires enough. Lesson learned and changes applied to the next draft.

April, May, & June

May is when I discovered the hallå agnes pattern. I love this pattern! I made five of them over the next couple of months. I have plans to make a few with sleeves for winter.

July, August, & September

In July, I helped organize the Canada 150 – It’s in the Bag blog tour. I also made my first Canada bag.I ultimately made four Canada bags, three of which are now in Columbia. I used the free Miss Maggie pattern by Emmaline Bags. This is a great pattern. I have plans for more Miss Maggies.

In August, I made another bra draft, and a Cloth Habit Watson bralette.

September was a big bra month. I made two more bra drafts, and another  Watson for Em.  

October, November, & December

In October, I helped to organize another blog tour. This time it was Canada Cups – Coming Unwired blog tour. I made a lovely Pin-Up Girls Sweet Sixteen bralette for myself. This is such a great pattern for having so many sizes. It’s supportive and pretty. What more can a girl want?In November, I helped organize one more blog tour. This time it was the ChrisW Designs Global Blog tour. For this tour I made the Serendipity Hip pattern for a friend.December came and saw one more bra draft, well two actually. The first draft didn’t fit and I wasn’t really expecting it to fit. That first draft of December led to a perfectly fitting draft. I’m ready to start bra-making again in the New year. What a great way to end my bra-making year!

Unfinished Business

   I still have a couple of things on my sewing list from this year that didn’t get finished.

Here’s the list that’s been sitting on my desk:

  • bra pattern
  • test bra pattern
  • read up on bag dividers
  • make a pattern for a bag divider
  • sew Raspberry Ripple.

Out of all of that, I did the first three. I found a pattern with a bag divider so skipped the forth one. There’s still one Raspberry Ripple all cut out and interfaced just waiting for me. I think that will be one of the first things I sew in 2018.

I said starting off, that my sewing list is ever-continuing. There are projects I’ve added for my 2018 sewing list.

  • I want to work on the design or style of my drafted bra pattern and sew a bra or two or three or four…
  • I have two lap quilts to sew.
  • A friend wants a robe.
  • I want to sew another handbag or two.
  • I have material to sew two winter Agnes tops.

That’s a few things to get me started in 2018.

Happy New Year, and happy creating!

Oh That Dress!

Recently, a friend asked me to go ‘Black Tie’ dress shopping with her. That sounded fun, so we made plans.

She had a shop in mind, so we went through all the dresses there to see what was appropriate for a black tie event.

  Gorgeous Dresses

 My friend tried on a number of dresses, but only two were lovely enough to really consider.

This adorable cocktail dress looked great on her, but wasn’t suitable for a black tie event. It just looked too good on her not to be included in her final list. This is the evening gown she bought for the event. It’s gorgeous and it really flattered her figure.  

Having Fun

 After helping my friend pick out so many lovely dresses, and seeing her try them on, I couldn’t resist trying on a dress or two.

This was the first gown I tried on. I loved this, but it did not love me back. I should know this styling is not flattering to my shape as I’ve been curvy all my life – even when I was a size 5. You can see on my croquis below, it isn’t flattering. It looked worse in real life.

No, that was not the right style for me. It was very easy to pass it up no matter how nice it looked on the hanger.

The next dress was a lot harder to pass up.  

While my friend was debating her dresses, I tried this one on.

I had to snap a photo of me in the dress too. When you try something on and feel pretty… it stands out.

Here’s the dress from the back:  

Ooh, it’s so lovely.

 I came home and looked for a pattern that was similar. I didn’t have to look far.

McCall’s 7684

McCall’s 7684 view C looks almost exactly the same. Same skirt, belt, zip up the back, pockets. The top is different.

I phoned the fabric store to see if patterns were on sale and they were! I was off to pick it up right away.Here are the dresses side by side:Here’s just view C:
 I’m so happy I went dress shopping with my friend. We really did have fun! I’m even happier I found this pattern.

That’s enough dreaming for me. It’s time to get back to work on all those Christmas gifts I said I’d sew.

Happy creating!

A Few Gifts

Before I can get back to sewing just for me, I had to finish a few sewing projects I promised to make for others.

Sewing Gift One

  Em, my son’s girlfriend, was over not too long ago, and she saw a small stash of material. She asked what I was doing with it, and I said I was donating it. I don’t like to keep things I’m no longer using, or don’t have plans to use.

She loved the one material and thought her mom would like it too. Would I make an Infinity scarf?

I searched around for a pattern, and found there was very little difference between all the patterns out there. Most call for 2 yards of material.

I had just over a meter of material, so I was beginning to think this wouldn’t work. Then I found a pattern that was one yard. I whipped up this scarf. 

This turned out so nicely, I wondered why I hadn’t thought of this myself. But the material was already claimed by Em, so maybe next time I’ll think of making a scarf. Here’s the side view. 

The only disadvantage to only having one meter of material is this scarf won’t double wrap. It’s thick as it is, so should still be nice and warm.

Sewing Gift Two

This next gift was some material brought back from Africa by a friend. She brought it back for another friend, but that friend doesn’t sew. Would I help?

I thought an apron would get some nice use, so that’s what we decided to do. I looked for a simple pattern that would show the material’s design, and found one. 

The material is waxed cotton, and it was a first for me to sew with it. It’s a bit more challenging than regular quilters’ cotton, but not too hard.

This is a reversible apron, so there’s no right or wrong way to wear it. 

It came together really well, and has good coverage. I heard our friend loves it.

 I have two more gifts to sew up. I’m making the Noodlehead Range backpack, and the Blue Calla Clematis wristlet.

Both bag photos are from their websites.

This will be my first time making a backpack. It’s also my first time sewing a Blue Calla pattern. I’ll share more on both of these once I sew them up.

I’ve had a few firsts this gift-sewing season. Once this is done, I’m back to bra drafting.

Happy creating!

Getting Some Sewing Done

I’ve had a few things on the go lately. The Canada Cups tour, which just finished, and a tour starting tomorrow! More on that a little later. Both of these have been taking up a fair amount of my time, but as I’d mentioned in my last post, my pup really needed new boots.

Done

  I finished a pair of booties for my pup. Rather than following the pattern and making a circle of faux suede, I used some faux leather and covered the whole bottom.I’m hoping they’ll endure a little better. Also seeing where the wear and tear is (no pun intended), I hope a more-padded bottom will prevent that.I cut the ‘strings off the old booties to re-use on the new ones. So the straps are looking a bit fuzzier, but they work.I also cut off the old Velcro and elastic bits from the worn out boots to use again, because wearing these every day from November until March, I’m sure I’ll be making a new set again next year. I am hoping this set will endure better though.

Next Project

   Have you heard of Beautiful Pie Shop’s slippers?

I bought the pattern last year thinking they’d make a great gift. I bought the fleece and the non-slip material for the bottom. I did everything except sew them up. I decided this was a project I was completing!

You know when something is just that perfect timing when the Facebook group announces they’re doing a sew-along the day you’re going to start to sew. I think I’ll wait a few more hours and sew-along with the pros.

 A Few Bumps

 You know how things always look so much easier when someone else is doing the sewing? That’s how it was for me with these slippers. However, now that I’ve made a pair, the next ones would be much easier.

My first little bump was not using my Teflon foot to sew over the non-slip bottoms! I pulled that first slipper through the machine.

Then I switched machine feet for the second slipper and I still pulled the slipper through the machine!  Yup, definitely non-slip!

I used tissue paper when I had to sew another part on that sole again.

The tissue paper tore off easily and for the first time sewing these slippers, I didn’t have to fight with the sole.

I did struggle a little with the instructions over which side was the inside and which was the outside as that’s never set plainly in the pattern – because it’s left up to you. You can use cotton on the outside and fleece on the inside or vice versa. However, it did challenge me.

Finished Booties

     I managed to make an adorable pair of slippers.  Aren’t they cute? And I know they’ll fit as Em and I wear the same size shoe, or in this case slipper.

Here’s a photo of the bottom of one slipper. I know one thing, she won’t be slipping around in these! And here’s the inside of the slipper.Do you see the little fleece bow? That’s covering up a mistake I made. I didn’t realize from reading the instructions to only cut through one layer of material for the elastic. Whoops! But a little bow over top and it’s all hidden.

The cute heart material was something Em gave me. I thought it would be fun to use some of it for her. The photos don’t show it very well, but the fleece is a dark fuchsia.

Starting tomorrow (or later today)!

Tomorrow, we have a blog tour starting! It’s the Chris W Designs Global Blog Tour. Come back here for a listing of all the blog stops – all over the world! If you’re not in Australia, but maybe in North America, the tour will be starting later today.

Happy creating!

Canada Cups – Coming Unwired in a Bralette

Hello! Welcome to my stop on the Canada Cups – Coming Unwired blog tour.

This tour is all about soft cupped bras in their many forms, whether it be bralettes, camisoles, or actual soft cupped bras – all designed by Canadian Designers. For my stop, I’m making a bralette from the Pin-up Girls Sweet Sixteen Bralette Collection.

The Pattern

Beverly Johnson is the designer of this pattern. Beverly owns Bra-Makers Supply here in Canada, and is one of our amazing sponsors! Beverly was willing to provide a pattern to a reviewer, but I’m such a pattern hound, I already had a copy of this pattern. Rachelle of That’s Sew Venice gladly accepted that offer though, so we are both making the Sweet Sixteen bralette pattern. You can read Rachelle’s post here.

A Few Details About the Pattern 

Beverly says, “Most would not say “support” and bralette in the same breath, but oddly enough, this one can be very supportive. With the options this pattern offers, this bralette could become your new breast friend! The typical ready-to-wear bralette is only available in smaller sizes..not ours!”

It’s because this pattern offers both support and a fuller range of sizes, that Rachelle and I both wanted to make this bralette. Just so you know, there are 72 sizes included in this pattern.

A little later in the post, I have some ideas to share with you about making this bralette more supportive.

Another Sponsor – Club Tissus

Another of our fabulous tour sponsors right here in Canada is new to me: Club Tissus. They very generously offered the tour bloggers a discount and free shipping to try their merchandise for this tour. Thank you, Club Tissus!

My thoughts were, ‘A deal on lingerie supplies?’ I went to their website right away.

My first impressions were, well, it was all in French. I do know some French, but am not familiar with French material names. Then I found the box in the upper left corner that allows us to switch from French to English. (Whew!) That was better. I had no trouble navigating their site after that.

I bought this gorgeous mesh to use for the cups.

I found everything I needed to make my bralette there except neckline trim elastic. I had some of that in my stash.

Living across the country, mine took four business days to arrive. That’s still really good. I did have one mistake with my order, and after emailing them, they had the right item in the mail within a day.

Set Backs

I had a couple of set backs with my plans for my first bralette (okay, there were three all together) – which is not something you want to happen when a sponsor has donated your material!

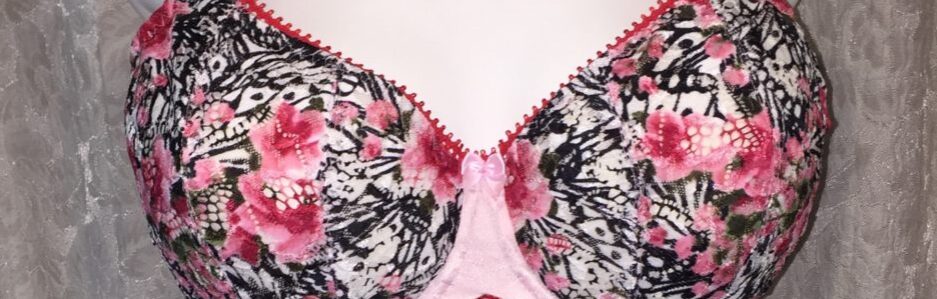
My first was mistake with this material wasn’t a mistake, and I should have stuck with it. I simply cut out cups from the material – no matching, just random cut outs. But no, I decided I could do better and I tossed those cups out. (Remember this bit for later.)

Then I decided to use the colored part of the mesh. I didn’t like that once it was cut out and sewn. It was too multi-colored. Those went in the garbage.

Next, I was going to match the patterns. It turned out I wasn’t able to match the print exactly for each cup. No matter where I laid my pattern pieces on the remaining fabric, I could not get a match. Unfortunately, I had already cut out one half of the bra and matching pattern designs takes a lot more material than not matching.

I let that idea go, and just cut out another set of cups – I was right back to what I first did, except it’s three cuts into the material later. I was on my way.While sewing the cups, and then top-stitching them, my machine decided to eat my material and made a big knot! As I gently tried to unpick the knot… I made a hole. 

Sadly, there’s no repairing that, and by this time, I didn’t have enough of this mesh to make new cups. I had to start over.

Take Two

  Thankfully, I was able to make this beautiful bralette with a stretch lace cup, and power net for the band from materials in my stash.

Oh, I love these colors together. This is the Platinum duoplex, power net, and strap elastic from Bra-Makers Supply. The lace is some gorgeous lace I found at Fabricland in Ontario. I really love these together.

I couldn’t find a 4 x 3 hook and eye in Platinum and I didn’t like it in black, beige or ivory, which were all I could find. So I lowered the back where the straps attach to use a 3 x 3 hook and eye.

 Here’s the side view. So very pretty.

 How does it fit? It fit quite well after I shortened the back band.

Here’s the band I cut out based on what I thought were my correct measurements. After re-measuring, I was an inch smaller than I thought. However, I ended up shortening the band to that red broken line. That’s more than just the inch difference. So if you’re making this pattern, which is a great pattern, just know the band fits big.

Once I had the band shortened, it was perfect. I’ve worn this for full days, and it’s very comfortable.

Support 

Using only stretch lace for the cups, I wasn’t expecting this to be the most supportive, but I would say it’s actually better support than any other bralette I own.

I thought of some options to make this pattern more supportive: Lining it with foam, which is an option mentioned in the pattern, but not my preference. Other options could be to line the lace cups with sheer cup lining, or some firm stretch mesh, or even duoplex. All of these would make this very supportive.

PHDs

  There are always the Projects Half Done. This was one of them. A lovely camisole pattern.  I bought the material for it; a gorgeous cotton/silk blend, and this lacy material I thought went well with it. I received the High Neck Camisole pattern from one of our wonderful sponsors, Lingerie Secrets.

As it turns out, I’m actually glad I didn’t get this completed because just before the tour started, I found an even better lace in my stash!The lace is a cotton lace too. I like this so much better than the original material I bought for this.

Thank You

I  want to express my gratitude to these wonderful sponsors for our tour! They’ve donated patterns, fabric, and findings to our bloggers, and have gone above and beyond and donated prizes for you – our readers.

Tour Discounts (These discounts have ended.)

  • Funky Monkey Fabrics is offering a 10% discount for the duration of the tour. Use code: CC10 for 10% off store wide until October 22nd. Not valid on already discounted full bolts.
  • 20% discount storewide at Fabric Please. Use code CANADACUPS.
  • 10% discount from Central Sewing Machines (email your order directly to Muriel@centralsewing.com to receive the discount)
  • 10% discount from Midnight Mountain Fabrics. Use CANADACUPS10 for the code
  • Free shipping from Club Tissus on all orders over $100. Use code: livraison100

 Come back here for our wrap up to enter into a draw for one of the prizes! Just look at these prizes!

Happy creating!


Tour Schedule

Hang with us as we reveal our inner secrets. 😉


// Please note that none of these post links are available before the scheduled date. If you click on one too early, you will get an Error 404: Page not found. You know about those, right? //

Sunday, October 15


Monday, October 16


Tuesday, October 17


Wednesday, October 18


Thursday, October 19


Friday, October 20


Saturday, October 21


Monday, October 23

  • Giveaway winners announced on all the blogs:

Little Heart Threads, Glitter in my Coffee, Michelle’s Creations, Mrs. Weaver’s Finest Unmentionables, Gracious Threads, Élégantine!, That’s Sew Venice, Sprouting Jubejube, Flying by the Seam of my Pants, Filles à Maman


Another Watson for Em

There is nothing so comfortable as a comfortable bra! Or in this case, a comfortable bralette. When a bra is comfortable, there is no feeling of can’t-wait-to-take-it-off. You really forget you have it on. That’s how Em was feeling. She kept telling me how much she loved her Watson, and that she didn’t get home from work and want to take it off right away. I’m so glad.

Em’s last Watson.

This was all just bits of this and that I had in my stash. Despite that, I think it turned out quite lovely.

Hints 

As well as telling me how much she loved it, there were all the hints of what her favorite colors are, that she’d love another one, this was all she wanted to wear…

I got the hints. I dropped a few myself, like you have to buy some materials if you want me to sew you bralettes. Still, I really enjoyed making her something she loved. So… I’m making another one to get my sewjo back.

  Sales

 B,Wear has recently had a few sales. The first one I was aware of was a 35% off sale. I took advantage and I bought some elastics. I’ve found elastics were always what I was seemed to run out of first because I wasn’t willing to unpick it all, especially triple-zigzag stitches!

Along with my elastics, this lovely lace came from Bodil’s B,Wear shop. I used this for Em’s Watson. It’s gorgeous.

I’m matching it up with black to make a striking combination. White lace cups and cradle, black band, straps and findings. Em did say black and white were her favorite color combination.

Other Plans

Originally, I was going to use some more ‘bits’ that were left over in my stash for another bralette. However, once I was sewing with these ‘bits’ I realized the material was terrible! My machine hated it, and I didn’t want to sew with it anymore. After fighting with it and my machine for the better part of a morning, there was one more part that just wasn’t right; I couldn’t face unpicking it again. I turfed it and it felt great!

This is a really thin Lycra material. I still had some leftover after cutting this out, but it’s in a give-away bag now. Someone else might love it, but not me. Not anymore. Along with this, two other very similar Lycra materials are leaving my stash too.

Em’s Second Watson

    Here’s Em’s Watson. I really love how this one turned out as well.

Oh, it’s so pretty. The black and white is so classic.

Here’s the side view: There was a lot of switching thread for this bralette. I only made one little mistake on the first color change. I went over the seam by a couple of stitches.

Other than that, I was quite pleased with all my switching back and forth.

Here’s the back of the bralette.

Seeing as I know this size fits her, I sewed the bow on already. I took advantage of the black and white color scheme to put a black bow on the front.

 Here’s a little tip for keeping these bows in place while getting it all under the presser foot – use a little bit of double-sided tape. You hardly need any, and it will wash away in the laundry, but it keeps it right where you want it until you sew it in place.

There’s only one thing I don’t love about this lovely bralette. The rings and sliders are one size too big. I don’t have any 3/8″ ones. Well, I did have a few but they were plastic, and I know plastic won’t survive being stepped on. (I never asked. I didn’t want to know.) The smallest size I have are 1/2″ ones, and as you can see, they’re a bit too big. I did try moving them, and they seem to stay in place quite well.

The most fun I have sewing for Em is hearing the exclamations coming from the other room when she’s trying something on: “It’s so cute!” I just don’t yell like that over any of my makes for myself. I might have a little more sewjo if I did.

The lace for this bralette came from B,Wear, the elastics from Bra-Makers Supply, the straps from Merckwaerdigh, and the power net from a new supplier to me – Club Tissus.

Happy creating!

Sewing Plans

I always have a long list of things I want to sew, and since my sewjo has taken a late-summer vacation, I’m organizing some of my plans. At least I still feel I’m doing something and making some progress this way.

Another Watson

Em has told me so many times that she loves the Watson I made her. She’s hinted she wants another one. She’s told me her favorite colors. She’s mentioned she wears the one she has all the time. So, I have one cut out for her in this adorable polka dot material. I think she’ll like this. 

You might recognize this material from a previous Watson I made.

I love this polka dot material.

A Camisole for Me

  I found this gorgeous cotton-silk blend. Oh, it’s sumptuous. That’s really the only way to describe it. To make this even better, I found it in the clearance section at my local fabric store. That was just a bonus!

I also found some lovely lace material. Together, it will make a very pretty camisole.

This being such lovely material, I may look at some actual lace I have too and decide then. I just need some sewjo again. 

A Handbag for a Friend

   A dear friend of mine has been living in the US for the past year. She saw my Canada 150 bag, and said she’d love one too. I don’t have any of the original fabric left, so found some that was perfect for her. Her hubby used to be a Mountie. I think she will really love this! 

Aren’t those Mounties adorable?

Drafting Ups and Downs

You know, sometimes, I fuss too much.

My fourth draft (second with Karin) only needed small adjustments. I don’t know why I simply didn’t make those small adjustments to the pattern. Instead I went back and re-drew everything. I didn’t get the same results.

As well, I ran out of duoplex from my stash. I still have a couple of kits, but I wasn’t going to cut into those. I had to take a break from my drafting.

On that day, with no bits of duoplex left, and a draft that wasn’t what I wanted, I was ready to throw in the towel. For the better part of the day, I was defeated. I was giving up. I couldn’t sew. I couldn’t draft. I might as well delete my blog. I’m sorry I wasted all our money. Blah. Blah. Blah.

That’s when my hubby came to my rescue – he calmly told me I was doing well. Look how far I’d come. Then he told me to go ahead and order some more duoplex to keep going. He is my hero.

Future Plans

 Well, I do plan to finish all of these projects, including sewing up that fourth drafted pattern with a few adjustments. As well, I have a Spring/Fall jacket I want to make, and a Agnes top with sleeves. I have the material for both of these as well.

All of these projects are just waiting for me to get my sewjo back. I hope my sewjo doesn’t take too long a vacation.

Happy creating!

The Fifth and Final Draft

This bra is my fifth and hopefully my final draft at this time. I hope it’s… well, I hope it’s perfect!

My Fifth Draft

  I really went back and forth before I sewed this bra – Should I sew it with the water-soluble (WS) thread, or just sew up a bra. If I use the WS thread, even if this bra is perfect, I will be re-sewing it. I really didn’t want to do that. I just want to sew a bra. However, I finally decided to just sew up it as another tester with the WS thread.

This looks better than the other two, but you can see it’s still not finished as nicely as a bra I want to keep.

A wonderful little tip I heard after I’d sewn my first bra with WS thread is to use the thread in the needle only, and regular thread in the bobbin. Water will still dissolve the upper thread, and the seam will come apart just fine. I’ve also heard to just dab the seam with water, which would save a lot of the drying time, and ironing.

Changes

 My band was a bit too big. Well, an inch too big to be exact. I’d recently lost a little bit of weight, and of course my ribs being one of the smallest parts of my body, that was where it showed first.

So before I sewed up another bra, I re-drafted the pattern for my cradle and band with my new measurements. I didn’t mind re-doing it all either. I really want to get drafting down pat, so a little extra practice isn’t a bad thing as far as I’m concerned.

 More

I re-drafted the pattern for my cups, again too – just for more practice. In fact, I spent the better part of a day drafting over and over. I made three drafts of both the cups, and the cradle and band by time the day was done. 

One other change I made while I was re-drafting my cup pattern was to lower my strap placement.

In addition to the changes I’ve mentioned above, I made my usual adjustments: a custom bridge, lowering the upper cup to meet the bridge, and adjusting for a flat spot.

One thing I’m not having to adjust is the difference between my cup and cradle caused by being an Omega shape. Let me tell you what I’m doing differently.

A Different Change

I’d heard before that you can go up or down one size in the cradle from the wire size you’re using. So if you’re using a 40 wire, you can use a cradle made for a 38, 40, or 42 wire.

It’s the same if you’re using a 40 cradle – you can use a 38, 40, or 42 wire. You can go up or down one size.

I’m doing that with my drafting. I’m using a 42 extra-long wire to draft my cradle – that’s one size bigger than the wire I normally use. It just happens to be the same length as the wire my cup size normally uses. Does that all make sense?Do you see how the 42 Extra Long wire is the same length as the 44 Long wire? My cup size matches a 44 Long wire. I normally wear a 40 Long wire. Using a 42 Extra Long wire to draft my cradle size, I’m able to make my cradle match my cup size perfectly.

The Conclusion?

 Somehow the band is still a bit too big! I’m having to fasten it on the middle eyes, but that’s a small adjustment. As well, when I lowered my strap placement, I achieved a bit more Va-va-voom than I want. A few tweaks to my pattern and I’m sewing up a real bra next!

Happy creating!

A Fourth Draft

This is my fourth draft in all, and my second draft with some help from the amazing Karin, of Braphoria & Mrs. Weaver’s Finest Unmentionables renown.

 For this draft, I re-used the band, cradle and straps. I only had to cut the cups out again. I really recommend using the water-soluble thread for something like sewing a draft or muslin. Here are all my ‘bits’ after soaking them and letting them dry – just a quick low-temp press and they were ready to go again.The Fourth Draft

 Here’s my draft: 

This is pretty much spot on. The band is still a touch too big, but when I pull it in tighter, everything looks good.

You might notice this bra looks a little more finished than the last one. I just couldn’t stand what a mess that bra was. I had to do this one a little better; finish a few more bits to make it look neater rather than it all looking like it was falling apart.

Here’s a side-by-side of this one and the last one:You can see the cups are a little more rounded over the apex, and the bridge is a little lower.

Even though this draft isn’t as messy as that third one, it still has its messy parts. Just take a look:


The channeling isn’t finished, the elastic isn’t finished under the cups, threads aren’t cut, and bits of elastic are peeking out here and there.

Adjustments

So if it’s pretty good as it is, then what adjustments do I still want to make? Well, I feel the bridge could be a smidge lower. Not a lot, but maybe another 1/4″.

As I mentioned above, I need to take the band in a little more. That’s it.

Frankenbra

With the bridge being pushed out at the top, I was wondering if I needed more room in the cups or if it was just my bridge too high for me. So, to see better what was going on, I cut open the seams to see if it was more room in the cups that I needed. It turns out, I didn’t need to do that. The band not being tight enough wasn’t giving me enough pull or splay on my wires. When I pulled on my band, everything settled where it needs to go… except the very top of the bridge.

So, I’m making one more muslin or draft. I’m really wanting to make a nice bra I can wear. I’m trying to decide if I will or if I’ll just make another muslin. I’m really going back and forth as to whether I’ll make another draft, or seeing as it’s so close and these are just little details, I’ll just make a bra I can wear. I’m leaning towards making one I can wear.

Thoughtful Gift

 My hubby is very supportive of my bra-making journey. He was there when I would come home crying after trying on every bra in a store, and still not find one that fit. Then I found specialty stores, and how could a bra cost $150 or more? He has been there through it all. Although he couldn’t understand all the whys or hows, he witnessed it.

The first year I started making bras, my DH bought me the first Bra-Makers Manual for Christmas. The following Spring, he bought me the 2nd Manual. With my drafting underway, he just bought me a wonderful third resource:

 Such a thoughtful gift.

Happy creating!

A Few Alterations

My third bra draft was pretty good. In fact, it would have been wearable except I used water-soluble thread. That little fact alone would make it good for one wearing only. Well, the water-soluble thread and the fact that it was slapped together…

It fit pretty well. That’s what I’m really trying to say here.

There were only a couple of changes I still wanted to make to this. I wanted to add a bit to the underarm area for more coverage there – just a half-inch. I wanted to round the cups a touch at the apex. And I wanted to lower the bridge a half-inch as well.

Changes

While I was making those couple of changes I listed above, I decided to change the style of the bra too. I added a power bar. So  now it’s the same style as the Pin-up Girls Shelley pattern with a split lower cup and a power bar. Shelley has been my favorite pattern, so it only makes sense I make something like that. 

Making these changes were such much easier than the actual drafting of the cups. That was much more of a challenge.

 Leftovers

After soaking my bra, all the threads dissolved, and I was left with bits again. This is great as I can re-use most of these bits. It’s just the cups I need to cut fresh. I found the band too big as well, so have adjusted that. It’s all ready to go for a second sew. 

Stay tuned for my bra-drafting. I’m hoping only one more draft and I’m cutting into some gorgeous lace again.

Seize the Day

Remember how I couldn’t put a bow on Em’s Watson because she didn’t want to take it off once she’d tried it on? Well, I had my chance. The circumstances surrounding this? Well, I don’t want to know. I do know the bralette was on the floor and got stepped on… That was already more than I wanted to know.

It seems little plastic rings can’t withstand being stepped on. I had to repair the bra. I replaced the rings and sliders with metal ones from a little second-hand bra I bought. I also added the bow! I had no intention of missing that opportunity.

Happy creating!