Have you ever made the famed Turducken? I’ve cooked it a few times. Twice after purchasing it with all the work done. And twice I’ve made it as a ‘roll’.
I do have a recipe to make it myself. In fact, I’ve had the recipe for 20+ years. However, I’ve yet to get brave enough to debone all these birds on my own. You can find Paul Prudhomme’s recipe here.
Just recently, I purchased another prepared Turducken and the meat to make a roll, all for our dinner group. Our theme this month was Out of This World, and was inspired by a genealogy find: The name Picard. Just like the captain of the Enterprise on Star Trek.
To start our dinner, I set a pretty Fall table. Then it was time to cook.
I didn’t get a photo of the Turducken before it went in the oven, but did remember to take a photo of my ‘roll’. It looked even better when it came out of the oven. Except that little pale spot? The duck skin I’d put on top stuck to the lid!
 And here’s the Turducken when it came out of the oven.
 The Duck meat created so much juice. I poured it off into a jar and almost half of it was fat! I put that in the fridge for the fat to harden up and I’ll throw the fat away. My hubby will get some nice soup with the broth that’s left over.
Here’s the Turducken browned up a little more, and ready to be carved. And my Turducken roll browned up, and carved.
 I wasn’t the only one to brought an out of the world dish to our dinner.
My friend, Jan, brought a dish that I’ve never seen or heard of before. Meat Fruit. It took her four days to make it! These looked amazing. Unfortunately, I couldn’t have any, but enjoyed watching Jan’s joy as everyone else dove into them.
 To round out our dinner, our shepherdess friend brought Shepherd’s pie, with meat from her own flock.
 It was a great dinner, and there are lots of Turducken leftovers.
Happy creating!
 I even have a couple of kits with strap lace in my stash. You know those kits that you save for someday. The strap lace is similar to what’s shown below on this gorgeous bra.
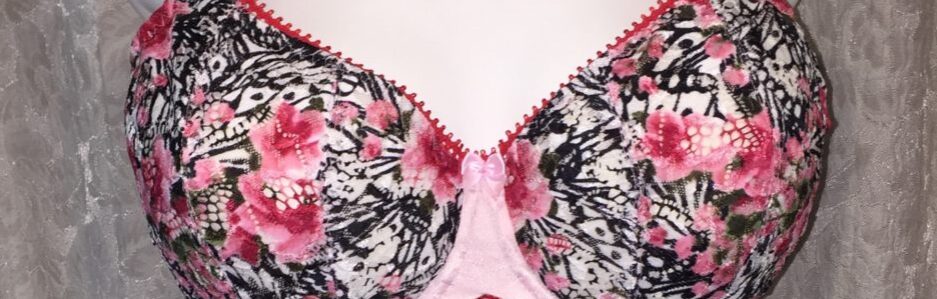
 Just look at these straps from a favorite RTW bra, the Prima Donna Milady. Those little bits of heart lace are adorable. I have some similar bits in kits from Kantje Boord. In fact, I bought the kit for the strap lace.
 This is a gorgeous left & right mirrored lace. It was my first time using anything like this, and it was fun. I chose beige duoplex for my frame because there was some pretty floral detail in beige too. I tried it with brown, but that was just too dark.
 To reinforce them, I’ve used sheer cup lining to make narrow tubes behind this strap lace. It worked perfectly.
 I’ve used the lower edge of the lace with just a little bit of the embroidery on it for the lower cup pieces.
 Lastly, I cut out a tiny floral from some of the remaining embroidered lace and used that instead of a bow on the center front.
 Have you used a kit with strap lace before? I really enjoyed it and want another kit now.
 This is a lovely coral and silver lace, with coral sheer cup lining, coral stretch mesh, and some coral findings. As well, it has small silver strap elastic, and silver upper cup elastic.
 Does anyone else feel a little geeky about how excited they get over lace, or findings? I hope I’m not alone, because I really did get excited about these.
 Didn’t they take color beautifully? I really am seeing why so many others have started to dye their findings or lace to make the exact colors they want.
 Look at that glaringly white bow. It didn’t take any color at all. It must not be polyester like the other findings. It’s a good thing the kit from Kantje Boord came with three little silver grey bows.
 Perfection!
 This is the lovely Ruby pattern. The cups are all lace with sheer cup lining behind the lace. That lining is not my sheer though. You can’t actually see the sheer part of my bra from the front.
 I’ve used this awesome burnout material for the band. It’s a little bit lighter than regular power net, but I couldn’t resist it. And it’s a fun little detail to make the sheer detail part of the band.
 I love this material. This was a purchase from a few years ago from Merckwaerdigh’s Etsy store.
 Oh, I love this material! I think a whole bra in this would look amazing.
 From left to right we have Tracy, Jess, and Em.
 I also hot glued the saucer to the cup to make it one unit rather than two pieces. It’ll make it easier seeing as no one is trying to drink out of it.
 And here’s Jess enjoying the scent of her homemade candle.
 I made a sweet little lemon-scented uncolored candle in this little votive holder.
 I also made a lovely pink candle in one of my husband’s grandmother’s tea cups.
 We all had fun, and made as many candles as we wanted. I had a 12-case of jars and only one or two had already been used. So we have lots of options each.
 Em also made a bunch of heart-shaped candle melts. Unfortunately, when she was removing them from the mould, both of mine split in half. Being as creative as she is, Em had a solution. She used hot wax to glue them back together.
 It was a really fun evening, and we’re already planning another evening. I think we should start our Christmas baking soon.
 This lovely lace is from Libelle Sewing. Everything else was in my stash.
 I brought the back straps in a bit because my friend is petite, however, they still look wide on the display. I’ll have to see how they are on her.
 I hope it fits perfectly. I haven’t had a problem with sizing for the Watson before, so here’s hoping for one more perfect fit.
 For my July entry, it was back to the drawing board in terms of design, and pattern. I just didn’t feel like I wanted a second swimsuit right now, so I asked Em if she wanted one. YES! Yes.
 It’s pretty adorable. But it’s also too small. I’ve never made this pattern before, and I’d need to size up the bottoms for sure. Sadly, they won’t fit Em, and they won’t even fit on my display.
 The front of the Marsha pattern has some adorable features too. A fabric twist at the center front.
 I’m sad this is too small, but am glad I tried this challenge and learned a few new things.
 Here’s my second pair.
 I moved this seam only because I wanted it a little further forward. I could move it forward still, but really, I’m just playing with the seam at this point.
 Happy creating!
 This turned out to be very pretty. Of course, there are still a few changes I want to make, but this fits so well. All the adjustments I learned are making this my best fitting bra yet.
 I also lowered my bridge, and raised the bottom of the bridge, and widened the bottom of the bridge too. And added the Gothic arch.
 I’ve moved the strap placement over on this pattern. One of the things I love about the Ruby pattern is I don’t have to pull so very much all along the underarm with my elastic. Just a little pulling and it fits well.
 Here’s the side view. Look how nicely the cup is fitting into the frame. Oh, I’ve said it before, and I’ll say it again. I’ll never get tired of seeing how nicely the cups fit in after taking that class with Jeanette.
 The final adjustment I made was to move the straps in on the back.
 Seeing as the bra has white in the lace, I thought white lace trim would be perfect for these panties.
 These are my self-drafted Hipster panties, and you might notice the side seam is forward a little. That’s just so all my side seams aren’t hitting all at the same place.
 And the back.
 It’s been a long time since I was a bride, but I love my new blushing bridal set.