A Few Accomplishments!

My husband and I went away last week for our 22nd anniversary. We found a wonderful deal at Christmas time and bought it and put it away for ourselves. We only live 4 hours from the Rocky Mountains, and it’s our favorite vacation spot. Our suite had a tremendous view! Just look at this:

View from Windtower Rm 234

This was the view from the kitchen patio door. I could just sit and look out at that. We spent 4 days with that view, and although there was still snow on the ground, and we even woke up to snow one morning, it was still perfect!

I took a few projects on my trip that I wanted to complete while I was there. One project was to complete the measurements for a bodice sloper. That’s not a big deal, but for some reason those last few measurements just weren’t getting done. They’re done now, so I can work on that.

Another project was fingerless gloves. I was determined to get them done. (I know, Andrea, it’s a bit late in the season.) I’d looked at many patterns, and finally settled on one I found on Ravelry. These are based on the Vanilla Frappe Fingerless Gloves. You can find the pattern here.

I really liked the ‘body’ part of this pattern, and decided to do just that, with a scallop border on the top and bottom. The body is knit; I crocheted the borders, so mine look different than the originals, but I’m happy with them.

fingerless glove 2

I’ve sewn one, and one waiting to be sewn up.

fingerless glove 1

The ball of white yarn is to do some flowers or hearts or some type of embellishment.

So two projects done. I also took my sewing kit to tighten a button on my coat, but that’s still on my to-do list.

And when I got back I had one more accomplishment!

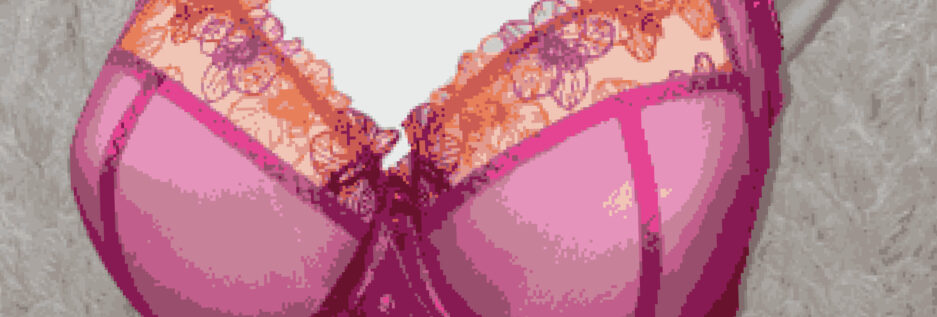
I worked on another bra. I knew the area that needed work – the bridge – so I tackled that as soon as I got home. And another success! I have the best fit I’ve tried for yet! Let me tell you, if you’ve never had a properly fitting bra – one where the bridge goes all the way back to the chest wall – well, it’s a different feeling. I’ve never felt that. It’s not uncomfortable, but it is different for me.

plunge bra prototype

When I started this bra, I have to admit, I wasn’t feeling super encouraged. It feels like there have been too many challenges along the way that left me less than hopeful. I even skipped some of the little finishing details on this bra – finishing details that made it onto all the other attempts I’d made. However, this one only needs minor tweaking. That has me excited!

One of those minor tweaks? The bridge can still come up about 1/4″. But that’s it’s. So now I need to look at plunge styles. I haven’t seen a lot of patterns for plunge bras. Does anyone know of any?

For this bra, I took my Sewy Rebecca pattern and made it into a Classic pattern. I also straightened the lower edge of the upper cup to get the most lift. I decided not to do a three or four piece cup on this so it would sew up more quickly, and also I don’t see a lot of plunge bras that have those features. So, once I had a basic Classic pattern, I used my trusty Bra Makers Manual to change the cup shape to a plunge style, or ‘fake’ demi-style.

plunge back 2

A very basic back, with the Prima Donna U-shaped back. I don’t think they’re the only ones doing this now, but I do remember them advertising this feature.

So a few little glitches I ran into while sewing this? You can see in the above picture that the back band is a bit smaller than the hook and eye closures. That’s a small adjustment. You can see it better here:

plunge back

That’s not a big deal – just a small tweak.

Another small tweak is the lower cup. I still have to make adjustments for the Omega shape, and need to fit a larger cup into a smaller wire. On this bra, (again) I didn’t put a lot of effort into it. So when it came time to fit the cup, I simply put a fold in the lower cup’s material. The cup still fits fine, and the seam line fit as well. I have altered the pattern with a dart to take out that excess on the next one I do.

plunge bra dart

You can see the tuck here. It shows more here than when I’m wearing it.

Bow to cover seam

Lastly, a tweak to make is my order of sewing if I do this style again. On this bra I had the cups sewn into the cradle and then looked and I still had to add the neckline trim. On a style like this, I think it would be better to do that before putting the cups into the bra. It works fine, but would be neater sewn the other way.

So, I’m very happy to say I’ve had SUCCESS! It feels really good to know I’m there with just a few minor tweaks now. Whew! I said a long time ago that I hoped my journey would encourage someone else not to give up! How long has it taken me?

Here’s to happy & successful creating!

Will It Ever Stop Snowing? And Other Greats!

I saw a cute video by Rick Mercer, a Canadian comedian, which depicts how I feel so well:

Yes, that is the sad state many Canadians are in right now. We’re just hoping for warmer weather, and … well, it’s snowing right now. Sigh. So much for the calendar saying Spring.

I’ll happily stay indoors today and work on my pattern, right? Sigh, the pattern. Okay, I’m going to focus on the positives and deal with the challenges next.

I got the short wires from Bra Makers Supply. I’m was hoping for the same length on the side, and shorter at the front to accommodate the lower bridge. Great! But nope, those didn’t work the way I wanted them to – too short on the side. I think I still want the Vertical wires, I’ll follow Amy’s suggestions on her blog (Cloth Habit) for shortening them.

With newly shortened Vertical wires in hand, I got out my Bra Makers Manual and drew a new bridge & cradle for these new wires. Another great! But, I’m not done with this topic yet. More to follow…

Then I decided to make sure my custom bridge really was the best fit I could get. An article from Threads that talks about making a Duct Tape Sloper was my inspiration. I decided to follow the same principle and use multiple layers of tape to make a ‘sloper’ for my bridge. That worked well too. And then I checked it against the custom bridge I’d made. It is almost exactly the same as what I’d done when I followed the instructions in Norma’s book, Demystifying Bra Fitting and Construction. So I have my correct bridge shape. Great!

full bridge

Here’s my little tape sloper. I didn’t continue the sloper past the marker – that wasn’t the problem area, so I focused on the middle of the bridge. The rest of the wire was fitting fine. But that area…

Well, a picture is worth a thousand words, so here is the difference between my little tape sloper and the newly drafted cradle pattern. Yes, there is a problem.

cradle issue

Do you see that area at the front of the cradle where the bridge is? It’s nice and round. I don’t match. So, what to do about that?

I have asked that question before, and didn’t get an answer that was satisfactory. I was told by one person there was nothing to be done about that. But that’s an important very supportive area, and it does need to fit. So, I re-drew the cradle with the custom bridge in place of the bridge here.

Back to those shortened wires. Oh my! I will tell you, shortening them is not a problem. However, covering that rough edge is! I read Amy post, and decided to follow her suggestions for using Plasti-Dip. There was no variety of colors, in fact I had my choice of red or black. That was it.

So with red Plasti-Dip in hand, I came home and dipped my newly cut and filed wires. I let them dry overnight even. They looked great! And then came that magical moment when I went to insert them into the bra channel. I should have taken a picture… I inserted the newly rubberized end of the wire into the channel and pushed, and pushed and pushed. Then I did what I’m sure 99% of married women do when they can’t do something physically — I called my husband. ‘Honey can you help me?’ He pushed and pushed. And then looked at me and said that’s not going anywhere.

It seems Plasti-Dip is a rubber coating. Rubbery is not what I was expecting. I’ve been to every hardware store in 3 towns and no one has anything other than the rubber coating-type Plasti-Dip. Well, that didn’t work.

I have read about others using Goop, but I don’t think that is a preferred method. I bought some heat-shrink tubing and will try that. I’ve said this before, and it’s still true… I’m close.

Happy Creating!

I Tried a Custom Bridge Already

I kept thinking about how to alter the bra pattern sitting on my desk so the bridge would fit and go right back to the chest wall. Last year I spoke with the staff at Bra Makers Supply, and they’d suggested I lower the bridge if it wasn’t going all the way back. That really helped. So that was one of the things I’d done on the custom bridge I made as well as a couple of other changes.

And some of the ideas I was thinking about to alter the bridge, like narrowing the top of the bridge but keeping it a normal width at the bottom, were the same alterations I’d done using Norma‘s book: Demystifying Bra Fitting And Construction. I had no desire to go back down that road again, trying to re-invent this, especially as all the changes I was thinking of were the same as before.

I decided to look at what I’d done last year when I made a custom bridge. I have a bag of bras I’ve made, and they are put into the bag when I’m not completely happy, or I deem them ‘unwearable’. It’s like the Bag of Bra Shame! I’ve kept them all so I can use parts like wires, rings & sliders , hooks & eyes again. So I dug out the bag, and pulled out the bra on which I’d done the custom bridge.

IMAGE_046

I didn’t even finish this completely. The channeling didn’t get sewn down. No little bows to cover up the seams at the straps. Poor little Ivory Shelley. When I made this, I was disappointed in not getting the fit just right (again), and I stuffed it into what seemed to be an ever-filling Bra Bag.

This morning I tried it on again, and there are a few minor adjustments to be made but it does fit pretty well. The bridge works just like it should. It goes all the way back. So I thought some more about what I didn’t like about this bra.

I decided to look at the wires. I originally had put in 38s, then 40s, (my original bra pattern changed shape a bit when I altered the bridge, and the original wires didn’t fit properly.) and although I’d been told I wasn’t likely a smaller wire size, I decided to try one. I had a couple of 38 Vertical wires, which correspond to a 36 wire. It worked out quite well that I hadn’t finished that channeling.

And… drum roll please. It fits! The wires aren’t too tight. I am amazed! In one little experiment, I may have taken care of all my fitting challenges I couldn’t figure out. I’ve had this little Ivory beauty on all day and it’s more comfortable than any of the $200 bras I own.

I am so excited! It’s drafting time again. Now with the bridge problem fixed and past adjustments to the patterns, I’m ready to make something that fits PERFECTLY!

Happy creating!

Changes in the Wind

I’ve posted many photos of jewelry I’ve made recently in the classes I teach. I’ve really enjoyed taking people through the steps of making each project. I’ve also really enjoyed seeing them learn and make their own creations. However, all this is about to change, and I’m not sure I like the changes being proposed. It seems, in the classroom, I will no longer be making jewelry. Going forward I am expected to explain how to make jewelry using large photos which illustrate it. I’m not fond of this change and am thinking a change in employment will be coming soon.

Another change I experienced this past week was to lose my Lifestyle Coach. She’s no longer working with my physician, so no longer available to me. She helped me through a really rough health patch a few years ago, and I’ve been with her for 6 years. I will really miss her. As I was leaving the office and giving her a hug goodbye, she commented on the abstract poinsettia brooch I had on my coat. I took it off and gave it to her without a second thought.

I have no regrets about giving a gift to a friend, however, my coat now looked quite plain. So I pulled out my felt again, and sat and came up with a couple felt brooches to dress up my coat. I find hand-sewing to be very relaxing.

I’ll count this as part of a commitment I made to myself to make (at least) one project each month. I am on track for that with these, but it’s still early in March, so I plan to get something else sewn up. Hopefully I’ll resolve that bra alteration in my mind and get that off my desk and sewn up!

Here’s the first felt brooch I made. Quite similar to the other abstract poinsettia brooch, but this time I used some deep red with a black polka dot on it. It’s really charming felt.

red polka dot brooch

This one came off my coat for the photo shoot here.

The next one is very similar, but I changed the shape a little. I wanted it a more uniform shape.

pink zebra brooch

I LOVE this felt! It is so fun and flirty.

And the last one I changed the design again.

leopard print brooch

I had fun with all of these, and really do enjoy sitting down and doing some hand-sewing. I bought some Swarovski Hot Fix crystals and I’m going to add some bling to these.

Something helpful I’ve realized about myself while writing this blog is I really like to think things through before I decide to do anything. I don’t think I realized how much internal discussion I had with myself before making a decision. For example, I’m still contemplating the bridge on that bra alteration. I’ve even re-drawn it but am still contemplating it.  And I’m not ready to start cutting fabric on that project yet.

What’s next on my project list? Well, I do want to continue with the two sloper classes I’ve signed up for on Craftsy, and tomorrow I’m heading over to a friend’s to help her with a sloper too. Seems like slopers are next. And that bridge. I will get them done!

Happy creating!

A Few Projects, Lots of Coughing

After my wonderful trip to the mountains a few weeks ago, I came down with the worst cold I can remember. And I coughed so much my ribs were hurting! I’m finally feeling a bit better and getting at some new projects.

But first, let me share a cute moment from our trip. One of the highlights my husband and I enjoy about going to the mountains is seeing the wildlife there. This trip we saw a few deer, coyotes, and bunnies. Yes, bunnies. At some point in the not too distant past, someone thought it would be a good idea to let domestic bunnies loose in Canmore. Well, it’s not uncommon to see the little furry guys hopping all over the town. But back to my dear husband. He kept saying he wanted to see bears. I reminded him, bears hibernate, but he still kept saying he wanted to see them. On our last day in the mountains, we were driving around and at the top of a road near the Banff Springs we came across this adorable family of bears!

Banff Bears

This made my honey’s trip! He got his bears.

As for me, other than coughing this past week, I did get my scarf done. I love it. I really mentally debated how to finish the outside part. And I actually knit up the better part of a ball of wool in a seed stitch. But I kept thinking with the straight border on either side, the overlapping edges of the middle part would give it a clear front and back side. And I didn’t want that. So, I abandoned the seed stitch and sat (and coughed) and tried to think of something else to give me that black border that looked so nice. I decided just to do some crochet all around the edges and I really like the result.

Red & Black Scarf

I love the contrast between the variegated red and the black. The black wool is 100% Merino.

close up scarf

Hmm. Although I’m using my camera again, and editing my photos. I still don’t love the quality. However, this does show that variegation better. It goes from pale reds to really deep burgundies. Just lovely colors.

And I’ve also been mulling over what changes I’d have to make to my Fantasie Vivienne clone. I knew a few changes I wanted to make. A narrower bridge, and lower too. And seeing as my wires are shorter than the professional wires, I’d need to adjust the side’s height as well. I was also trying to figure out how to adjust the cradle and use my correct wire size which is one size smaller than what was in the original.

So I started that too. No cutting out yet. Just figuring out all the changes. So let’s look at that first one. Narrowing the bridge won’t affect anything else very much. But lowering it will. I had to adjust the upper cup accordingly. Same with lower the side. I adjusted the side panel and then the band. And lastly, the cradle. I was having a little trouble figuring out how to adjust for one size of wires. Would I have to re-draw the whole cradle using the wires as a starting point? I decided to take a 1/4″ out and eyeballing it, it looked good. There’s still some splay room for the wires, so all should work out okay.

bra project

Here are my re-drawn pattern pieces with the adjustments made, my bra kit from Bra Makers Supply in a pretty black with pink detail in the lace, and the picture of the original bra as a reference. I’m thinking with the changes to the bridge I’m making, it may end up looking more like their plunge bra.

plungenon plunge

Here they are for comparison. I’ll have to see if this is more along the lines of what mine ends up looking like.

Happy creating!

Another Clone Finished

There were just too many blog posts where I hadn’t finished the bra clone I started. So… I finished it!

100_2042

Here’s my Prima Donna Duchess clone. She turned out really nice. A few minor bumps on the road, but still very nice. I wore this bra on my recent mini-vacation to the mountains and I was very comfortable in it – more so than the original.

One of the things I did was make an ‘exact’ clone of the bra, right down to the wires. I used wires I’d had from an old Prima Donna. I’ve found most RTW bras have longer wires than what I use. They must be extra long, because I buy long wires. I don’t really prefer these longer ones, but didn’t want to do any alterations on this. The only thing still missing is sewing a little crystal & bow on the bridge.

One of the bumps I had was I didn’t have enough channeling in the kit I’d bought! This was a kit from I purchased before they closed. I was surprised there wasn’t enough, but was determined I’d get this done. I didn’t want to use any channeling from any of the other kits I have either, so I used a single bit I had left over from a past bra. I have BAGS of bits and it came in handy.

100_2047

Here’s the inside of one cup showing the beige channeling. This also shows the seam in the lining. I really like that extra seam for the support it adds to the lower cup.

100_2046

And here’s the black channeling. I didn’t have any beige bits! However, I decided this won’t bother me because I’m the only one who will see this – at least when I wearing it every day. Anyone reading this now knows my bra doesn’t have matching channeling!

100_2043

I did like this shiny Lycra that was part of the kit, but didn’t find it really strong, so I lined it with power net. I had a small piece of black (again) and used that. What I ended up with is a really nice supportive band. I like the double material. It feels very comfortable. And it’s not the first time I’ve used it. I did a few bras with Lycra and lined them so they were doubled. Very comfortable.

100_2048

Here you can see the black inside. The only draw-back to this, which I didn’t anticipate is it makes it a little less forgiving when wearing. The original fits snugly, and this fits a bit too snugly now. So I use an adapter so I have that extra set of eyes I need. If I make this again I’ll add 1/8 – 1/4″ to each side of the band to make up adding that second layer of material.

I would have loved to match the lace so it was perfectly symmetrical on both cups, but didn’t have enough for that. Maybe on a future bra.

And the straps were a bit different this time. One these straps I did the lower piece which is covering the edge of the band and ends up enclosed in the hooks & eyes. And then only a one strap piece above that. Previously I had used two pieces above that. It took a little while of looking at it to figure out what I needed to do. I had already sewn the bra straps to the front of the bra, so picked out the stitching. Then I made the strap starting at the back. I put on the slider, then after that was sewn, I ran it through the loop on the top of the band. Then it could be attached at the front. This was how it was done on the original, so I tried this and I think I prefer it. So the last things I sewed together were the straps to the front.

There. Whew. This clone is no longer sitting on my sewing desk waiting for me to finish it. What a relief!

Happy creating!

Jewelry and a Pareo

I bought a new bathing suit for an upcoming 3-day conference & hotel stay my hubby and I are going on.  He loves to hot tub, and I rarely join him, but decided I’d at least sit by the pool this time and keep him company. But sitting around in a bathing suit isn’t the most comfortable for me. I like to be a little more covered up. Maybe if I lived in the tropics I’d feel differently, but this Canadian girl likes to stay warm! A pareo wasn’t offered with the swim suit, so it was up to me to come up with something. There’s always basic black, but I only wanted to use that as a last resort. I was really wanting something that would go with the suit. Here’s what I found:

100_2025

I’m really pleased with how well these go together. Are they a perfect match? No. But there are similar elements and colors; enough so I will be wearing this on our up-coming trip – at least by the pool. The material is a knit, and I simply cut out a rectangle and did an overcast stitch around the edges. I also decided to use the material with the pattern running length-wise down my body. I’m not the tallest, and thought this would be more flattering than a wide horizontal pattern going across me.

Onto jewelry now. My classes have been filling up the last few weeks; I had five students this week in one class. That was my biggest yet. I made a few things and this time I LOVE the colors. A while back I made a blue and gold necklace, and really liked those colors together, so decided to do something in those colors.

Here’s the first piece of jewelry I made – a memory wire bracelet, and then an elastic bracelet.

100_2028

These bracelets feature dyed Imperial Jasper beads, Aqua & gold glass beads, and golden glass beads. I love it! I think I wore it every day last week. The elastic bracelet has the same beads in it.

100_2037

Then I had a Crimping class and used those same beads to make this necklace. Well, I was wearing the two items for a few days when I decided to be all matchy-matchy and made a pair of earring too! This picture is nice and close so you can see the three beads really well.

100_2041

And to really put the matchy-matchy over the top, I made a Medical ID bracelet to boot.

100_2040

So I think I’m good now with the matching Imperial Jasper. I did make one other piece of jewelry in my class this week. While waiting for my students to finish their projects, I put together an eye-glasses holder/chain.

100_2039

Completely different beads this time! Well, almost completely different. I still used Jasper, but this time undyed. And I used white, pale pink and pale grey pearls in-between.

It was a big jewelry week, but I love what I made. And am really pleased with the pareo. Still unfinished on my desk: the Prima Donna Duchess cloned bra. I have no big desire to finish it, but am determined to clean my desk off so will set a deadline for myself. Next post I will have it done!

Happy creating!

Happy Australia Day and More

I’ll start this post by wishing any and all Australian readers and friends a Happy Australia Day! My husband and I are part of the Australian Wine Club here in our town, and although I don’t drink, we have wonderful get-togethers and I enjoy them very much. We just celebrated Australia Day together and just look at our menu:

Pan Seared Chilean Sea Bass topped with Grape Tomato salsa, bedded with braised fennel

Wild Boar Consomme with Julienne green onion cake

Duck leg Confit & Port Belly, dried cranberry Saskatoon glace de viande, garlic asparagus & dilled baby carrots, and Potato & Yam pie

Sticky Date Pudding and Anzac biscuits.

It was delicious! We have such fun with our group.

But back to sewing and other crafts.

I completed my first-ever self-made pattern and sewed up the skirt. I mentioned previously the class Design and Sew an A-Line Skirt on Craftsy. Would I recommend the class? Well, I’m divided on this one.

In other classes I’ve taken on Craftsy the instructor has been great at getting back to anyone with a question. I can’t say the same on this one. I have contacted Craftsy about this, and they’ve been great, but my questions remained unanswered. That right there is why I don’t know I could recommend the class 100%

I did learn the basics of how to draft a skirt pattern myself, and how to do some basic alterations as well. I’ll be taking another go at it too, as this one sits too low for my liking. The instructor suggested a lower-sitting skirt as that’s more in fashion right now, but I’m not completely comfortable in it.

skirt

Here it is on me. It’s sitting about 2-inches below my natural waist. A pretty good fit though. So for that reason, I would recommend the class.

invisible zipper

And I’m thrilled with the invisible zipper here. Great instruction on that part.

I did use a longer zipper and shorten it. Thanks to Threads, I was able to do that easily. I found out an invisible zipper can only be shortened from the bottom. Threads is such a great resource! You can read about how to shorten a zipper here.

So will I recommend the class? I guess I will with one caveat. If you run into problems and ask questions, I don’t know if you’ll get an answer there.

Happy creating!

Conquering Crochet

I’ve been having a struggle with my thoughts. As a teen I learned to crochet and knit, but by time my 20s came around, I was only knitting. I’d crocheted more than one afghan as gifts, but for whatever reason didn’t keep up with it.

Well, because it’s been so long since I’ve crocheted, I don’t really feel like I can crochet. So I’ve been challenging myself to pick it up again and overcome this thought that I can’t do it.

Scarf

Buying this pattern was my ‘jump’ back into crochet. I bought the pattern on Ravelry, and although it looked so beautiful, and I spent way more on wool than I’ll ever admit to my husband, I could not get the pattern to work. I tried numerous times.

One time was rather funny. My husband came into the room just as I was tearing out the work I’d done and the look on his face! He looked horrified. I had to assure him I could do this over and over it nothing was harmed in the tearing out.

But this pattern really frustrated me because no matter what I did, and I tried a few variations, I could not get the same look. It wasn’t encouraging to me.

I met with my friend, Valerie of Intricate Knits, and took my pattern & wool to her to see if she could figure out the pattern. She couldn’t get it either. She said she could probably take a lot of time and figure it out and re-write it but it just wasn’t worth the time.

This past year we got a PVR and I search for craft shows, well sewing, knitting, crochet and jewelry shows primarily, and record them. Just a few days after meeting with Valerie I was watching Knit & Crochet Now. I was so surprised to see them showing this pattern:

4-213-crochet-scarf-2

This is close to the original center crochet pattern, but after looking at it and reading it, and contemplating it, I decided it was too ‘thin’ looking for what I wanted. So I started searching again. However, it is a beautiful pattern, and I will add it to my pattern stash. Here is the scarf pattern on Knit & Crochet Now: Madena Lace Scarf.

So, next was to find a pattern I really did like, I felt I could do, and would make me happy replacing the original pattern. After some searching on the net, I found a wonderful tutorial with nice clear pictures to explain any changes in the pattern she’d made. Here’s her blog site with this pattern & tutorial. It was great! Easy to follow and I’m so pleased with how it turned out. Perfect for replacing that original crochet part of the pattern.

red crochet pattern

My ‘camera’ (phone) doesn’t do this justice. It’s a beautiful rich variegated red going from vibrant reds to deep burgundies and pale blushes. The wool is a blend of Merino, Cashmere and Nylon. It’s wonderful to work with, and to feel. So nice!

I’ll have the knit part done this week and sew the scarf together.

Happy Creating! And I encourage you to do something you don’t think you can!

Not So Much Sewing

I did a lot of sitting this past week. I hurt my knee just over a week ago and it started to get better and then I did too much. I drive a standard car, so all that shifting was too much for my knee. So this past week I did a lot of sitting and with my leg up and doing my best not to hurt it again. I’m able to go up and down stairs again with only the littlest bit of a twinge in the knee, so I’m almost there.

My muslin did get done though. And so did my A-Line skirt pattern.

a line skirt pattern

Pretty basic, just like an A-Line skirt should be. It looks a little off in the picture, but isn’t when it’s sewn up. Not sure why it looks this way.

I was having some trouble ‘squaring’ the pattern at the top where the waist and side seam meet. Seems there was just too much of a difference between my hip & waist to get a 90 degree angle on the pattern. So I raised where the hip line sat by about 4 inches so the curve is much less than it was, and also took the waist out by 1/2-inch to decrease that angle some more. This worked for the pattern, but when I put the darts in…

Well, before I put the darts in, I sewed up the muslin.

I’m going to break up my chain of thoughts here just for a moment to share I put in my first invisible zipper! I was quite pleased with how it turned out. The zipper is the same one I plan on using with my fabric, that’s why it’s black and not white.

zipper

But back to the muslin; I tried it on, then pinned in the darts and … (the frightening theatrical music would play right here) the waist didn’t want to go back over my hips. I tried to gently squeeze myself out of the muslin and those pins but it didn’t work.

tear

This tear is what happened – the muslin tore where the pins were for the darts. I have a matching one on the back too. But not both darts,  just the two farthest from the zipper.

dart in pattern

You can see here where I closed the dart on the pattern there is quite a difference between my hips & waist. So what to do?

I haven’t had a response on the Craftsy platform when I asked a question in this class, but wanted an answer from someone with more experience than I had. I put a call in to my local sewing store and spoke with an instructor there. She suggested I use elastic for the waist!

Well, back to my comment from last week, all my skirts are either elastic waists or they are too big in the waist.

It’s funny, I started sewing over 30 years ago, yet still don’t feel like I know it all when it comes to sewing. So am glad to have resources to call on for things like this. Even if it does confirm what I am already thinking.

She also gave me a good idea saying keep the front of the skirt free of elastic and just have it in the back for the straighter look A-Line skirts are known for. I liked that idea, but it might be too much elastic for the back of the skirt.

And will I still want a zipper if I’m going to use an elastic waist? I’m thinking not.

So as soon as my knee is up to driving again, I’ll be heading to the fabric store for some wide elastic. I don’t have any in my stash and I want a wide waist band. Which I’m going to have to draft because that wasn’t part of this course.

Happy creating!