Beige Lace Overlay

With this Beige Lace Overlay bra, I feel I have my beige bra wardrobe complete. I have enough of a basic color to now branch out. I won’t be able to do that tomorrow, but hopefully soon.

Here’s my latest bra – the Beige Lace Overlay:

100_2333

This style is the same as the last beige bra I made. I was so happy with the lace on that bra, I decided I’d do the same again. My thinking was if the lace is different, then it feels completely different – at least to me. (smile)

All the materials are from Bra Makers Supply – including the pattern, but it isn’t the original pattern. What I’ve done is taken the Classic Full band pattern and altered it significantly to fit me. I’ve altered the cradle, the bridge, the upper cups and the lower cups, drew my own band based on a Prima Donna band. Heck I even alter the wires.

100_2326

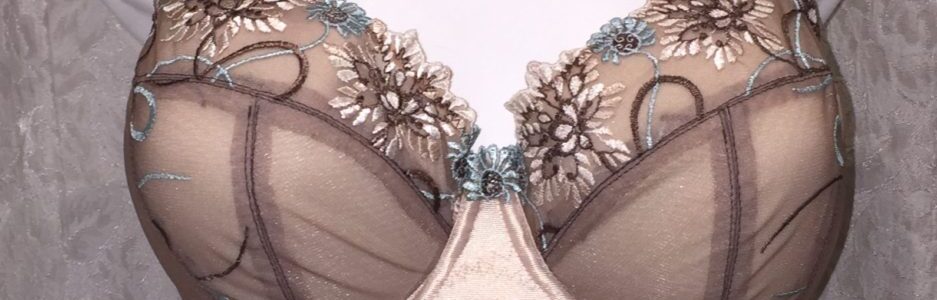
Here’s a close up of the front. You can see here the lace doesn’t go all the way to the top of the upper cup – but lays over the upper cup. It’s a very pretty option for this style. You can also see how the upper cup curves with the style. This style is described in the Bra Makers Manual as a Fake Demi Cup. It still gives the coverage of a full cup.

100_2327

And this photo is just because I really love adding bows to cover the strap seam. It is such a pretty feature.

I won’t show the back or sides of this bra as they are the same as what I usually do – so no changes there. However, I do want to show you something else I thought to share with you. I remember when I first started making bras. Knowing where to cut the channeling was always a bit fuzzy for me. It was rather hit and miss for a while. Sometimes it ended up under the upper band elastic, but sometimes not. I would just zigzag over it in those cases. it still worked, but wasn’t quite as pretty as I was wanting. Then I figured out a way to do it.

100_2322

You can see here I’ve folded my upper band elastic over to where I will sew it, but it’s not sewn down  yet. It’s not even pinned yet. Then I lay the channeling over that. This gives me a clear visual to use. I’m holding the channeling here for the picture because it just didn’t want to lay flat. Pins come in so handy, don’t they?

100_2323

And once I see where I want to cut it – where the top of the channeling will lay under the elastic – then I cut it. I also cut it on a bit of an angle. I follow the slope of the band rather than cutting it straight across the top of the channeling.

100_2324

And here you can see how neatly the 3-step zigzag finishes that channeling. I hope this helps.

One last bit here, do you remember this?

scan0002-b

I’m in the hunting-gathering stage for this project. I’m collecting laces to put together to make my own version of this beautiful bra Amy Relf made. I LOVED this, and have the picture beside my sewing desk to remind me to work on this.

Happy creating!

Basic Black and a New Love

I have so many plans for what I want to sew. Is everyone like that? An ever-growing list of what you want to sew? Does anyone else ever get all those wants accomplished? My list just keeps growing.

So, what have I been up to? Well, I took my friend to a specialty bra store for a fitting. I wanted to see what the store would put her into. It was a very interesting experience. I could see the store didn’t properly fit her, and she could see the bra they put her in didn’t fit her. But the woman working in the store either could not or would not admit the bra didn’t fit her. The cups were too small and the band too big. Yet every bra they offered her was the same size, and they all fit the same way. I wondered if maybe they didn’t have anything that would really fit her. It did help me though, because I think she’s going to need a 32 F. However, she only wears non-underwired, so I may still have some challenges. I haven’t made an non-underwired bra yet.

When meeting my friend, I arrived at the store earlier than my friend, so just had to look around and then after looking I HAD to try on a few things. I’ve fallen in love again. This time with the Prima Donna Milady Padded Balcony bra. I thought this style was called a Balconette, but the tag says Balcony. Either way, it’s lovely, and I want to sew one!

Prima Donna Milady Padded Balcony Bra 36F

Isn’t that pretty? (I’m not posting an actual picture of the bra – just so I don’t get into any trouble with Prima Donna, just a drawing of it.)

It has a 3/4-high thin foam cup inside the lace cups – I put a pink line where the foam cup stops. You can see the foam cup doesn’t come to the top of the bra edge, but only 3/4s of the way up. A unique feature. The lace cups have a vertical seam with a small dart at the bridge. I didn’t look too closely at the straps, and was wishing I had my camera with me when I was in the store. I need to figure out how to make this one for me too, after I make the Amy Relf bra.

I have made a few things in the past week or so since my last post. I finished the lovely gold-filled Medical ID bracelet, and also a basic black bra.

For my basic black bra, I went back to the drawing board. I wanted to take my time and re-draft my pattern. So I used the Pin-Up Girls Classic Full Band pattern as my starting point.

I took it in at the underarms on both the upper & lower cup, I moved the straps over in the front and on the band, I made the bridge narrower, and I put a downward hike on the band. I also moved the apex over.

My first attempt – in a tester bra – was a bit too small in the cup. Still completely wearable, just the bridge doesn’t sit right back to the chest wall – it’s about 1 cm out. As well, the apex had been moved over a bit too much. So, off to the drawing board again.

But before I went back to the drawing board, I did something I haven’t wanted to do. Something mentioned in the Bra Makers Manuals – I cut open the cups at the seam line in the front to see how much I needed to add to the pattern. Oh, how I haven’t wanted to do that! I’m not even sure why, but it was very hard for me to do. However, I did and was able to get much better results from having done it.

I added to the pattern at the center front on both the upper and lower cups – that same amount from the slit, and that took care of the apex too. It’s a very good fit. I’m so glad I took some time to remember all the alterations I wanted to make. I am really happy with my back this time, and my strap placement.

Basic Black front

Here’s the front. Just as I said, a basic black. I needed a new basic one. All my other basic ones were over a year old, starting to show too much wear, and a bit too stretched out in the bands.

Basic Black back

And the back view. This shows a bit of the downward hike, but not too much. Overall, a nice everyday bra.

Happy creating!

Love at First Sight.

This post is just a short one, but I think you’ll fall in love too!

While out for coffee with my friend, Valerie, we’d sat and visited for a while and then  were wandering around Chapters looking at everything from cookbooks to craft books. We made our way towards the magazines and she picked up Altered Couture and innocently asked me if I’d ever seen it before. I hadn’t. She stared to flip through the pages and there was a bra!

If you’re thinking I’m a bit obsessed with bras, then I think I agree. But they’re so pretty, and practical too. (I say in self-defense.)

I’ll let you decide, but for me, it was love at first site. The article is Corset Collection by Amy Relf.

scan0002

Actually, it’s a long-line bra. Here’s a close-up of the bra front:

scan0002 b

Isn’t that charming? I have ideas for all those little bits that aren’t enough for a full cup. Bravo Altered Couture magazine, bravo!

Amy Relf has a blog: atelierdami.wordpress.com; Beautiful work, Amy. Really beautiful. You’ve inspired me. And thank you so much for allowing me to share a bit of your work.

I encourage you to get the magazine and read Amy’s article. I’m not going to share everything, but I think just this will inspire you too.

Happy creating!