Matching Panties for A Modern Floral Shelley and The Bra-A-Week Challenge

This week I have a couple of pair of panties I made to co-ordinate with my Modern Floral Shelley.

I love cotton, and this Indigo cotton spandex is from Bra-Makers Supply. The lace is from the Merckwaerdigh kit I used for the bra, and the elastics are from Frog Feathers on Etsy.

2 panties

On the first pair I made I used a bit of the lace I used from the bra and then some Ivory lace elastics – Ivory also being a color also in the Lycra. I’d wondered if maybe there was too much lace, but then decided there can never be too much lace. I love them. They’re so comfortable.

Too much lace

The second pair, which is my favorite style to make, uses the same lace from the kit for the whole front panel. On this pair I used Navy lace elastics.

Fav style of panties

Both pairs of panties are from my TNT panty pattern – Kwik Sew 2286, which I have fun with by changing the lines or style, but using the pattern as a base or starting point.

I also picked up a couple of pair of panties in some coordinating colors, not so much because I wanted or needed the panties, but to clone them for patterns. I really like the top pair – how the back part of the panty wraps right around the front in a little V across the hip, and the lace elastic in the design. Very pretty. The bottom pair is simply a high cut style, but still fun.

RTW

Now our Bra-A-Week Challenge. We’re on week 26 of the Challenge! It is so very inspiring to see everyone’s submissions.

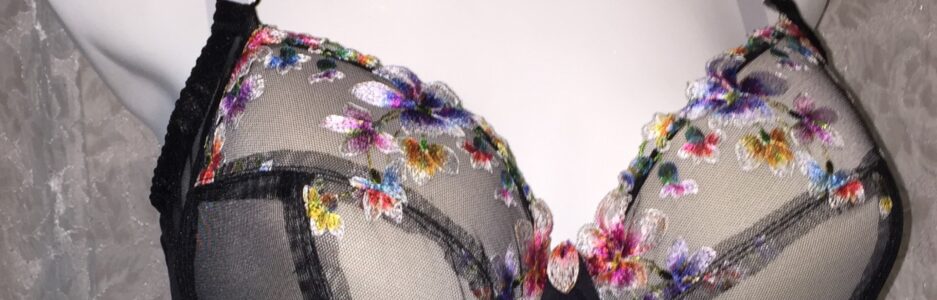
This week we have a beautiful bikini from Diana.

WK26Diana

That is so lovely. Diana wrote about this on her blog poetsie.blogspot.nl. If you don’t read Dutch, it helps to open it in Google Translate. You can read it that way in your own language. Check it out here for English.

This is so colorful and fun. It’s really lovely, Diana.

Our next submission comes from Maddy.

img_1570

Maddy made the Marlborough bra. This is her second time making the Marlborough; she made a few modification to the pattern and got an almost perfect fit. That perfect fit (or almost perfect) feels so good!

Maddy also mad a matching pair of Ohhh Lulu Grace panties.

img_1581-e1435650089567

This was Maddy’s first time making the Grace panties, and she really loves the style and fit! That is so good to know because the Grace panties are on my to-buy list. Thanks for recommending them, Maddy!

You can read all about Maddy’s Marlborough and Grace panties, with more pictures and details about the alterations on her blog:  https://missmaddysews.wordpress.com/2015/07/09/something-wicked-this-way-comes/
Our next submission comes from Monserratt. Monserratt is a Pin-Up Girl like me, and made her bra from the Classic pattern.

stardust front

I love these colors! So gorgeous! You really need to see take a look at Monserratt’s blog: https://monserrattlopez.wordpress.com/2015/07/11/we-are-stardust-bra/ – she has a lot of information on there as to what she’s done in the way of alterations, but also a lot of photos. You can see her lovely makes, and her great photos!
stardust back
Love that blue and gold! So very pretty.
Our next submission comes from David.
Zdj cie0475
 David’s bra features black lace across the front overlaid with the straps. This is something like a short corset, bandeau, sport bra and strappy.
Zdj cie0477
 But there are two different laces used here. You can see the second lace on the back.
Zdj cie0480
 Isn’t that stunning? Just gorgeous. David is a freelance lingerie designer, his label is: Bonnet Bleu
Our last submission is from Erin!
Erin made this is a bikini for her sister’s birthday.
IMG_2400
 Erin’s sister picked out this fabric and wanted a cute itsy-bitsy bikini, but with a little more structure (underwires & foam). It’s a vertical seam cup, low cut with short wires. (Erin thinks she’s the equivalent of a 34C although she drafted this pattern off her measurements).
IMG_2389
 The details are a cute tie in the front and on the sides of the bottoms and nice double stitching on the outer fabric for the cups, gold rings and G-hooks. Erin said it was lots of fun to make – and hopes it fits her sister perfectly!!
What a nice birthday gift! You can read more on Erin’s blog: http://emeralderin.blogspot.ca.
I’m loving summer hosting the challenge – it is so exciting and fun to see all the makes coming in!
Happy creating!

A Modern Floral Shelley and The Bra-A-Week Challenge

My most recent Shelley is a bit of an experiment for me. My experiment was in the materials I used. I usually use Duoplex for my bra cups. On this bra, I used the Lycra that came in the Merckwaerdigh kit and then lined it with Sheer Cup Lining. Seeing as there’s no stretch in the lining, I thought it would work.

il_570xN.672896523_cb2l

Isn’t that pretty? I loved it the moment I saw it. And I’ve learned, when I see something in Margreet’s Etsy store that I love, I buy it right away. I’ve found if I wait, it’s gone. My challenge with using kits from Merckwaerdigh is I need the support of Duoplex or something non-stretch. If I use Duoplex underneath the Lycra, it’s getting to be the cost of two bras. I wanted to try something different.

I had a little more trouble sewing Lycra than I do Duoplex. I’m not used to sewing stretch when sewing my cups. Here you can see where I made a little mistake in my sewing.

Mod Blue Shelley

Look at that wrinkle. I decided it was a small cosmetic error, I’m going to give it a cosmetic treatment – cover it up.

I love this material, but there was one big downside to it – all the shades of blue in it. I planned on using a Navy findings kit from Bra-Makers Supply, as well as Navy Power Net from them. So, I needed Navy thread. Fine. I got Navy thread. When I sewed the elastic on the back of the lace though, the Navy looked terrible. So, off to the store to match some thread to the lace. The thread that matches the lace, doesn’t look great on the Lycra. Sigh. I wasn’t going to buy a third spool of thread for the bra, so the Navy thread is now a design element on this bra.

front

Here’s the bra from the front. I love those three little bows at the front. And those little bows … they’re all me-made. The Merckwaerdigh kits don’t come with bows. The only bows I had really didn’t go with the colors of the bra, so I looked at my ribbon stash. This golden ribbon was the only one that went well. It’s really fun to make ribbons, and easy. I shared how in this post. I used the cardboard method, but the fork method looks like it produces a lovely bow as well.

three bows

Here are the bows all finished and sewn on with a blue bead in the center. It hides that little wrinkle pretty well.

back

Here’s the back of the bra. I did over-calculate how much I had to add to the band using the new, stronger elastics from Bra-Makers Supply. You can read about those elastics here. I had to cut a bit off both sides to make it perfect for me, and next I’ll adjust my band pattern.

So, how did my experiment go? The bra fits a touch looser than when I make it from Duoplex. The only place I noticed any wrinkles at all were under the arm where I already have to make an adjustment. Now, if I could only sew Lycra more neatly and without wrinkles!

Now onto the Bra-a Week Challenge submissions!

This is week 25 of the Bra-A-Week Challenge, and this week we have some very beautiful submissions along with my own.

The first bra is from Sofia. It is such a delicate work of art inspired by a one of her favorite lingerie brands.

Little-Black-Bra

Here’s Sofia’s Little Black Bra. Isn’t that gorgeous? Sofia used Eyelash lace backed with nude Power Net to achieve the look on the front of the bra.  As well, she took careful attention to match the lace on the cups. All that extra attention does show. She finished her bra with black Power Net for the band and a 3 Hook and Eye set. Stunning!

You can read more about Sofia’s inspiration and Black Lace Bra on her blog Silver Lining. So very lovely!

Our second bra this week is from France and it’s actually a set of bras, not just one.

IMG_2287

I can’t even imagine how wonderful it would be to have someone make custom-fitting bras for me. France is making them for her Mom. What a wonderful thing!

Look at all these beautiful bras! This is what you can do once you have that perfect pattern.

IMG_2288

This photo shows the back of the bra. Look at how perfectly the whole bra fits! And it looks really comfortable too with that full back. That’s just so great!

Our next submission is from David of Bonnet Bleu. It’s another lovely delicate looking bra. David made this bra using Black tulle and white lace for his triangle lace cup bra with nude bra cup foams.

Zdj cie0469

The black is more visible here from the side. The wings are black. So very lovely and delicate looking.

Zdj cie0472

David is a freelance lingerie designer, label: Bonnet Bleu.

Happy creating!

A Couple Pair of Matching Panties

This week I have a couple of pair of panties to match the Ivory and Pink Sewy Rebecca bra I made. I mentioned a few posts ago how I was going to use some Cotton Spandex Double-knit from Bra-Makers Supply. The color wasn’t an exact match though. It’s close, but not exact.

Here’s the bra and panties together.

Full Set on Catherine

Here you can you see the cotton looks quite a bit deeper in color than the Duoplex. However, I’m still very happy with this set.

The panties are from my TNT pattern – Kwik Sew 2286. I prefer the KS 2286 because it so closely resembles my very favorite RTW panties from La Vie En Rose. They had the lace at the legs and waistband as well, and I loved that.

I used KS 2286 without any alterations this time, and then used the two remaining scraps of lace I had left over from making my bra, and added those to the panties. There was so little lace left too. I’m always sad when a much-loved lace is gone.

On this pair, I sewed the pink and ivory lace to the stretch lace I used on the waistband and then sewed it to the panty as one piece. I cut away the cotton from behind the lace as well, to make a ‘window’ of the lace.

Full Set

Here are the two together. I do think the lace pulls them together pretty well.

For the second pair of panties I made, I had even less lace than this first pair. It was time to get creative with what I could do with it.

playing with lace

Here I was just laying the lace out in different patterns to see what would look nice and what I preferred.

And here is my second pair of panties to match my Pink and Ivory Rebecca.

panties 2

I like these as much as the first pair. Again, I cut away the cotton from behind the lace to make a window. You can see the window in the picture below.

window

There, two pretty and much-loved cotton panties to match my new bra.

Happy creating!

A Pink and Ivory Rebecca

In my efforts to decide if I prefer the Sewy Rebecca pattern or the Pin-Up Girls Shelley pattern, I made another Rebecca. I know I love my last Shelley bra, and wanted another comparison with a few more adjustments made to the Rebecca.

This time I used a little bit of lace that was left over from a bra I’d made for a friend. And I mean there was just a little bit of lace. There was just barely enough for the upper cups – no mirroring the lace here, but they’re close – and then I had to get creative with the scraps that were left over to use them to make matching panties.

Here’s my very pretty Pink and Ivory Rebecca:

Front

This is so pretty! I love this lace and have looked for it again, but… I can’t find it anywhere. I’d bought it at Bra-Makers Supply, and I haven’t seen it since. I’m ready to start hoarding lace! This is a lovely pink lace with very distinct ivory or cream in it. And it goes so well with the ivory Duoplex and Power net.

Pretty Side

On the side view, you can see where I added just a thin strip of lace that was left over. It doesn’t take a lot of lace here to make the side look so much prettier.

Back

And a basic back. I’m still using my alternate method of attaching the straps. I use some of the bottom band elastic on the outside of the band and fold that over the top of the band with a slider attached to it. Using the elastic here allows more stretch and movement than the strap elastic, it also conforms to the U-shape more smoothly. I also use two sliders rather than a slider and ring. I find the strap has a little less movement and making it less likely for the strap to fall off my shoulder.

So, what alterations did I do to the Rebecca to make it fit me?

The first changes I made were to the bridge – I know I have to lower it 1/2″, and an adjust for a flat spot on the bridge too. I also changed the cradle to a smaller cradle that normally takes a 36 wire rather than the 42 cradle the cup needs.

I thought about making small darts in the pattern to take out the excess, and although I love that neater look, I’m finding it does compromise the cup’s fit a bit. I need the extra space those darts take away. So, I put in gathers along the wire line.

The photo below shows the excess cup compared to the cradle. I have to make that all fit.

Excess Cup

This photo shows the gathers in the wire line seam. I run a long gathering stitch along the wire line, pull the bottom thread to make small gathers all along the bottom of the cup. Then I sew the cup to the cradle. It works very well, and although there is still the odd little wrinkle where a gather is showing, steaming it well with the iron really does make most of those gathers disappear.

Gathers

I used the Flexible wires again on this bra. They do make a difference in the fit. They are long enough for me, and conform well to the shape of the smaller channeling and cradle. However, they are not the easiest to get into that narrower U-shaped cradle. I had to fight with them a little. I told myself they are worth the effort. And once they are in, I don’t need to take them out again for a long time.

The inside of the bra is so pretty with its enclosed seams. I really do love that aspect of the Rebecca pattern.

Pretty Inside

And one last detail:

Clearer Crystal

I sewed a pretty crystal in the inverted V of the bridge. It has movement and does move a bit. It’s so pretty when it catches the light.

Next week some matchy matchy – matching panties.

Happy creating!

My BMS Chart

The idea for this week’s post comes from a reader and friend. I sent a chart I’d made to my friend, Naomi, and she said what a great idea it would be for a post. Okay. Here it is.

I really like things to match, and match well. I don’t think I’m excessive. When I think excessive, I remember a high school science teacher who wore everything in the same color – top, skirt or pants, pantyhose, shoes, purse. If she came to school wearing green, everything was green! I have distinct memories of a lot of green! I’m not that bad, but coordinating bra and panty sets is something I want to do.

A lot of my bra-making stash comes from Bra-Makers Supply. I like the quality and choice of materials, I’m in Canada, so it’s one of the best options for shipping for me, and Beverly Johnson is such a wonderful help. On the BMS web site, you can see the colors of their Duoplex, Power Nets, Finding Kits, and Cotton Spandex Double-knit – these are the ones I look at because these are the ones I want to co-ordinate. I’ve spent a lot of time going back and forth on their web site looking to see what colors are available in all of these categories.

They also offer sample packs of all of these materials so you can see and feel what you’re getting. I have a mini stash with a sample pack of each of these. When I got these with my order a while back, I was most excited about them when I opened the box! I couldn’t wait to see all the colors available.

Sample packs

However, even having those samples, I found myself flipping back and forth through them, checking and re-checking to see what was there and what matched with something from another pack.

So, in my desire to match materials for bra and panty sets, I put together a chart. It’s up on the wall beside my sewing desk for easy reference.

chart

Here’s my BMS Chart. It shows the colors of the Duoplex, the Power Nets, (both Regular and Double Knit), the Cotton Spandex Double-knit, and the Finding Kits. It’s even color-coded for ease. *Note: BMS has added more Finding kits since this chart was made.)

When I want to make a completely matching set – you know, be all matchy matchy – I look at the Pink highlighted rows. Those rows show where each of the categories has the same color. If you look at the red, it has Duoplex, Power Net (both), Cotton Spandex, and Finding Kits all in red.

The blue highlighted rows aren’t complete – it’s missing one of those matching components, but still pretty complete. The Ivory, Peach, Fuchsia, Turquoise and Navy Blue don’t have Cotton Spandex in those exact colors. However, I just ordered some Banana in the cotton which is close in color to the Ivory, and some Indigo which is close to Navy. By using the same lace on both the bra and panty, it will bring the set together well.

ivory trio and banana 1

Here’s an Ivory Trio from BMS on top of the Banana Cotton Spandex. The Banana is a bit deeper in color, but close enough that I’m happy with it.

peach ivory

Here’s the Duoplex in Ivory and the Banana Cotton with an Ivory and Peach lace. I think this looks fabulous!

The Purple on the chart is the only one that has all matching categories except the Finding Kit. I think that would still be wonderful as a set with either a Black or Lilac Finding Kit to complete it. And of course, again, the lace can pull things together. If I used black lace with the black findings and purple for the rest of the bra and panties, it would be lovely. Or Lilac…

I used my chart to help me decide what findings to use with other lace finds I come across. If I find a lovely lace I just can pass on, now I can take a quick look at my chart to see what options are available for pairing that lace with the rest of the components I’ll need to make a bra and panty set. In fact, I have a bra kit I ordered from Merckwaerdigh‘s Etsy store. However, I need firmer support than Lycra can offer, and large findings, so I supplement the kit I bought. I checked and a few options that would go well with it were Ivory or Navy. You’ll be seeing a lovely set with Navy in the future.

Merck and ivory

Merck and navy

I hope my coordinating chart makes it up on some new walls and helps others to be all matchy matchy too.

Happy creating!

Finally… Some Sewing

After two sewing fails in the past two weeks, I felt like my sewjo had got up and left. So, this week I made myself cut out some panties to go with my bra. You’ve all seen the bra before. Here’s my latest matching bra and panty set.

Untitled-2

This is the Sewy-fied Shelley bra, and my TNT Kwik Sew 2286 panty pattern, which I’ve changed up a bit by adding the lace panel to the front.

I’ve mentioned this before, and I’ll say it again – I’m spoiled now. I only want to wear matching sets of bras and panties. I had always color-coordinated everything before, but with RTW bras costing $150+, there was no way matching panties were going to happen.

Now that I have my bra fit worked out, matching sets are a must! I love sewing my own lingerie.

This time, cutting out the matching panty went without a hitch, but it wasn’t just smooth sailing from there.  I realized I didn’t have enough elastic to finish my panties the way I like, and the way the pattern says. I was wondering if it would be another no-sew week at that point.

My first thought was to tea-dye some stretch lace. I have lots of white I bought on sale. Nope, that didn’t work.

Untitled-3

The tea gave me a lovely deep beige, but it wasn’t the same as either of the other beiges I was using. I was already using two differently hued beiges. I really didn’t want to introduce a third beige. So, two bumps on the sewing road, but I realized I must be feeling better because I had my old I’m-not-giving-up attitude.

Untitled-8

I decided to finish the back waist band with the dark purple trim that came with the Merckwaerdigh kit. One problem solved. Although, I’m not loving the beige thread on the purple, I wasn’t up to picking it all out and starting over again.

The outlined sewing order for Kwik Sew pattern is: the gusset is sewn to the back and then the front using what is commonly called the ‘Burrito’ method, then the lace is applied to the leg openings, the sides are sewn up, and lastly the same lace is applied to the waistband. Altering the pattern, I have to change my order of sewing. The first thing I do now is attach the elastics to the waist bands. I sewed the purple trim to the back, and some nice plush black elastic behind the lace panel at the front.

Untitled-9

Here you can see the elastic already sewn onto the waist while I’m just in process of pinning the lace to the legs. I didn’t do this on the first pair I altered and learned the hard way.

Untitled-5

Another small change I made was to use my sewing machine’s Overcast stitch rather than a simple Zigzag stitch. That gave me a straight seam on the right side of the fabric rather than the not-perfectly-straight seam from a Zigzag stitch.

After pressing it on the right side to flatten the seam, I added one more change…

Untitled-6

I gave the seam a bit of reinforcement by Zigzagging over the just-sewn seam. Another quick press and it looks so nice and neat.

One last little change I made was thanks to a reader. Carmen mentioned how she sews down the seams on the gusset with a Zigzag stitch – a tip she picked up from Sigrid. I thought it was a great idea. Thank you, Carmen!

Untitled-1

In the photo above you can see a close up of the Zigzag stitching. It does two things: it reinforces that seam, and it flattens that seam much more than pressing it can.

Untitled-10

So here’s my first pair of panties to make a matching set with my bra. The next pair will have to wait until my stretch lace gets here.

The materials I’ve used here are a mix from Bra-Makers Supply, Merckwaerdigh, and Frog Feathers. The Duoplex, Power Net, Findings, and Cotton Spandex Doubleknit are from BMS. The lace, Lycra and trim are from Merckwaerdigh. The stretch elastic is from Frog Feathers.

Happy creating!

A Red Rebecca

I knew when Erin from The Sewing and Life Adventures of Emerald Erin put out her Bra-a-Week Challenge, I wouldn’t be making a bra each week, but I have been trying to keep up with a submission every other week. And this week I have one.

My Red Sewy Rebecca.

100_2901

I can’t say enough how much I love sewing this bra. As the seams are coming together, they’re turned and then hidden between the lace and lining on the upper cup, or the duoplex and lining on the power bar. And the inside looks so very neat and tidy. It’s really a delight to sew.

100_2895

You can see here the inside of the upper and lower cup but there are no visible seams. Oh, that is such a nice touch.

The bra came together fairly easily, but I honestly think that’s because I have experience sewing bras. The instructions I have are the English instructions from ELingeriA and they’re not my favorite. I find I’m often looking at what they’re saying to do, and then ignoring it and following instructions from Beverly’s Craftsy class, or one of my Pin-Up Girls patterns.

100_2910

There are a couple of things I like about this pattern. One is the lower edge of the upper cup is quite straight. A straight bottom edge to the upper cup gives more lift. I do like that. Another thing I like is the underarm area is smaller and I don’t need to adjust it. The fewer adjustments, the better.

Again, on this bra, I gathered the cup to fit into the cradle. I had intended to adjust the pattern, but my week was going by quickly and I wanted to get sewing and forgot. Next time I’ll make some adjustments and show you what I do for that.

100_2911

The back of the bra is pretty basic. I do like the black findings kit with the red, and the red and black lace. All the materials came from Bra Makers Supply. I already plan to order more of that lace. It is so pretty. When I’d ordered the kit, I put it away for a little while and when I pulled it out again this week, I thought it was just black lace. So when I unpacked it, it was a treat to see those red flowers.

This photo is the inside of the bra. Look how neat that is! Here’s a close up:

100_2913

Love, love, love this!

Enclosing the cup seams would be quite easy to do on any bra, just use some lining material and ‘sandwich’ it when sewing. Let’s talk about that using the upper cup and lower cup. Place the two cup parts right sides together as you normally would. Then the lining material, which was cut from the upper cup pattern goes on the wrong side of its non-matching part – the lower cup. You make a sandwich of the cup pieces with the upper cup material and lining as the bread, and the lower cup as the filling. Sew, trim, and turn the matching upper cups pieces so they are now together. Press, top stitch and enjoy seeing those enclosed seams hidden neatly inside your upper cup.

100_2897

You can see here the seam is exposed still, but has been trimmed. The lining will fold over the seam to meet its matching upper cup and then press and top stitch. It is so neat and lovely.

It’s the same for the power bar. Place the power bar with the cup right sides together – just the same as when you’re sewing it without lining it. Place the power bar’s lining on the wrong side of the cup; sew, trim, press with the power bar and lining together, and top stitch and now your whole cup is so neat and enclosed!

Happy creating!

Panties To Match

Here are my panties to match my Sewy Rebecca bra.

100_2872

Did you know Sewy actually has panties to match their bra pattern?

rebeccaslip_3kopie_p1

Here they are. This is from the Sewy website. And here’s the line drawing of the pattern from their website.

tzrebeccaslipgr_p3

Aren’t they lovely?

And on a side note, I’ve found being an English-speaking person, who does not read or speak German, the best way to navigate the Sewy website is on Google Translate. You can read everything translated into English, but you can’t place an order when using Google Translate. Ask me how I know. You can see the Sewy website translated here.

Back to my sewing. The panties I made are from my TNT Kwik Sew 2286, but I altered the front. This time, since I was adding the lace panel and wanted to keep the scallop at the top of the lace, I remembered to add the lace elastic to the waistband before sewing the lace panel on. I love them.

And here is the matching set.

100_2875

My intent is to make two pair of panties for each bra I make. So after my Rebecca was done and I got out my cotton spandex, I realized I only had enough cotton for one pair of panties. I already have the lace cut out for the second pair of panties, but it looks like I have to wait for them.

I told my hubby I needed to order more cotton material, and, well, we had a discussion and he suggested that since I’ve bought all this other material with plans to sew other things, I needed to sew something other than bras and panties to match. Sigh. He just doesn’t understand how addictive bra making is. And for a garment I have to wear every day – it’s just such a delight to put my own on rather than anything RTW.

We came to a compromise – I ordered more material and I’ll sew something else before I sew another bra or panty. But… there was the Watson Sew-along, and there’s Erin’s Bra-a-Week Challenge going on right now, and there are patterns to perfect now that I have my size and fit all figured out. I’m having a very hard time choosing another project when I want to sew bras and panties.

So, I told myself, while my supplies are on the way, get something else sewn and then I’ll have both time and resources to sew another pretty matching set.

So, a Flirt Skirt it is.

100_2881

This is in a stretch denim. Look at that flare at the back. Such fun. It really is flirty. My skirt’s not quite done. I still have the waistband to finish, but that won’t take long at all. The ‘top’ is simply material I draped over my dress form. I’d bought some of material to make a cowl neck top, so that will be next… after my second pair of panties.

100_2879

Happy creating!

Sewy Rebecca Revisited

This week I’m looking at my Sewy Rebecca pattern again. I do really like the pattern, so wanted to revisit it. However, the hard part was I felt like I was starting all over again with fitting. I’m not, but I’ve had too many ‘doesn’t quite fit properly’ experiences to not be a bit gun shy.

So, the first thing I did was compare the muslin I’d made a few months back to my correctly fitting Shelley bra. I pinned the muslin over top of the bra on Catherine.

100_2837

You can see here, the size I’d traced off and sewn up was too big. I wasn’t sure of my size, so actually graded up one size from the largest to make sure I was getting the proper depth of cup. I’m glad I did. I could see I really would be fine with one size down. Also, I traced around the muslin in pencil to show where the seam lines are underneath.

100_2839

You can see the lines here at the underarm, and in the first picture at the top and bridge. I also traced the bottom of the cup where the seam is for the cradle. That gave me a clear indication of sizing.

Once I was finished I took the muslin apart and trimmed off the seam allowance. Then I laid those pieces over the pattern pieces to compare those. Again, I was pretty sure I had the correct size. And one last comparison – I measured the wire line length and the cross-cup seam length and they both match up too. I was ready.

For the band, I laid my Shelley band over the Rebecca pattern to find the size. I really did use my whole pattern as a sloper to make the new pattern fit.

I adapted the Rebecca bridge to the right height for me, and added in the correction to the pattern for the flat spot I have. I also made the cradle smaller to fit the smaller wire I use. So the last change I need to make was to adjust the larger cup to fit into the smaller band.

Before I cut into my good material though, I sewed up another muslin.

sewy on fav

There. Almost all the wrinkles are gone. There are wrinkles on the dress form’s bra though, so this is looking perfect. Now to pick out some material.

I’ve bought some lovely material over the last couple of years that I’ve been saving for that day when I had my fit down. It was time to break some of it out!

I picked a gorgeous Black Cherry kit I’d bought from Bra-Makers Supply. I loved this kit and was really looking forward to using it. I’m not disappointed.

100_2854

One of the first things to happen was a set back. I went to press my seams and one little touch of the iron scorched my material. I don’t know how my setting dial on my iron was turned to the hottest setting, but I adjusted it and got out my seam ripper. I had some lace on that band and I still wanted to use it.

100_2863

Next I want to show you what the Omega shape means – in practical terms, it means the cup is bigger than the cradle. Do you see those edges do not meet? As this was still a bit of a test run – even though I took a lot of preliminary steps – I didn’t do any alterations to the cup pattern. I will take in the wire line of the cup’s pattern on the next one I do. On this bra I did a gathering stitch along the bottom to ease those two parts together.

100_2860

You can see here the gathers inside the cradle. But with some serious steam after the cup was sewn into the band, you can’t see the gathers at all.

100_2866

And here’s my Sewy Rebecca. I love this color. I love so many things about this pattern. It looks as neat (almost) on the inside as it does on the outside. I really love that. As I was sewing, that was what excited me the most.

100_2858

Here’s the cup before it was sewn into the cradle. All the seams are enclosed. The cross cup seam is enclosed between the lace and the lining. The power bar seam is enclosed between the duoplex and the lining. It looks so very neat inside. I’m quite excited about that.

100_2868

Here’s the bra from the side. That little piece of lace was unpicked from the scorched section I showed you earlier. I’m really pleased I took the time to do that. I’m loving that little detail. As well, the steam really did make those gathers disappear. You can’t see them.

100_2869

And here’s the back. The findings kit isn’t available in Black Cherry, so I used black. The cotton isn’t available in the Black Cherry either, so next week black cotton and lace panties to match.

Happy creating!

A Beige Shelley Set

I’m pretty sure I’ve used that title before, and will likely use it again. I really like my basics and I like the Shelley pattern by Bra-Makers Supply. Here’s my most recent Shelley:

100_2808

I need to make some proper-fitting foam inserts for photos. I don’t like all the wrinkles! However, as a bra, this is my best yet. I love it. It’s kind of funny because I saw this lace on the Bra-Makers Supply (BMS) web site, and ordered it right away. When I got it, I was putting it with my other laces, and lo and behold, there was another order I’d placed before for the same lace. Yup. I know I like it when I do that. It wasn’t the first time, and I doubt it’ll be the last. I did that with a Merckwaerdigh lace as well.  It’s good to know I really like it.

For this Shelley, I did what I did for the last couple of bras I made. Rather than making alterations to the cup to make the larger cup fit into the smaller cradle (Omega shape), I went in-between the sizes. The cup corresponds to a 42 wire, the cradle I need is a 38. I used the 40 cradle. The wire still fits. In fact, BMS say with their patterns you can go up or down a wire size if you need. That makes it perfect for me. The fewer alterations, the better because one alteration leads to another and another.

I thinned the area under the cup even though I used the larger elastic. You can see that here:

100_2813

Beverly, The Fairy Bra Mother, did a very informative blog on how to do this and I’ve been doing it since. You can read her wonderful instructions here.

I also lowered the bridge, adjusted for a flat spot I have and added a vertical dart to the pattern to take out a little excess under the arm.

It’s so wonderful to have learned to do this, and from now on I can have perfectly fitting bras. That is tremendous!

Another sparkly idea that came from Beverly was to add some Swarovski crystals to the bra. Pure brilliance. So, I added a little bling to the bra too. This bra has bows and crystals.

100_2811

I attached these sparkling little delights on the bridge just above a ‘floating’ piece of lace. I say it’s floating because I only sewed the sides of it into the seams of the cup and cradle. I used the Swarovski Hotfix Crystal Tool to attach the crystals and love the result. The only change I’d make here is one that will make it a bit easier for me – attach the crystals before inserting the under wires. However, as much as the tool seemed to want to wobble a bit, the end result looks nice and straight.

The back is quite basic.

100_2812

There is a small pucker where the hooks and eyes meet the band, but it’s not the very large wrinkle showing in the photo. That was just me not catching that the band wasn’t on Catherine (my dress form) perfectly straight. I was fighting a cold and forgot to check to see if the band fit properly into the hooks and eyes. I think there’s a 1/16″ little tuck there because I  didn’t want any edges sticking out.

Now, for matching panties.

You’d never have known it by following my blog, but I do love matching bra and panty sets. For a long time I was on a quest to find cotton because I love my cotton panties. Once I found my source at BMS, I was working on getting my bra fit down. All the materials for my bras and panties come from BMS except the elastic lace I used on the waist bands – that came from Frog Feathers on Etsy.

Here’s the first pair of panties I did:

100_2818

I love these. Nice soft cotton and matching pretty lace. Who could ask for more? I used my favorite Kwik Sew 2286 pattern and altered it. I did go up a size because the cotton just didn’t have the same stretch as some other knits I’d used in the past. The alteration I made was a simple one. Rather than cutting the front on the fold, I traced the whole front out and then cut off the one side of the front. I added a seam allowance to both sides creating two new pattern parts.

I did run into a bit of a snag not having thought it all through enough. When I was adding the lace to the waist band, I realized I didn’t want to cut off the scalloped part at the top of the lace. So I just ended the elastic lace where the other lace started. Next time I will add the elastic lace to the band before sewing these two parts together.

100_2820

Having that little blip happen helped me with my second set of panties though. Here’s my second pair:

100_2817

Yup. I love these too. It’s the same base pattern, but on this one I traced the front out and laid my lace over it. I wanted the scalloped edge at the top. So with the lace on top of the pattern, I drew a line where the lace ended. Then I traced that part again and added a seam allowance. For this set, I added the back waist elastic first. That wasn’t going to work for the font though. For the front I added a bit of left over upper band elastic. It’s hidden behind the top of the scallops.

100_2821

Here it is from the inside. I didn’t want to leave the front without any elastic, even though the lace is a stretch lace.

100_2819

Here they are, my two new matching panties.

Happy creating!