Sewing for a Friend

So what am I working on? I’ve cloned the Prima Donna Luna bra. It’s a very pretty bra, and my friend is so happy to have a good-fitting bra. But the color is not what she would have chosen. I know that too — when you get outside of standard sizes, you don’t always have the same choices, and pale green would not have been a choice she normally would have made. But when one makes bras, we can choose what materials and colors we want.

prima-donna-luna_0162626_fdp

So, my friend came over and brought her bra. And I set her up on my computer to look at Bra Makers Supply’s kits. She looked through and picked a few she liked. And she found more than a few! But we’re starting with one kit and one bra, and we’ll see from there. While she was looking, I was using the pin-method of cloning. I showed her how by putting the pins into the seams, the fabric isn’t damaged at all.

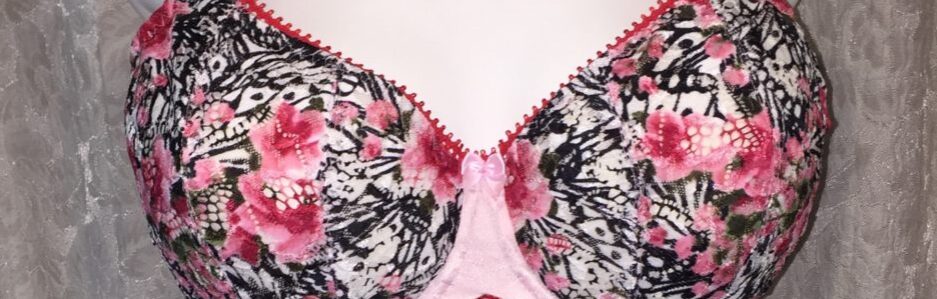
Here’s the kit she picked. It’s very pretty and delicate looking.

Trio%20ivory%20ivory%20pink%20and%20ivory%20lace

As well as a bra, my friend is moving into a new house, and she wanted a new apron that would go with the colors of her new kitchen. So again, we went shopping – this time to the fabric store, and with pattern in hand, we picked some fun colors for her new apron.

The apron is a pattern I bought on Craftsy. It’s a pattern by So Sew Easy. She has a number of free patterns I’ve been looking at, and will try at some point. But the apron pattern is the Reversible Apron – I’ve got you covered!.

After I bought the pattern and we bought the material, my friend decided she didn’t want a reversible apron. She wants two aprons! So although I’ll be using the pattern to cut out the apron, I won’t be following the instructions as they are written, and won’t be able to give a fair appraisal of the instructions, or at least not all of them. I did follow the instructions up to attaching the neck ties, but not after that. And dropping off in the middle of instructions like that, left me to come up with a way to finish the edges. However, up until that point, she did a great job explaining and showing with pictures how to sew the apron.

Here’s the apron I made:

100_2233

I love that front panel. It’s so charming.

100_2235

And the material here with the sparkles is the neckline trim, ties, the waist band and ties, and the bottom band as well. Why shouldn’t a girl be sparkly in the kitchen as well?

100_2238

This picture really shows why the apron is called ‘I’ve got you covered!’ – it wraps around the hips. That is a very nice touch if you ask me. Much better than just covering the front of the body. This apron wraps right around Catherine (my dress form) as Catherine really doesn’t have any hips at all.

And lastly,

100_2239

Faith, hope and love … and musical notes! It’s even got flowers in there. That just about wraps up everything I love right there.  Hmm, just thinking, it needs lace.

Happy creating!

Lowering the Bridge

So, I want to take a quick look at where I was at: the new longer wires I’d tried weren’t fitting properly and it was almost like giving up all the ground I’d gained in getting a proper fit; the bridge wasn’t going all the way back to the chest wall – and I was really beginning to wonder if it was really possible!

I put in yet another call to Bra-Makers Supply with another question. And guess what? Bridges really can go all the way back to the chest wall! I’ve had success!

Something that would have helped me tremendously is Norma’s new book: Demystifying Bra Fitting and Construction. I’d read on someone’s blog (I can’t remember whose blog to give her credit (sorry!)) there is a great section in the book on bridges, and that one section alone made the whole book worthwhile. It really is a great section! I’m hoping to have some time either today or Saturday to try it out. And even if you’re getting a great bridge fit, there is so much information in the book. Well done, Norma! and thank you!

However, I did have more success this week with my bridge. Is it perfect yet? Not quite, but it is actually all the way back to the chest wall. I think I just need to tweak the shape now.

Here’s my most recent Shelley.

Bra front

Most of the materials are from Bra-Makers Supply, but the lace is a wonderful lace I found in Merckwaerdigh’s store.

On this bra I lowered the bridge by 3/4 of an inch. This gave the bridge the room it needed to go all the way back to the chest wall. I also overlapped the wires at the top of the bridge. I tried a tester earlier in the week without overlapping the wires but I still wasn’t getting the bridge all the way back. So, now just to tweak the shape a bit. Even my hubby said this is the best fit he’s seen me get yet.

bra side

Here is the side view. I re-made my Shelley pattern for this bra, but still need to take a bit out of the underarm area – there are a few puckers there, but not so many that it’s unwearable. Everything else was really good. Well, I may move the straps in a tiny bit.

bra back

And the back. I am really loving the new way of attaching the straps. As promised, I took some step-by-step pictures to show what I did.

Top elastic sewn on

When attaching the upper band elastic, don’t take the elastic down around the curve to the hooks & eyes; end it at the top of that curve. This has been trimmed to be nice and neat.

new shoulder elastic pinned

Take some elastic – I’m using the same bottom band elastic here – and pin it on with the little scallops facing outward. Can you tell I like to pin things securely?

shoulder back pinned

Put a ring or slider on the elastic and fold it over. Since the rings & sliders come in sets, I’ve alternated which ones I’m using and they both work great. Here it is from the inside of the bra. And again I pinned it.

strap attached

After sewing it on with a zigzag on both sides of the elastic, I attached the strap. It gives a nice professional finish to the bra.

close up shoulder attachment

Doesn’t that look nice and neat? I will definitely use this again and again.

Next to try again with my Shelley with a couple of tweaks.

Happy creating!