A Modern Floral Shelley and The Bra-A-Week Challenge

My most recent Shelley is a bit of an experiment for me. My experiment was in the materials I used. I usually use Duoplex for my bra cups. On this bra, I used the Lycra that came in the Merckwaerdigh kit and then lined it with Sheer Cup Lining. Seeing as there’s no stretch in the lining, I thought it would work.

il_570xN.672896523_cb2l

Isn’t that pretty? I loved it the moment I saw it. And I’ve learned, when I see something in Margreet’s Etsy store that I love, I buy it right away. I’ve found if I wait, it’s gone. My challenge with using kits from Merckwaerdigh is I need the support of Duoplex or something non-stretch. If I use Duoplex underneath the Lycra, it’s getting to be the cost of two bras. I wanted to try something different.

I had a little more trouble sewing Lycra than I do Duoplex. I’m not used to sewing stretch when sewing my cups. Here you can see where I made a little mistake in my sewing.

Mod Blue Shelley

Look at that wrinkle. I decided it was a small cosmetic error, I’m going to give it a cosmetic treatment – cover it up.

I love this material, but there was one big downside to it – all the shades of blue in it. I planned on using a Navy findings kit from Bra-Makers Supply, as well as Navy Power Net from them. So, I needed Navy thread. Fine. I got Navy thread. When I sewed the elastic on the back of the lace though, the Navy looked terrible. So, off to the store to match some thread to the lace. The thread that matches the lace, doesn’t look great on the Lycra. Sigh. I wasn’t going to buy a third spool of thread for the bra, so the Navy thread is now a design element on this bra.

front

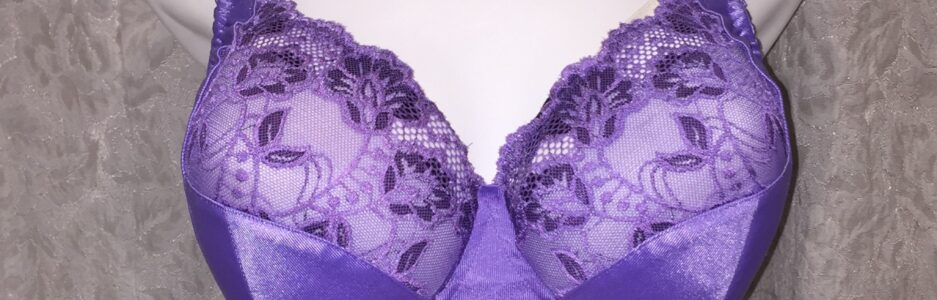
Here’s the bra from the front. I love those three little bows at the front. And those little bows … they’re all me-made. The Merckwaerdigh kits don’t come with bows. The only bows I had really didn’t go with the colors of the bra, so I looked at my ribbon stash. This golden ribbon was the only one that went well. It’s really fun to make ribbons, and easy. I shared how in this post. I used the cardboard method, but the fork method looks like it produces a lovely bow as well.

three bows

Here are the bows all finished and sewn on with a blue bead in the center. It hides that little wrinkle pretty well.

back

Here’s the back of the bra. I did over-calculate how much I had to add to the band using the new, stronger elastics from Bra-Makers Supply. You can read about those elastics here. I had to cut a bit off both sides to make it perfect for me, and next I’ll adjust my band pattern.

So, how did my experiment go? The bra fits a touch looser than when I make it from Duoplex. The only place I noticed any wrinkles at all were under the arm where I already have to make an adjustment. Now, if I could only sew Lycra more neatly and without wrinkles!

Now onto the Bra-a Week Challenge submissions!

This is week 25 of the Bra-A-Week Challenge, and this week we have some very beautiful submissions along with my own.

The first bra is from Sofia. It is such a delicate work of art inspired by a one of her favorite lingerie brands.

Little-Black-Bra

Here’s Sofia’s Little Black Bra. Isn’t that gorgeous? Sofia used Eyelash lace backed with nude Power Net to achieve the look on the front of the bra.  As well, she took careful attention to match the lace on the cups. All that extra attention does show. She finished her bra with black Power Net for the band and a 3 Hook and Eye set. Stunning!

You can read more about Sofia’s inspiration and Black Lace Bra on her blog Silver Lining. So very lovely!

Our second bra this week is from France and it’s actually a set of bras, not just one.

IMG_2287

I can’t even imagine how wonderful it would be to have someone make custom-fitting bras for me. France is making them for her Mom. What a wonderful thing!

Look at all these beautiful bras! This is what you can do once you have that perfect pattern.

IMG_2288

This photo shows the back of the bra. Look at how perfectly the whole bra fits! And it looks really comfortable too with that full back. That’s just so great!

Our next submission is from David of Bonnet Bleu. It’s another lovely delicate looking bra. David made this bra using Black tulle and white lace for his triangle lace cup bra with nude bra cup foams.

Zdj cie0469

The black is more visible here from the side. The wings are black. So very lovely and delicate looking.

Zdj cie0472

David is a freelance lingerie designer, label: Bonnet Bleu.

Happy creating!

A Quick Repair and Another Skirt

Recently I was wearing one of my Shelley bras, and something just didn’t feel right about the back. I felt around and I was all done up, so really didn’t know what was going on there. So I had to wait until I got home and could look in a mirror to see what was going on.

What Happened Here

This is what I saw! Well, that’s just isn’t working, is it? I knew I would want to repair this bra right away, as it’s one of my favorites. It didn’t take me long to realize the elastic I used at the back just wasn’t strong enough to hold … well, it wasn’t strong enough hold anything.

I had this elastic in my stash, and hadn’t used it at all because it was so flimsy.

bad elastic

You can see here, I had a fair amount of it too. I hadn’t used it on any bras because it just stretched out; it didn’t recover. I decided this is not anything I wanted in my stash, and it wasn’t good enough to send to a friend. It has left my home and is where it belongs now.

repaired

There are times when a repair or fix needs to happen, and after carefully sewing things on so they won’t come off, I just don’t want to rip things apart. I felt that way after double stitching my  hooks and eyes on, and zigzagging the edges as well. So, what other options are there for a repair?

For my repair on this, I ripped the old elastic out up to the hooks and eyes. Then I trimmed it really close to them. I butted the new stronger elastic up to where I’d trimmed the old away and zigzagged that first. This allowed me to not need to remove the hooks and eyes, which weren’t the problem anyway.

Then I attached the rest of the new elastic to the band. I’ve worn this a couple of times now and no problems at all. Bad old elastic!

This week I finished another skirt. I live in skirts in the summer. In fact, I have my next skirt all cut out waiting to be sewn. Skirts are my summer staple.

If you haven’t tried the Flirt Skirt yet, I really recommend it. It’s a very comfortable skirt to wear, and I get so many compliments on it. It’s that back part. The part I call the ‘flirt’. That’s the part people are saying, ‘Turn around’. ‘Did you make your skirt?’ ‘What pattern is that?’ It’s definitely fun.

Untitled-1

This skirt has no stretch in the material, so I changed the pattern a bit – instead of using my knit sloper, I used the woven one to determine how big to make the pattern. The denim I’d used before only had a bit of stretch, so I didn’t need to adjust this one that much. This is a light-weight cotton with a denim look.

Untitled-2

And from the side with that flirty part showing.

No photos of me in my skirt just yet – my photographer is absent at the moment, and has been too busy to be my photographer this week.

Happy creating!

A Shout Out and a Few Accomplishments

I’m one of those people who LOVES gifts. Just ask my dear hubby. Our first year married, he got confused because my birthday and a former long-time girlfriend both had our birthdays on the 15th – just different months. It was a lovely fall day, and he was heading into the room I was in with a card in hand and something behind his back. His Mum realized what he was doing, and stopped him. I had no problem with it at all. I just told him I wanted my gift. I didn’t care what the occasion was. I was good with the mix up – just hand over the gift. He made me wait. But that tells you a little of my personality there. I love gifts!

So, I want to say a big ‘Thank You’ to a couple of wonderful fellow bra-makers (whom I met on Amy’s Sew Along) who have sent me the loveliest gifts. Thank you Ginny and Naomi!

A while back, Ginny sent me these lovely laces and elastics.

Laces and elastics from Ginny

I’ve dipped into these elastics on more than one occasion. Elastics have become a valued item here. I hate using precious elastic on something that ends up not fitting! And I have plans for one of these laces on a bra I’ve got all cut out. But not the one I’m working on right now – I ran out of strap elastic for the cut out one.

Ginny also sent some adorable earrings she’d made – which didn’t make it into the shot here. You can see some of her hand-made creations here in her Etsy shop.

These are the laces I just got from Naomi. I love that beige. I’ve always been a beige or black girl. But there are too many laces out there that are so pretty to stick with that. Pretty colors, here I come!

Laces from Naomi

And a bunch of elastics, straps, upper cup elastic and more. Oh, that dark purple… such a beautiful color.

Elastics from Naomi

So a really big Thank You to both ladies.

And those accomplishments I mentioned? I finished my moulage AND my sloper. Both patterns are packaged away for the time being. I have to sew something now and I’ll pull the sloper out after I get my sewing fix.

moulage done

Here’s the final moulage. I found this great material in the clearance area and it worked better than the printed one I’d used previously. It is such a relief to be done this. Naomi sent me a great idea to transform my dress form using the moulage. Take a look at how Mary did it in her blog Cloning Couture. I’m definitely mulling this idea over. It’s a great idea!

And lastly, here’s an idea I got from Sigrid’s blog. And I looked and looked for this posting from her, and could not find it. Here’s what she said, “Pin (or baste) the cup over a well fitting bra, using the seam allowances for the pinning.”

Testing Bra Cup size

This is a new pattern for me. It’s Kwik Sew’s 3300, and I had to guess which size I was going to be. I did pretty well. This is a great starting point. I’ll have to change it from a partial band to a full band, but I can do that fairly easily knowing the basic cup pattern will fit so well.

Standard alteration to fit in smaller wires

This isn’t the easiest to see, but there’s a pin there at the bottom of the cup where there is excess material. That’s about a standard amount I need to take out to account for the smaller wires I need. So this is on it’s way to being pretty good already. Off to work on some pattern alterations now.

Happy Creating!