Hmmm

Well, I’m not sure how I feel about this one. It fits and I’m actually wearing it now. But there’s something I’m not loving about it.

Pink Butterfly material

Maybe it’s just too pink! I thought it would be so pretty for spring. But I’m not loving it.

It’s the Pin-Up Girls Classic Full Band pattern. I got the material from Merckwaerdigh‘s store, and the lining from Bra-Makers Supply. It’s a cotton-Lycra blend. I lined the cups so they would be non-stretch.

Something  I tried that a little different is I added the strap to the top of the lace. I don’t think I love that. That, and all the PINK from the front view.

Pink Butterfly side view

When working on the bra, I decided to add a little of the lace to the side seam. It doesn’t look so bad from this angle. But that front view just looks SO PINK!!! Maybe it’s because I’m really more comfortable with basic colors and adding something to them like some color in black lace. Ha! Honestly, if you looked in my closet you’d find half or more is black!

This view shows a little more of the Lycra material. Isn’t that pretty? I think that’s why I bought it – all those flowers.

No, I’m really not sure how I feel about this one. I actually wrote this blog once and deleted it because I’m not crazy about this bra. But it does fit, and I am wearing it.

Hmm.

I’m looking forward to something a little more toned down for my next bra.

Happy creating!

And This Time With Seam Allowances?

I enjoy reading news online, and usually check what’s new before I read my emails in the morning. One morning there was a video saying what NOT to buy your girlfriend for Valentine’s Day. That got my attention, and I figured it was going to be something to do with lingerie.

And it did have to do with lingerie. Basically, men were being told not to buy bras for their girlfriends because bras were hard to fit. I had no problem with that – that is very true. However, it was the next part that really surprised me and stayed with me.

After telling men not to buy bras for their girlfriends, the video went on to offer help in bra sizing. Here’s their help: The Fruit Rule. If she’s the size of a couple of lemons, then she’s an A cup; the size of a couple of oranges, she’s a B cup; two grapefruits? she’s a C cup. And to finish it off nicely, if she’s the size of two cantaloupes she’s a D cup. Isn’t that nice and neat? I can’t speak for all women, but I don’t fit into that fruit salad.

Enough about fruit comparisons, I’m going to share a little more of my progress with my ‘adjusted’ Shelley pattern.

I’ve been mulling over my Shelley without seam allowances for a while now. I did add seam allowances and then got thinking about whether that was what I needed or not.

I made a tester bra to see how it fit with seem allowances and it just wasn’t giving me the fit I wanted. My dh says I’m trying to get a perfect fit, and I say,  ‘Yes, I do want a perfect fit.’

Without the seam allowances added, it fit perfectly into the cradle size I need. Without seam allowances the lower cup fit like a dream – something I’m struggling to achieve. However, without seam allowances, the upper cup was too small. I need more depth to get the bridge to sit against the chest wall, and a little more coverage up top too. I was torn between adding seam allowances and/or redrafting the upper cup somehow.

I decided to add a seam where there isn’t one – I added the amount of a seam allowance to the top of the upper cup, and also changed the pattern so I had the depth I need to bring the bridge back. It all worked. This one got a bow even, or as another blogger put it – it was bow-worthy.

Shelley front view

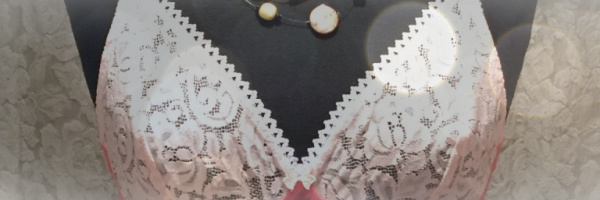
Here’s my latest Shelley from the front. I used the black forms I’d made and shown a few posts ago. They don’t fill the cups out completely, but I think they fit better than the foam cups did.

I love the lace and duoplex combination on this. The lace was from Merckwaerdigh’s store on eBay. The duoplex and findings are from Bra Makers Supply.

To help the upper cups fit a little better, I didn’t line them this time. On my first Shelley I did line the upper cups. Since I need a little more give there, no lining this time around. And that helped too.

Shelley side view

I have to say, I LOVE how neatly the cups are fitting into the cradle. I am so very pleased with how this has turned out. I didn’t like the look of the ‘easing’. I had to do so much easing along the lower cup, it looked more like gathering to me. And it gave the cups a balloon-like shape. This is much better.

Shelley back view

And a basic back. Looking at it, the straps seem a bit far apart, but I didn’t notice that when I put it on. Something to think about tweaking for my next time.

I got my ‘real’ Shelley pattern in the mail today. Tomorrow I’ll have some time to pull it out and compare all the pieces to what I’ve made from the Pin-Up Girls Classic pattern and CD Designer Bras by YOU! I have to say, I loved learning how to make this, but it will be a treat to have the pattern too.

My next project may be to help out a friend. She recently went to a specialty store and was fitted only to find out they don’t carry anything in her size – too small around the rib cage. After dealing with the fitting challenges of the Omega shape, a small band almost sounds simple. I’ll post what we do, and how it turns out.

Happy creating!

This is a Test; This is Only a Test.

Boy, that takes the pressure off. Knowing this was only a test; knowing I wasn’t going to be making the WHOLE bra before I found out if it would fit. That really took the pressure off.

So, onto my tester bra that I’m sewing for Amy’s Sew-Along.

I’m sewing the DB3 by Danglez. Starting all over was a bit of a stress. I’ve made so many alterations to my Pin-Up Girls Pattern that I can now go to it and know I’m going to get a bra that fits – even the Shelley. (smile)

However, I didn’t know at all how this bra would fit. And if anyone is wondering, I did get the right size. I decided to try some of the alterations I’ve made to the Pin-Up Girls, and things have worked out pretty well.

Adjustment to lower cup for Omega Shape

These tissue paper pictures really don’t show very well, but it does give you an idea of what I’m doing. Here are the alterations I made to the lower cup. I did the same for the power bar. I was hoping this would take enough of the extra out of the pattern around the wire line, and it was pretty close.

showing the adjustments for Omega shape not enough

Here you can see I didn’t quite get the adjustments I needed and still had a little more cup than wire line. I took my pins out and made my power net stretch a bit. I did alter the pattern again though, so next time I won’t have to stretch it all.

front of tester bra

Here is the front of my tester bra. The cups fit well, but I do need to take them in at the underarm – just like my Pin-Up Girls pattern.

For the material, I didn’t use my ‘good’ materials that I’ve ordered from Bra-Makers Supply or Merckwaerdigh. This is some left over Power Net, and some Lycra I bought on sale the other day. I did interface the Lycra to give it more support.

interfacing on the lower cup

This shows the interfacing on the lower cup. I also interfaced the bridge & powerbar for more support.

back of tester bra

This last picture shows the back of the bra. If you look, you can also see the pins at the underarm and center of the bra. Those are areas I want to adjust on the pattern.

I am so happy with this tester bra experience. Trying it out first and knowing I wasn’t going to be ‘completing’ the bra really was a tremendous idea – Thank you, Amy!

Now to upload my photos to the Sew-Along. And soon to come, my completed Danglez DB3.

Happy creating!