Lowering the Bridge

So, I want to take a quick look at where I was at: the new longer wires I’d tried weren’t fitting properly and it was almost like giving up all the ground I’d gained in getting a proper fit; the bridge wasn’t going all the way back to the chest wall – and I was really beginning to wonder if it was really possible!

I put in yet another call to Bra-Makers Supply with another question. And guess what? Bridges really can go all the way back to the chest wall! I’ve had success!

Something that would have helped me tremendously is Norma’s new book: Demystifying Bra Fitting and Construction. I’d read on someone’s blog (I can’t remember whose blog to give her credit (sorry!)) there is a great section in the book on bridges, and that one section alone made the whole book worthwhile. It really is a great section! I’m hoping to have some time either today or Saturday to try it out. And even if you’re getting a great bridge fit, there is so much information in the book. Well done, Norma! and thank you!

However, I did have more success this week with my bridge. Is it perfect yet? Not quite, but it is actually all the way back to the chest wall. I think I just need to tweak the shape now.

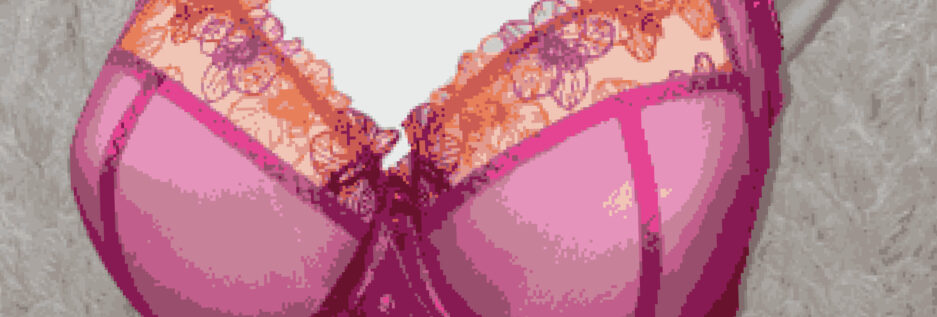
Here’s my most recent Shelley.

Bra front

Most of the materials are from Bra-Makers Supply, but the lace is a wonderful lace I found in Merckwaerdigh’s store.

On this bra I lowered the bridge by 3/4 of an inch. This gave the bridge the room it needed to go all the way back to the chest wall. I also overlapped the wires at the top of the bridge. I tried a tester earlier in the week without overlapping the wires but I still wasn’t getting the bridge all the way back. So, now just to tweak the shape a bit. Even my hubby said this is the best fit he’s seen me get yet.

bra side

Here is the side view. I re-made my Shelley pattern for this bra, but still need to take a bit out of the underarm area – there are a few puckers there, but not so many that it’s unwearable. Everything else was really good. Well, I may move the straps in a tiny bit.

bra back

And the back. I am really loving the new way of attaching the straps. As promised, I took some step-by-step pictures to show what I did.

Top elastic sewn on

When attaching the upper band elastic, don’t take the elastic down around the curve to the hooks & eyes; end it at the top of that curve. This has been trimmed to be nice and neat.

new shoulder elastic pinned

Take some elastic – I’m using the same bottom band elastic here – and pin it on with the little scallops facing outward. Can you tell I like to pin things securely?

shoulder back pinned

Put a ring or slider on the elastic and fold it over. Since the rings & sliders come in sets, I’ve alternated which ones I’m using and they both work great. Here it is from the inside of the bra. And again I pinned it.

strap attached

After sewing it on with a zigzag on both sides of the elastic, I attached the strap. It gives a nice professional finish to the bra.

close up shoulder attachment

Doesn’t that look nice and neat? I will definitely use this again and again.

Next to try again with my Shelley with a couple of tweaks.

Happy creating!

Here a Change, There a Change.

Just a follow up from last week’s post: I don’t prefer Vertical wires. I wore them for a whole day, then on the second day I took them out. I put in my regular Long wires and am much more comfortable. That just goes to show, some women dealing with the Omega shape will do better with them, others will not. There really are no ‘set’ rules, are there?

So, I had altered my Sewy Rebecca pattern for my needs – smaller lower cup edge to fit into the smaller wire frame I need. But I decided to do a few more alterations. Here’s why:

There are things I do like about the Sewy Rebecca, and there are things I don’t like about the pattern. There are also things I like about the Shelley Full Band pattern, and a couple of things I’d change. So, I decided to see what would happen when I put the two patterns together.

I was joking with Andrea from Satin Bird Designs saying I was creating a monster; she dubbed the new bra the Franken-bra. Thankfully, it turned out very well and much prettier than those monikers sounded too.

Here’s what I did:

1. I really like the upper cup on the Rebecca – it’s just a little straighter across the seam line, so gives a little more lift. So, I used Rebecca as my starting point.

2. However, I like the split lower cup on the Shelley, so I split the lower cup on the Rebecca.

3. I also changed the shape of the Rebecca  power bar to look more like the Shelley – especially at the top where it joins the strap. In the English instructions for the Rebecca only strap elastic is used for the straps whereas the Shelley uses a fabric strap, which is my preference.

4. So I added the fabric strap.

As cute as Franken-bra is, I re-named her Shelley Rebecca. Here she is:

Front View

Here’s the front view. I used a non-stretch lace (Floral Lace Fabric) I bought from Bra Makers Supply. I really like this lace fabric.

Here’s their description:

“All-over woven lace with a floral design with virtually no stretch – making it perfect for bra cups. We would recommend stabilizing the fabric for the frame or the straps but it certainly could be used for the entire front of the bra.”

I really like this material. One thing I like about it is the seams virtually disappear into the fabric because of the texture of it. The other is it really is non-stretch, so can be used all over.

Side View

Here is the side view. Nice smooth fit into the wires, so I’m very happy. (If you’ve been reading along, please notice my restraint here in what I’m NOT mentioning.) A nice small underarm area, so again happy me! Do you see how those seams blend so well. I had to lighten the photos to get the seams and other details to show at all. Black on black really isn’t the best for photos.

Back View

Hmm, straps felt a bit too far apart still. I need to go through my patterns and make a back pattern I’m completely happy and thrilled about.

Again, I used a straight stitch to tack down the eyes, and then this time I also changed my width for the Zigzag to a wider than 2.5 stitch, which is standard for sewing lingerie. Both of these helped it go on nice and neatly.

Cup with arrows

This is just to show in a little more detail how the seams virtually disappear with this fabric. I was quite impressed with this. It also shows where I put the seam in the lower cup of the Shelley Rebecca.

Strap

Here’s where I changed the top part of the power bar. I also changed the direction it faced at the very top by cutting off the top and taping it back on ‘backwards’. I think I preferred it this way as I need the straps in a little more normally.

Well, I have more sewing to do, and a medical ID bracelet to make too.

Oh, and I used the foam cups to fill the bra cups this time. I’m still undecided which looks better.

Happy creating!