I’ll be honest, it might actually be take four, or maybe even five. I think I’ve blocked a few of them out. But! I’ve finished them and they fit just how I want.
I didn’t want them to be tight. Oh my! No! I wanted them to skim over my hips and my thighs so I’d feel they flattered my figure. And I have that now.
I’ll try to get a couple of photos for you soon with me wearing them, but for now we’ll have to use the mannequin.  I made a few more alterations. I added more length to the rise, and went up a size in the hip to get the results I wanted.
As well, I didn’t do the flirty little side opening. I love it, but it’s still winter here. We have a lot of snow on the ground. So I’ll save that fun feature for summer pants.  So I now have a great basic pattern for knit pants, with a very fun optional side slit.
To deal the the difference between my hips and waist, I added back darts to the pants. There was just no way the waistband was going to go on smoothly otherwise.
I also used my coverstitch option on my serger for the first time.  It worked well, but it’s very different from the other coverstitch machine I had. I had to downsize in our move, so traded that machine as my serger has both functions. It was a bit of a struggle, but I have a few RTW pairs of pants just waiting to be hemmed. I’ll get more practice in soon.
I have to admit, bra sewing is my passion. I don’t LOVE other clothing sewing as much. I’ll be getting more practice though. I’ve signed up for the Cashmerette Sloper School. Sewing up my sloper will be another March project.
Good thing I have a bralette to make for Em this month. I think I need to sew something for me too. Is bra-sewing withdrawal a thing?
Happy creating!!


 What I’ve learned so far for fitting pants is, I need to lengthen the rise, adjust for full thighs, and a sway back. But I’m getting there!
 Here’s the side view of the pants. You can see at the bottom I have them tied up. It was too cold to have them open. You do not want to know what the temperature has been like here!
 Here’s a close up of the opening and the knot. It would work wonderfully in a drapey fabric, but as you can see it works in a CL as well.
 Lastly here is the back view. I do like these, but I really want a more flowy drapey look. So I’ll be working on making a few more adjustments to these – but not so much for fit. More for style this time.
 Honestly, I think I fell in love with the lace here, but our first assignment was a woven top, and this does fit that.
 I love that little keyhole design on the back.
  These are very flowy and I don’t think I’ll need to make any other changes to the pattern. And, I can finally throw out that terribly worn slip.
 The one big difference between the culotte slip I had and this is the old RTW one didn’t have a front or back seam.

 Oh, I loved the lace and the copper duoplex together. I was sad it didn’t fit perfectly.
  I loved the shaping of this bra, and the Freja is very close to the same shaping.
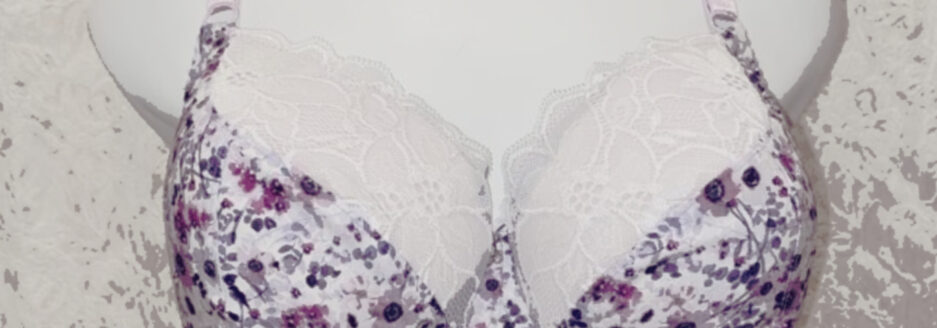
 I had this lovely pink kit from BMS so decided to use it for my second attempt of the Freja. It’s lovely!
 I could use the tip from Porcelynne on the side here – to add another strip of channeling beside the wire channeling and add boning there. However, when I was wearing this it wasn’t bothering me that the wire is a little lower at the side.
 I’m really happy with how the Freja fits. Yes, there’s a little playing around I can do to help my Omega shape fit even better, but for an attempt I wasn’t sure would turn out better than the first time, I’m very happy.
 Next I’m thinking of making a pair of panties to match.
 You can see on the bottom here I’m not cutting off the seam allowance on the bottom of the pattern. You will need that – that is the part that is sewn into the cup.
 You’ll want to sew both the foam and lace cups into the cradle at the same time.
 As well, you can change the shape of the upper edge of the foam, and have some fun with the foam not being exactly the same as the cup. The foam on the cup above follows the curve of the lace cup.
 I do my best to line up the vertical seams on the foam with the seams on the cup.
 I love this! I’m really happy with it.
 Here is one last photo of my new Josey Milady. Showing the inside of the bra, and the curve of the foam cup.
 This one I think will be perfect for the Josey pattern, or the Shelly pattern, but I’m going to try copying this color combination on Lilypa’s new bra pattern –
  I love this style. I can’t wait to make my own bra using the colors of the Madison above.
 It’s a treat it is to teach in this store. They just had their grand opening at the end of June. It’s a beautiful new facility. One of the best features is the classroom is on the main floor.
  First thing when you enter the store, there’s a mannequin advertising the bra and panty classes wearing the tiniest bra and panty set.
 The classroom was all set up and ready for us! We had our fittings there behind the screen.
 Four women signed up, and I was happy they all left with well-fitting bras.
 One woman was really having a problem with her fit. No matter what we did, her bra wasn’t fitting. After two attempts with alterations both times, and the end of the class nearing I suggested flexi-wires. Once we put the flexi-wires in her bra it fit her perfectly. It was amazing the difference the wires made in her bra fitting.
 Here’s my croquis wearing the line drawing of the dress. One thing about trying on clothes this way is it won’t account for any adjustments I make to the pattern. I won’t be using one size. I’ll be blending sizes together to get a better fit.
 I’m still not sure about the shape for me, but it might be one of the most comfortable dresses I ever make. I definitely think it’s worth trying.