I had been asked a few questions on how to make a foam lined bra. Here’s what I’ve been doing.
The first thing I do is take my pattern pieces and mark where the seam allowances are. Most of mine are where the designer put them, but all my bras are adjusted for an Omega shape. And yes, you can do this if you have an Omega shape.
You’ll have to ignore the orange markings on the bottom of this first photo if you’re following along to do this yourself. You DO NOT want to cut that part off. The rest of the seam allowances you do cut off.
Here’s another example. You can see on the bottom here I’m not cutting off the seam allowance on the bottom of the pattern. You will need that – that is the part that is sewn into the cup.
Once you have cut off the seam allowances on your pattern, you have a foam cup pattern pieces that fit you and will line up perfectly with your lace cupped bra.
Sew the foam cups together with a wide tight zig-zag stitch.![]() Once you’ve sewn your foam cups together cover the upper edge of the foam with fold over elastic.
Once you’ve sewn your foam cups together cover the upper edge of the foam with fold over elastic. You’ll want to sew both the foam and lace cups into the cradle at the same time.
The underarm elastic will fold over the foam, so it only gets one pass of sewing (the second one) when sewing on the elastics there.
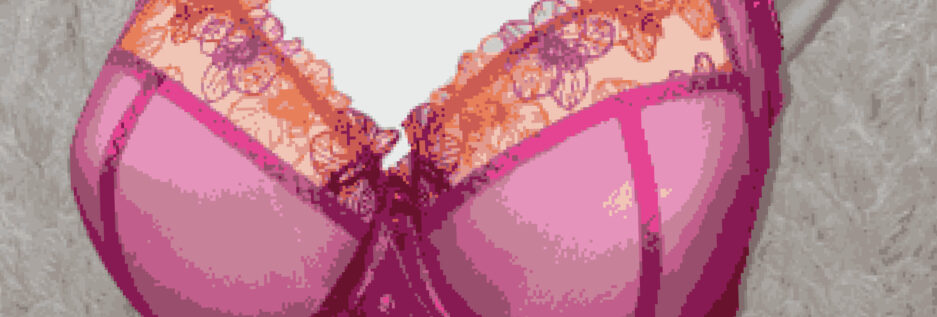
Your foam cup is fully attached to the cup. It is attached at the bridge, fully under the cup, and at the underarm. It does not move. The foam cup is loose under the lace at the top.  As well, you can change the shape of the upper edge of the foam, and have some fun with the foam not being exactly the same as the cup. The foam on the cup above follows the curve of the lace cup.
On this bra below, instead of following the curve of the outer cup, I gave the foam more of an up-swirl towards the underarm. I do my best to line up the vertical seams on the foam with the seams on the cup.
I hope this blog post has answered all the questions you’ve had, but if you have others please let me know.
Happy creating!
