December – Snowy and Snuggly – Stay warm and cozy this winter in your new favourite snugly underwear. Not only do we encourage you to make warm and comfortable underwear, but why not think outside the box and try lining your bra with something that will take the chill off? It could be cotton lining, foam, fleece, fur, or something you come up with on your own!
For the challenge this month, I didn’t do a bra or underwear. This month it’s a set of matching sleep tees for a couple of dear sisters. A friend called and asked me if I’d make them for a Christmas gift. And I thought they’d be perfect for my entry because they are definitely something snugly and to keep warm.
Both sisters are musicians, and their mom found a great knit with a musical motif. How adorable is this? Being a musician myself, I love it.
I shared earlier the pattern I planned to use. It’s a really great pattern. Quick and comes together well. I made view B with short sleeves for both of the sleep tees.
Here they are from the front. I think they turned out quite well. I love the treble clefs.
I also finished both of these with my Cover Pro machine to give them a nice finished look.
Here’s the side view. I really like the curved hem on these too. I think it’s very flattering.
On the first one, I followed the instructions, which have you hem the front, back, and sleeves before sewing up the side seam. I didn’t love that, so didn’t do that on the second one. On the second one, I sewed that side seam up and then hemmed the tee with my Cover Pro. I did like that way better.
And the back view. Yes, I think these will be warm and snugly.
Happy New Year, and as always, Happy Creating!
 This is lovely, and I may copy that little peep hole feature at some point.
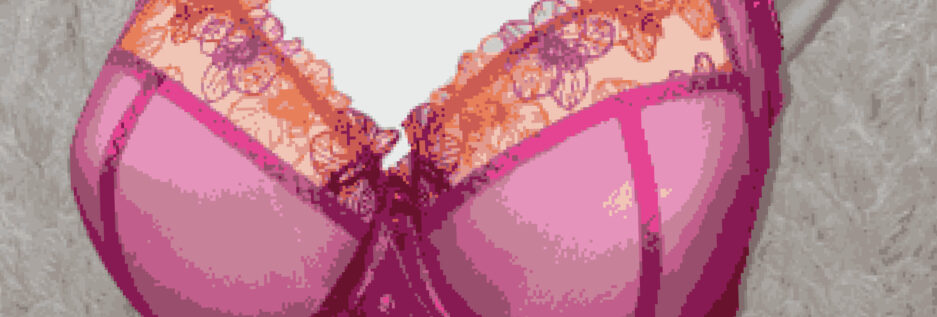
 A foam cup for some amazing lift, and a vertical lace cup over top.
 This is the Panache Quinn High Waist brief. On, this is pretty. Yes, this is my inspiration this month.
 I chose not to do a high cut brief. I used to love high cut briefs when I was in my 20s… before I had kids. I’m much happier with hipsters these days.
 There is a peek of that lace in both views.
 Ooh, that is so pretty. This lace is so soft too, so these cotton-Lycra panties will still be so comfortable, as well as very pretty.
 I just may have to make more of this design.
 I even have a couple of kits with strap lace in my stash. You know those kits that you save for someday. The strap lace is similar to what’s shown below on this gorgeous bra.
 Just look at these straps from a favorite RTW bra, the Prima Donna Milady. Those little bits of heart lace are adorable. I have some similar bits in kits from Kantje Boord. In fact, I bought the kit for the strap lace.
 This is a gorgeous left & right mirrored lace. It was my first time using anything like this, and it was fun. I chose beige duoplex for my frame because there was some pretty floral detail in beige too. I tried it with brown, but that was just too dark.
 To reinforce them, I’ve used sheer cup lining to make narrow tubes behind this strap lace. It worked perfectly.
 I’ve used the lower edge of the lace with just a little bit of the embroidery on it for the lower cup pieces.
 Lastly, I cut out a tiny floral from some of the remaining embroidered lace and used that instead of a bow on the center front.
 Have you used a kit with strap lace before? I really enjoyed it and want another kit now.
 This is the lovely Ruby pattern. The cups are all lace with sheer cup lining behind the lace. That lining is not my sheer though. You can’t actually see the sheer part of my bra from the front.
 I’ve used this awesome burnout material for the band. It’s a little bit lighter than regular power net, but I couldn’t resist it. And it’s a fun little detail to make the sheer detail part of the band.
 I love this material. This was a purchase from a few years ago from Merckwaerdigh’s Etsy store.
 Oh, I love this material! I think a whole bra in this would look amazing.
 For my July entry, it was back to the drawing board in terms of design, and pattern. I just didn’t feel like I wanted a second swimsuit right now, so I asked Em if she wanted one. YES! Yes.
 It’s pretty adorable. But it’s also too small. I’ve never made this pattern before, and I’d need to size up the bottoms for sure. Sadly, they won’t fit Em, and they won’t even fit on my display.
 The front of the Marsha pattern has some adorable features too. A fabric twist at the center front.
 I’m sad this is too small, but am glad I tried this challenge and learned a few new things.
 Here’s my second pair.
 I moved this seam only because I wanted it a little further forward. I could move it forward still, but really, I’m just playing with the seam at this point.
 Happy creating!
 This turned out to be very pretty. Of course, there are still a few changes I want to make, but this fits so well. All the adjustments I learned are making this my best fitting bra yet.
 I also lowered my bridge, and raised the bottom of the bridge, and widened the bottom of the bridge too. And added the Gothic arch.
 I’ve moved the strap placement over on this pattern. One of the things I love about the Ruby pattern is I don’t have to pull so very much all along the underarm with my elastic. Just a little pulling and it fits well.
 Here’s the side view. Look how nicely the cup is fitting into the frame. Oh, I’ve said it before, and I’ll say it again. I’ll never get tired of seeing how nicely the cups fit in after taking that class with Jeanette.
 The final adjustment I made was to move the straps in on the back.
 Seeing as the bra has white in the lace, I thought white lace trim would be perfect for these panties.
 These are my self-drafted Hipster panties, and you might notice the side seam is forward a little. That’s just so all my side seams aren’t hitting all at the same place.
 And the back.
 It’s been a long time since I was a bride, but I love my new blushing bridal set.
 I think these are adorable! In fact, I like them so much, I went on to cut out five more variations! I’ll show you those after I show you the side and back view of this first pair.
 And the back view.
 I used up the last of the stripes, and that inspired me to make a pair in the last of the black with white polka dots. These are so cute.
 I have two more pair of white with black polka dot panties all cut out, but somehow with a whole rack of thread, I didn’t have any white thread.

 Aren’t these great? I hadn’t decided if I wanted the black on the bottom, on the top, or color blocked, but I knew they’d be adorable together.
 Here they are side by side.

 I like this one a lot better.
 As I was drawing this, I realized exactly what it was I didn’t love about the first two combinations – I wanted more continuity between the top and bottom pieces. So Rad Patterns’ Panel Undies inspiration struck again. I could do an ombre panel on the tankini bottoms as well.
 I told Jeanette I was going to copy her idea. These are adorable, and I knew my own pair would go so well with the Ingrid bra I just made.

 Here’s the scuba panel I added to the side seam.
 The scuba is really nice to sew, and it adds such a lovely pop of color. I’m so glad I saw Jeanette’s little shorts and copied them.
 Even the back has a little pop of color with the waistband.
 Lastly, here I am putting my new capri-length pants to good use.
 I love these, and am happily planning my next Challenge entry.