Still Looking for Perfection

Well, I think the title says it all. However, I feel a little trapped in the try-try-again scenario, I know going back to RTW bras isn’t the answer either, especially knowing my cup & wire size do not match.

So what progress have I made in the last week or so? Well, remember my pretty bra  – the black Lycra with swirls and the flipping underwire? And I mean literally flipping; I’m not trying to cover up a swear word. I had a thought what I could do to make it wearable. I pulled out my underwire stash and compared the bra’s cradle to the different sizes – I knew 38 was too small, and 44 too large. I found one that fits quite well. It’s not perfect, but it is wearable – and still a closer fit than RTW.

Duh

So pretty and still wearable. Not perfect though!

And on the topic of underwires… I thought I found my perfect fit, but when I wore the couple of bras I’ve made with that size of wire, they’re doing what started all my alterations in the first place – causing a deep ridge under the bust. So, they’re either too big or too small. Since they’re not digging into me at all, I’m thinking too big. This really is another area of challenge for me.

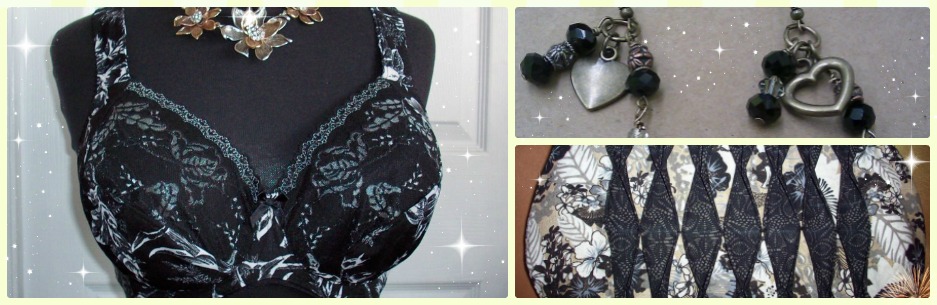
This week I continued with my idea to use my Sewy Rebecca pattern and make a Classic Full Band bra pattern. I made the adjustments after making a tester, and here’s the result.

Bra Front

Isn’t that pretty? I love the fabric – so glad Lycra and I became friends again. Overall, it’s a pretty good fit. I’m still not getting the bridge all the way back to the chest wall. I’m starting to wonder if that’s going to be an elusive myth that I search for all my sewing days!

As a side note here, I did put a call in to Bra-Makers Supply and had a talk with Beverly about how I was not getting the bridge all the way back. She suggested I try a cup size up and band size down. I tried it and the band did fit better, but the cup was too big. Maybe I’m in between cup sizes. And still no bridge contact!

Bra Side

Anyway, I’m going to have to encourage myself a bit with the progress I have made. I do have a larger cup fitting into a smaller wire, and it is nice and neat looking. I do have a better band for me, and the straps aren’t falling off my shoulders – which they did in RTW too. So I am making some headway here.

Bra Back

I really like the black elastics with this material. But I can see one area here that I didn’t notice when I wore it – that gap under the arm at the side. Again, the problem is a difference in my shape and the mannequin’s. There is no gap when I wear the bra.

New Way to Attach Strap @ Back

And this is a great little way to attach the straps. I learned this when I had the private lesson a few weeks back. When attaching the upper elastic to the band, rather than run it down the strap curve, leave that until after the upper elastics are sewn on. Then use the bottom band elastic.

Pin the elastic on outside of the band covering the strap curve, attach a slider or ring here, fold it over and pin it so it doesn’t move on you, and sew it on. I really like this look – it’s a very neat look.

And if that wasn’t clear, let me know, and I’ll post pictures of next time.

Finally, the burning question of the week? Did this new pattern with a straighter upper cup give me a little more lift? I think it did. I also looked through my stash of patterns to see if I had a straighter upper cup in any of the other ones I have, and didn’t find one that was straighter.

Happy creating!

A Tester, A New Pattern, and Duh!

Do you ever do something, and then wonder, What was I thinking?’ Well, I was either over-thinking or not thinking at all!

Here’s the lovely bra I made:

Duh

You saw a bit of this last week. It’s lovely, the fit is pretty good. I’m still not quite getting the bridge back to the chest wall (Grrrr!), but it’s almost wearable.

Almost. Did you notice that. I did wear it and here’s what my problem was: the underwire was flipping up at the front under the bust and twisting along the bottom of the bra! What? This was a completely new one for me. I had no idea what wasn’t working. And it made it a bit uncomfortable.

So a call to Bra-Makers Supply and a question for Beverly. It kind of felt like deja vu – her answer was similar to one from a long time ago in my journey – something was either too big or too small. Last time it was the wires, this time the cradle.

And yes, duh! The cradle was too big. I have no idea what I had been thinking but I did not use a 38 cradle – used a 44 and folded it to take away some of the width. I eye-balled it, but clearly not well enough. There was an inch in there that needed to come out. It should have been so simple – use a 38 cradle and make it the same length as the 44.

So, one bra that is in the pile to take apart and redo. I don’t love fixing my mistakes, so I have a pile of them and they wait for me. That bra is now in the pile. I’ll pin a note to it so I don’t forget why it’s there.

So, this week, I made a tester for my friend. Thankfully, she is an easier fit than me. Her cup and wire size match. That makes it a LOT easier. However, I did up a 30 F for her, and the band is too big and cup too small. I do know her wire size, so I can figure out where to go from here for her.

One thing she commented on, that I haven’t loved either – she wanted more lift in the cup. I understand that – I need all the help I can get.

So, off to the drawing board again. I know from the Bra-Makers manuals that the straighter the upper cup, the more lift the cup has. Hmmmm. I thought about the patterns I have with a really straight upper cup. But none of them are ‘classic’ patterns.

I used what I knew from making my own Shelley pattern from the Designer Bras By YOU! CD, and did it backwards.

I used my Sewy Rebecca upper cup and put it together with the powerbar from the pattern.

With Power Bar

Then I re-drew it.

New Classic Upper Cup

I added the strap tab, and gave the top a nice smooth curve rather than the straight edge for lace. On this one (which is reversed, sorry) I also took in the under arm.

Here’s the tester I did with my new pattern:

Brown Tester

It’s almost there. I tried this one before I did any adjustments just to see how it would fit. I found out I did need to take in the underarm in both the upper and lower cups, take in a bit of the length at the wire line, and add a bit to the bridge depth. So, I’ve adjusted my pattern, and I’m off to cut out my new pattern.

I do have another pattern that has an ever straighter upper cup, so I may do this same technique with that pattern this week too.

Happy creating!

Starting All Over Again?

That’s how I felt – like I was starting all over again. And I wasn’t thrilled about it either.

I’ve been very close on every bra I’ve made, but I wanted better. I wanted perfect. You’ve all heard that before!

So, a few weeks ago I checked on the old Bra-Makers Supply web site to see if there was a teacher who lived close to me.

I found a teacher, and did a Google search to see if she had a class  happening near by. I found a class too! And it is happening just over an hour from where I live, and in only a month’s time. I felt like I had hit the jackpot!

I called the school where she teaches and asked them to have her contact me. She called me the next day, and after our talking for a bit, she said I didn’t need the beginner class and then offered to come to my home and give me a private lesson! I was ecstatic!

It only took a few weeks from that initial phone call until I had an official Bra-Makers’ teacher! And in my home!

So we spent all of Friday and Saturday together. She told me one thing I already knew – I was close, very close.

So, we worked together over two days and I think the best thing out of the whole weekend was finding an even better wire size for me.

Let me show you what I mean:

38 - 44 Regular Wires

Here is the wire I’ve been using compared with the wire that usually fits my cup size. The smaller wire better fits me, but the larger wire fits the cup better. That has led to numerous alterations to my basic pattern.

However, that smaller wire is also lower in the underarm, and really wasn’t giving me the support I needed there.

I had put in a call to Bra-Makers and asked Beverly about it and she suggested a Vertical wire, and said the corresponding wire to the 38 was the 40 Vertical. However, the 40 Vertical wire felt too tight at the outer base of it. So I went back to a 38.

With the teacher here this weekend, we talked about it and then decided to try a 42 Vertical wire (42V) to see if it was a better fit. I really didn’t think it would be. I thought it would be too big, but it was perfect!

42 Vertical Wire to 38 Regular Wire

I’m not sure if you can see that or not, but I have the 38 wire on top of the 42V. I drew a bright pink line at the top of the 38 wire so you can see the 42V comes up higher at both the center front & underarm. This now gives me the better coverage I needed, without coming in too much at the base & side.

But I was in a panic for days trying to figure out what changes I was going to have to make to my size cup to fit this new wire. I did find a bit in the Bra-Makers Manuals on how to adjust for this, but wondered if I was going to make the cup too big seeing how I’m always adjusting smaller.

Then I had a thought today to compare it to the wire charts and see what size it was closest too. And it’s closest to a 44, which is the wire size that corresponds with the cups size I’m using! What a relief!

That got me cutting and sewing again!

Want to see one more wire picture?

42 Vertical Wire to 44 Regular Wire

Here’s the 42V on top of the 44 wire. The 42V comes up a little higher, but is narrower too. When measured, they’re the same length. Wire problem solved.

So, I don’t have a completed bra yet. I have a tester I did and it’s very fun material:

Tester Bra

This is a Lycra, with a non-stretch lining in the cups for support. I’ve decided I prefer the non-stretch lining to interfacing – it’s a much lighter feeling cup with more flexibility, and I think, even more strength than the interfacing gives.

I’m making the Pin-Up Girls Classic Full Band pattern, and from there I’ll make a new Shelley pattern.

List of Adjustments

Here are the adjustments I’ll need to make. I really didn’t want to start over, but felt that would give me the best fit using this new wire. Thankfully, I’m not starting over in knowledge! I’ve learned so much in the past year. Hopefully I’ll have my new bra done tomorrow. I’m planning on taking the day to sew.

Happy creating!

Hmmm

Well, I’m not sure how I feel about this one. It fits and I’m actually wearing it now. But there’s something I’m not loving about it.

Pink Butterfly material

Maybe it’s just too pink! I thought it would be so pretty for spring. But I’m not loving it.

It’s the Pin-Up Girls Classic Full Band pattern. I got the material from Merckwaerdigh‘s store, and the lining from Bra-Makers Supply. It’s a cotton-Lycra blend. I lined the cups so they would be non-stretch.

Something  I tried that a little different is I added the strap to the top of the lace. I don’t think I love that. That, and all the PINK from the front view.

Pink Butterfly side view

When working on the bra, I decided to add a little of the lace to the side seam. It doesn’t look so bad from this angle. But that front view just looks SO PINK!!! Maybe it’s because I’m really more comfortable with basic colors and adding something to them like some color in black lace. Ha! Honestly, if you looked in my closet you’d find half or more is black!

This view shows a little more of the Lycra material. Isn’t that pretty? I think that’s why I bought it – all those flowers.

No, I’m really not sure how I feel about this one. I actually wrote this blog once and deleted it because I’m not crazy about this bra. But it does fit, and I am wearing it.

Hmm.

I’m looking forward to something a little more toned down for my next bra.

Happy creating!

A Short 70s Trip

I was thinking it wasn’t a very creative week, but I did finish a Medical ID bracelet for a customer, and have another one to start for another customer; had a private jewelry-making lesson, which was very enjoyable, and made a few pair of earrings. However, I didn’t take any pictures.

There’s been no sewing all week. I think that’s a first for me since I got my new sewing machine last year. My previous machine had a few problems, and had been such a frustration, I’d put it away for quite a while. I must have gone into withdrawal and not even realized it.

I did sort through my sewing stash, and did my best to re-organize it all. Maybe the announcement on the calendar that it’s now Spring got me in a cleaning mood. I have a few items that I’m not going to keep, and I did organize things a little better, but came to the conclusion that I need more room and more storage.

Last week when I was looking around for information on the Milady, I read something about a ‘Spacer Bra’ on the Prima Donna web site – and it reminded me of the 70s.  Just the name of the bra itself made me think of the Cross Your Heart bras – you know, the ‘lift & separate’ ones. Do they still advertise that way?

It made me wonder if that style was coming back into fashion. So many other fashions are looking like a flashback to the 70s. Maybe bras will go there too.

Just to help with my curiosity, I had a second look at the Spacer bra, and although it doesn’t look like it’s a lift-&-separate style bra, what they had to say about the bra still reminded me of them:

“This spacer bra covers your breasts completely without making them look bigger.”

Well, what normally makes us look bigger? Pushing things together and lifting them up; creating cleavage. Hmmm. Still sounding a little lift & separate to me.

I can handle that, just please no bullet bras!

Happy creating!

Basic Black and a New Love

I have so many plans for what I want to sew. Is everyone like that? An ever-growing list of what you want to sew? Does anyone else ever get all those wants accomplished? My list just keeps growing.

So, what have I been up to? Well, I took my friend to a specialty bra store for a fitting. I wanted to see what the store would put her into. It was a very interesting experience. I could see the store didn’t properly fit her, and she could see the bra they put her in didn’t fit her. But the woman working in the store either could not or would not admit the bra didn’t fit her. The cups were too small and the band too big. Yet every bra they offered her was the same size, and they all fit the same way. I wondered if maybe they didn’t have anything that would really fit her. It did help me though, because I think she’s going to need a 32 F. However, she only wears non-underwired, so I may still have some challenges. I haven’t made an non-underwired bra yet.

When meeting my friend, I arrived at the store earlier than my friend, so just had to look around and then after looking I HAD to try on a few things. I’ve fallen in love again. This time with the Prima Donna Milady Padded Balcony bra. I thought this style was called a Balconette, but the tag says Balcony. Either way, it’s lovely, and I want to sew one!

Prima Donna Milady Padded Balcony Bra 36F

Isn’t that pretty? (I’m not posting an actual picture of the bra – just so I don’t get into any trouble with Prima Donna, just a drawing of it.)

It has a 3/4-high thin foam cup inside the lace cups – I put a pink line where the foam cup stops. You can see the foam cup doesn’t come to the top of the bra edge, but only 3/4s of the way up. A unique feature. The lace cups have a vertical seam with a small dart at the bridge. I didn’t look too closely at the straps, and was wishing I had my camera with me when I was in the store. I need to figure out how to make this one for me too, after I make the Amy Relf bra.

I have made a few things in the past week or so since my last post. I finished the lovely gold-filled Medical ID bracelet, and also a basic black bra.

For my basic black bra, I went back to the drawing board. I wanted to take my time and re-draft my pattern. So I used the Pin-Up Girls Classic Full Band pattern as my starting point.

I took it in at the underarms on both the upper & lower cup, I moved the straps over in the front and on the band, I made the bridge narrower, and I put a downward hike on the band. I also moved the apex over.

My first attempt – in a tester bra – was a bit too small in the cup. Still completely wearable, just the bridge doesn’t sit right back to the chest wall – it’s about 1 cm out. As well, the apex had been moved over a bit too much. So, off to the drawing board again.

But before I went back to the drawing board, I did something I haven’t wanted to do. Something mentioned in the Bra Makers Manuals – I cut open the cups at the seam line in the front to see how much I needed to add to the pattern. Oh, how I haven’t wanted to do that! I’m not even sure why, but it was very hard for me to do. However, I did and was able to get much better results from having done it.

I added to the pattern at the center front on both the upper and lower cups – that same amount from the slit, and that took care of the apex too. It’s a very good fit. I’m so glad I took some time to remember all the alterations I wanted to make. I am really happy with my back this time, and my strap placement.

Basic Black front

Here’s the front. Just as I said, a basic black. I needed a new basic one. All my other basic ones were over a year old, starting to show too much wear, and a bit too stretched out in the bands.

Basic Black back

And the back view. This shows a bit of the downward hike, but not too much. Overall, a nice everyday bra.

Happy creating!

Love at First Sight.

This post is just a short one, but I think you’ll fall in love too!

While out for coffee with my friend, Valerie, we’d sat and visited for a while and then  were wandering around Chapters looking at everything from cookbooks to craft books. We made our way towards the magazines and she picked up Altered Couture and innocently asked me if I’d ever seen it before. I hadn’t. She stared to flip through the pages and there was a bra!

If you’re thinking I’m a bit obsessed with bras, then I think I agree. But they’re so pretty, and practical too. (I say in self-defense.)

I’ll let you decide, but for me, it was love at first site. The article is Corset Collection by Amy Relf.

scan0002

Actually, it’s a long-line bra. Here’s a close-up of the bra front:

scan0002 b

Isn’t that charming? I have ideas for all those little bits that aren’t enough for a full cup. Bravo Altered Couture magazine, bravo!

Amy Relf has a blog: atelierdami.wordpress.com; Beautiful work, Amy. Really beautiful. You’ve inspired me. And thank you so much for allowing me to share a bit of your work.

I encourage you to get the magazine and read Amy’s article. I’m not going to share everything, but I think just this will inspire you too.

Happy creating!

Here a Change, There a Change.

Just a follow up from last week’s post: I don’t prefer Vertical wires. I wore them for a whole day, then on the second day I took them out. I put in my regular Long wires and am much more comfortable. That just goes to show, some women dealing with the Omega shape will do better with them, others will not. There really are no ‘set’ rules, are there?

So, I had altered my Sewy Rebecca pattern for my needs – smaller lower cup edge to fit into the smaller wire frame I need. But I decided to do a few more alterations. Here’s why:

There are things I do like about the Sewy Rebecca, and there are things I don’t like about the pattern. There are also things I like about the Shelley Full Band pattern, and a couple of things I’d change. So, I decided to see what would happen when I put the two patterns together.

I was joking with Andrea from Satin Bird Designs saying I was creating a monster; she dubbed the new bra the Franken-bra. Thankfully, it turned out very well and much prettier than those monikers sounded too.

Here’s what I did:

1. I really like the upper cup on the Rebecca – it’s just a little straighter across the seam line, so gives a little more lift. So, I used Rebecca as my starting point.

2. However, I like the split lower cup on the Shelley, so I split the lower cup on the Rebecca.

3. I also changed the shape of the Rebecca  power bar to look more like the Shelley – especially at the top where it joins the strap. In the English instructions for the Rebecca only strap elastic is used for the straps whereas the Shelley uses a fabric strap, which is my preference.

4. So I added the fabric strap.

As cute as Franken-bra is, I re-named her Shelley Rebecca. Here she is:

Front View

Here’s the front view. I used a non-stretch lace (Floral Lace Fabric) I bought from Bra Makers Supply. I really like this lace fabric.

Here’s their description:

“All-over woven lace with a floral design with virtually no stretch – making it perfect for bra cups. We would recommend stabilizing the fabric for the frame or the straps but it certainly could be used for the entire front of the bra.”

I really like this material. One thing I like about it is the seams virtually disappear into the fabric because of the texture of it. The other is it really is non-stretch, so can be used all over.

Side View

Here is the side view. Nice smooth fit into the wires, so I’m very happy. (If you’ve been reading along, please notice my restraint here in what I’m NOT mentioning.) A nice small underarm area, so again happy me! Do you see how those seams blend so well. I had to lighten the photos to get the seams and other details to show at all. Black on black really isn’t the best for photos.

Back View

Hmm, straps felt a bit too far apart still. I need to go through my patterns and make a back pattern I’m completely happy and thrilled about.

Again, I used a straight stitch to tack down the eyes, and then this time I also changed my width for the Zigzag to a wider than 2.5 stitch, which is standard for sewing lingerie. Both of these helped it go on nice and neatly.

Cup with arrows

This is just to show in a little more detail how the seams virtually disappear with this fabric. I was quite impressed with this. It also shows where I put the seam in the lower cup of the Shelley Rebecca.

Strap

Here’s where I changed the top part of the power bar. I also changed the direction it faced at the very top by cutting off the top and taping it back on ‘backwards’. I think I preferred it this way as I need the straps in a little more normally.

Well, I have more sewing to do, and a medical ID bracelet to make too.

Oh, and I used the foam cups to fill the bra cups this time. I’m still undecided which looks better.

Happy creating!

Another Shelley

I’ve really gone back and forth on my Shelley pattern. After I got the official pattern in the mail, I had to open it and compare all the pieces to what I had done. I was very pleased the patterns pieces were mostly similar, but there were a couple of small differences, and I wanted to make a Shelley closer to the ‘real’ pattern.

I think the biggest treat was to have instructions. I was winging it at times, and other times referring to my Bra-makers Manual. Between the two, I did get a few made, but having instructions (great instructions!) really was nice.

That seam allowance! Well, I decided not to add it again. The lower cup really fits better without it. So, that really makes my fit a bit of a challenge and I doubt I’ll ever buy another bra knowing what I know now.

I’ve also been re-reading my Bra-makers Manual again. It’s good to read it again after making a few bras. I’m picking up things I missed or didn’t understand as fully the first time I went through the book. For one thing, I had posted not too long ago that Lycra and I were not going to be friends. Well, we’ve made up! A little tip in the manual and I was off to my stash of fabrics to pull out some Lycra I’d bought and then decided not to use.

Here’s my Shelley again, but in a lovely Lycra & Lace:

Front View w Foam Cups

I’m so very pleased with how this bra turned out. I love the combinations. I’m not sure I love using the foam cups to fill out the cups for pictures though. I can see little puckers on the cup that look like darts. There are no darts – just cups not filled out.

Back View

And the back. The straps are a little tiny bit closer to the middle on this. Not a big move, but a little one. Still more comfortable and I’m not feeling like straps are falling off my shoulders.

I’ve had some problems attaching my hooks & eyes. I don’t seem to have a sewing machine foot that will let me sew the hooks on easily. So what I did here was I used a straight stitch to attach one side of the hooks (the eyes are never the problem) and then folded it over and did a zigzag. I went on much easier and looks much smoother than some of the other bras I’ve done.

Side View w Foam Cups

And the side view. You can see the foam cup here. I’m not sure which I prefer – the foam cups or the black beanie forms. I did take a few pictures with the forms in too and was going to have a vote to see which looks better. Maybe next time.

I made this a little higher at the sides to fit a vertical wire. I showed the difference between a long wire and a vertical wire a few posts ago. I’ve been wearing the vertical wire all day and I’m not sure I love it. Thankfully, changing a wire isn’t the hardest thing to do! I may try a long wire and see if I prefer that. It may simply be I’ve never worn a wire that fits so closely before and I’m not used to it.

And I’m probably going to say this again and again, but I really am happy there are no ‘gathers’ along the bottom of the cup (I know they weren’t really gathers, but it almost looked like it!). Easing a larger cup into a smaller wire may be necessary, but I really didn’t like the look of it. This is much smoother and I really am very happy with the way it looks.

Close Up Underarm

And lastly, I finally got a great fit under the arm. So many times, I would take in the underarm on the pattern, but it was still a bit too big. I took this in what seemed would be too much, but it’s perfect.

I have more Lycra in my stash, and am thinking we’re going to be good friends! And that perfect bra my husband is always saying I’m trying to make? This is the closest I’ve come yet! I’d say this is next to perfect. So for anyone thinking of starting a journey in bra-making, I’d say ‘Yes! Go for it!’ It can be a challenge, but it’s also very rewarding.

Happy creating!

And This Time With Seam Allowances?

I enjoy reading news online, and usually check what’s new before I read my emails in the morning. One morning there was a video saying what NOT to buy your girlfriend for Valentine’s Day. That got my attention, and I figured it was going to be something to do with lingerie.

And it did have to do with lingerie. Basically, men were being told not to buy bras for their girlfriends because bras were hard to fit. I had no problem with that – that is very true. However, it was the next part that really surprised me and stayed with me.

After telling men not to buy bras for their girlfriends, the video went on to offer help in bra sizing. Here’s their help: The Fruit Rule. If she’s the size of a couple of lemons, then she’s an A cup; the size of a couple of oranges, she’s a B cup; two grapefruits? she’s a C cup. And to finish it off nicely, if she’s the size of two cantaloupes she’s a D cup. Isn’t that nice and neat? I can’t speak for all women, but I don’t fit into that fruit salad.

Enough about fruit comparisons, I’m going to share a little more of my progress with my ‘adjusted’ Shelley pattern.

I’ve been mulling over my Shelley without seam allowances for a while now. I did add seam allowances and then got thinking about whether that was what I needed or not.

I made a tester bra to see how it fit with seem allowances and it just wasn’t giving me the fit I wanted. My dh says I’m trying to get a perfect fit, and I say,  ‘Yes, I do want a perfect fit.’

Without the seam allowances added, it fit perfectly into the cradle size I need. Without seam allowances the lower cup fit like a dream – something I’m struggling to achieve. However, without seam allowances, the upper cup was too small. I need more depth to get the bridge to sit against the chest wall, and a little more coverage up top too. I was torn between adding seam allowances and/or redrafting the upper cup somehow.

I decided to add a seam where there isn’t one – I added the amount of a seam allowance to the top of the upper cup, and also changed the pattern so I had the depth I need to bring the bridge back. It all worked. This one got a bow even, or as another blogger put it – it was bow-worthy.

Shelley front view

Here’s my latest Shelley from the front. I used the black forms I’d made and shown a few posts ago. They don’t fill the cups out completely, but I think they fit better than the foam cups did.

I love the lace and duoplex combination on this. The lace was from Merckwaerdigh’s store on eBay. The duoplex and findings are from Bra Makers Supply.

To help the upper cups fit a little better, I didn’t line them this time. On my first Shelley I did line the upper cups. Since I need a little more give there, no lining this time around. And that helped too.

Shelley side view

I have to say, I LOVE how neatly the cups are fitting into the cradle. I am so very pleased with how this has turned out. I didn’t like the look of the ‘easing’. I had to do so much easing along the lower cup, it looked more like gathering to me. And it gave the cups a balloon-like shape. This is much better.

Shelley back view

And a basic back. Looking at it, the straps seem a bit far apart, but I didn’t notice that when I put it on. Something to think about tweaking for my next time.

I got my ‘real’ Shelley pattern in the mail today. Tomorrow I’ll have some time to pull it out and compare all the pieces to what I’ve made from the Pin-Up Girls Classic pattern and CD Designer Bras by YOU! I have to say, I loved learning how to make this, but it will be a treat to have the pattern too.

My next project may be to help out a friend. She recently went to a specialty store and was fitted only to find out they don’t carry anything in her size – too small around the rib cage. After dealing with the fitting challenges of the Omega shape, a small band almost sounds simple. I’ll post what we do, and how it turns out.

Oh, and my dh is also requesting matching panties, so that may be in the near future too. Two other bloggers have just offered free patterns, and I’m planning on trying both of their patterns.

http://www.madalynne.com/

http://www.fehrtrade.com/article/676/free-lacey-thong-panty-pattern

Happy creating!