I finished my first Angie sewn with thread that won’t dissolve when I wash it. I tried it on and didn’t want to take it off! It’s so nice.
Angie
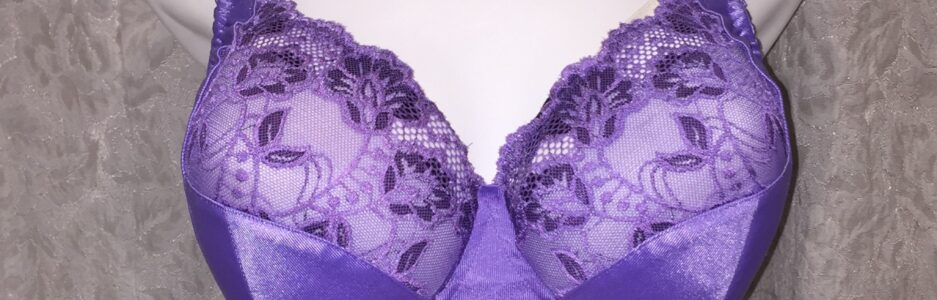
I think this is a really lovely pattern, and makes a very pretty bra. The design is different from almost all the other bras that are available for the home sewing market. The Angie pattern doesn’t have an upper cup like so many bra patterns. In fact, I can’t think of another pattern that doesn’t have an upper cup. There are four pattern pieces to the cups, but none of them are upper or lower. The cup is completely different due to it being all vertical seams.
As I was re-reading this before posting, I did remember another bra that was similar in it had vertical seaming – the Lavender and Lace bra Mrs. Weaver made. The lines are different though, and that bra was never released as a pattern for sale. These Lavender and Lace bras are lovely, but back to Angie for this post.
I love the shape and design of this bra. In ivory, it reminds me of a sea shell. Delicate and pretty.
Here’s my Angie from the side. I was also happy with the adjustments I made to the cup to make this fit me and make it fit in the frame so neatly. No more puckering on the cups! I’m not going to get tired of that any time soon.
The best part of this bra is the lift it gives. It really lifts! Okay, the best things are it lifts and it’s also very comfortable.
Details
I’ve used non-stretch strap tape for the front straps on my Angie. All elastic straps don’t work so well for me. I didn’t have any ribbon on hand to stabilize the front of the strap elastic either, which is another way to give support to strap elastic.
A pretty bow hides all the stitching at the top of the cup where the strap is attached, and the elastics are meeting. If a bra I’ve made has a bow on it, you know I’m happy with it! It’s bow-worthy.
I also used a cute ruffled trim for the upper cup.
Alterations
The alterations I made to this pattern are: I adjusted the cup to be smaller at the wire line, I shortened the bridge and underarm to work with the wire I’m using, and I added a Gothic arch to the front of the band.
The Gothic arch was a last-minute decision. I was pinning on my bottom band elastic and decided I wanted it. So I quickly altered the bottom band to include it. I’m glad I did.
I’m so happy with this bra! And am really looking forward to making my next one already. Boy, another Ruby and Angie in the plans.
I saw a lovely strap alternative for this pattern, so want to try that when I make my next Angie. This photo is from B,Wear’s Instagram. What a lovely addition to the pattern. Yes, I definitely want to try this strap alternative for my next Angie.
Happy creating!


 Recognize this? I just used this gorgeous cotton Lycra to make my
  I think it’s adorable! However, it’s a smidge small in the cups.
 I need to gather the elastic under the arm more. I’m very shallow there, and have to make that adjustment on almost every bra I sew.
 Look at this nice deep back.
 This photo shows the side seam and the under-bust seam. Both are enclosed. It’s a very nice feature. The only seam not enclosed is the center front.
 Do you see that nice wide elastic at the bottom edge? That’s 3/4″/19 mm elastic. Another supportive feature of this bralette.
 This looks the same on the outside, but the inside is lovely soft cotton Lycra.
 Soft, comfortable, and those lovely enclosed seams. It’s really nice.
 What a cute set!
 This fits really well. And those vertical seams really give great lift.
 There are little bits of elastic that are sticking out all over this bra that got tucked away for the nice photo.
 You can even fold elastic so it’s out of the way, and sew over it like I did for the hooks and eyes.
 The only finishing on this bra that’s been done is the top-stitching. I was pretty sure these cups were going to fit perfectly, so got them all ready for the next time I sew them.
 I can’t wait to sew this up knowing it’s going to fit so nicely.
 I even tried making the cup size in Swedish tracing paper just to see if it was close. Just in case, I sewed my bra with wash-away thread.
 Let me tell you there is lift happening with this lovely pattern. I do need to go back to that first cup size though. I’ll try it with elastics this time.
 Do you see all those vertical seams? Vertical seams really lift. The cup has a lovely round shape as well.
 I really like the shape of the cup, and especially at the side. This fit me quite well, which is encouraging. I usually need to take the underarm in, and I won’t need to on this pattern.
 I’m very impressed with my first attempt at Angie, and only wish I’d gone with my first cup size choice.
 Ingrid is a non-wired bra pattern, with three front-closing options, as well as a comfort band option.
 I really like this bra. I’m rather impressed with the support it gives for not having a wire.
 I looked for a grey hook and eye set, but my stash seems to be very low on hooks and eyes. That’s something to stock up on. So rather than grey on the back, it’s white. If you look closely, you’ll see I didn’t have 3/8″ upper band elastic in black or grey. Again, I had white on hand, so that’s what I used.
 Here’s the back of the repair. There’s double-sided interfacing fused between the duoplex and that little strip.
 Thankfully, the majority of this repair isn’t seen in the bra – it’s in the seam.
 I also like the power net inserts at the front. I think it looks unique.
 You might recognize the lace I used in this Watson as the same lace I used in the first Watson I made for Em. I thought the peach would look really nice with the charcoal mesh.
 Em loves the new color combination. That’s good news. I have more charcoal mesh for the next bralettes I make for her.
 I’ve used fusible knit interfacing for the front cradle. I might need to buy some in black to use with the rest of the charcoal mesh I have. I don’t love the white behind this.
 There’s a little fold in the material where the band meets the hooks and eyes. Em lost some weight and the bands were too loose on her this time. I measured her again, and she’s two inches down around her rib cage. I had to take these in after I’d made them.
 I think this one is just adorable. The lace is from Libelle, a new Canadian source for me. I’ve ordered from her a couple of times now, and the quality is very good. The prices are even better.
 I thought both of these were lovely, and fun.
 And the back.
 There’s the same little tuck in the fabric on this bralette as on the long-line. It’s not too noticeable, and it did the job. It took the bralette in enough for her to wear them and adjusted the pattern for next time.
 You might have noticed, I haven’t added any bows. It’s not because it’s not bow-worthy this time. I’m not sure I want bows. I made some. I pinned them on to see what I thought, but I wasn’t over the top in love with the bows on it. I may look for a little golden leaf charm. I think that would look great on this bra and mirror the gold leaves in the lace.

 It’s out by a smidge, but that’s pretty darn good.
 Here’s my drafted cradle and the tester frame. This was pretty good.
 This one is good too. And it will be much easier to use with the added material in the cradle.
 That’s quite a difference the wire makes.
 Everything is exactly where it is supposed to be. The bridge is right up where it needs to be, not pushed down, not coming away from the chest wall. The wires are just right too.
 How is it fitting? In all honesty, this probably would have been fine if I’d made it into a bra. It fit better than any RTW bra I’ve had. But I figured why not go for the brass ring. Seeing as this was still only a tester, I still made a couple of changes to my pattern.
 Another adjustment was deciding if I wanted to lower the upper cups to meet the bridge, or raise the bridge a bit. I pulled out the custom bridge I’d drafted a few years ago, and decided to incorporate that into the frame. That means the cups won’t need to be lowered any more than they are now. The bridge will come up 1/4-inch to meet them. I’ll have to overlap my wires, but I’ve done that before.
 Once again, I’m going for that perfectly matched cradle and cup at the side seam, and once the upper band elastic is added to the underarm of the cup, I’m going to have it!
  Yes, I’m happy with how this is all coming together.
 Oh, a pattern drafted for me? Yes! I was interested. I signed up right away.
 Although this first bra didn’t fit perfectly, I was so happy with it. Let me show you why.
 Do you see how the cup meets the cradle and they’re both the same length? I haven’t had that happen in a bra since my second or third bra when I found out I had an Omega shape. I am so excited about that.
 Overall, even though I could already sew a bra, I’m so glad I took the beginner class.
 On this bra, we’ve lowered the bridge, adjusted the cups for the lowered bridge, and adjusted for my Omega shape. I also added a Gothic arch, but that wasn’t part of the class. However, as a class, we thinned the band.
 Another lovely feature that shows in the side view is the power bar. It’s an S-shape. That was a first for me. It’s so pretty.
 Again, on this bra I’ve used sliders only rather than rings and sliders. It does give a neater line on the back, but I have a lot of rings and sliders in my stash, so I will be using those still.
 I wanted to change the cups on this to make them a little rounder. I also wasn’t completely happy with my power bar. Something seemed a little bit off where the strap tab and the underarm were meeting. I also changed the band to a downward hike, but it needed work too. More on that later in the post.
 There’s really very little difference between these two, but I decided to use the white. Seeing as my lace is a little bit darker than the ivory duoplex I’m using, I thought the white behind it brightened it up a bit.
 I even enjoyed taking my time with all the top-stitching. I was only finished the cups in the above photo, but they were so pretty I had to take a photo.
