Drafting in Steps

My attempts at drafting my own bra haven’t been 100% to my satisfaction. My hubby says I want perfection. He’s not wrong. I’d settle for snuggled up beside perfection.

 Drafting First Steps

 I decided to go back to the Bra-makers Manuals and go over some of the steps in there for checking fit. The first thing to look at is the frame.

I decided I’d start over with my frame. The frame was fine, but I wanted to add some elements from the classes I took at Central Sewing, as well as some other design elements. This was a perfect time to re-do my frame.

Years ago, I cloned a Prima Donna Deauville bra I had, so I took some elements from that too. I gave my frame a wider cradle. I also gave the band a downward hike. It still has the lower bridge, and lower underarm.  Here’s my drafted cradle and the tester frame. This was pretty good.

One change I made. Do you see how little material there is there in the cradle to attach the cup? That 1/4-inch might be fine when making a bra, but it didn’t seem like much for the tester. I added another 1/4-inch. I also added a little more room under the arm.

For my tester frames, I use bits and scraps of whatever I have leftover from previous makes. Left over bits of elastic are especially great for a project like this.

Take Two

 The second new frame I made.This one is good too. And it will be much easier to use with the added material in the cradle.

I also gave myself a clear visual by sewing a seam line where the cup would meet the cradle. That’s the ivory stitching you can see in the above photo, and the one below.

I took a photo to show the difference between when the wire is in, and before it’s in the frame.That’s quite a difference the wire makes.

How Does It Fit?

  I’m happy to say this frame fits perfectly. My next endeavor will be to work on cups adjusted for my Omega shape.

Here’s the frame on my new display. It fits better on me.Everything is exactly where it is supposed to be. The bridge is right up where it needs to be, not pushed down, not coming away from the chest wall. The wires are just right too.

That’s the first stage of fitting a bra. Once the frame is correct, it’s time to test the cups.

Next Steps

After making a few adjustments to my pattern, I sewed up a pair of cups. I incorporated that adorable S-curve for the power bar.

I mentioned I’d sewn a seam in the cradle to follow. (I did this because I’d added that extra 1/4-inch.) I also sewed a 1/4-inch running stitch along the bottom of the cup. When it was time to sew the cups into the cradle, I just matched the two lines of stitching I’d done. So easy!How is it fitting? In all honesty, this probably would have been fine if I’d made it into a bra. It fit better than any RTW bra I’ve had. But I figured why not go for the brass ring. Seeing as this was still only a tester, I still made a couple of changes to my pattern.

I thought the cup might be a smidge small, so I clipped into the cross cup seam. Yes. I could add 1/8-inch there, so I did. I know an 1/8-inch isn’t a big deal, and like I said, if this had been a finished bra, I would have been happy with it. Since it was still a tester, I improved my pattern. Another adjustment was deciding if I wanted to lower the upper cups to meet the bridge, or raise the bridge a bit. I pulled out the custom bridge I’d drafted a few years ago, and decided to incorporate that into the frame. That means the cups won’t need to be lowered any more than they are now. The bridge will come up 1/4-inch to meet them. I’ll have to overlap my wires, but I’ve done that before.  Once again, I’m going for that perfectly matched cradle and cup at the side seam, and once the upper band elastic is added to the underarm of the cup, I’m going to have it! Yes, I’m happy with how this is all coming together.

Following Up

One last comment on the frame – a number of posts ago when writing about Tester Frames, I mentioned how hard it was to sew the cup into the frame once the frame was completed. Well, I took the wire out and it’s not hard. It’s not hard at all. The wire was what made it so difficult. Leave the channeling open for the wire, slip that wire out. It makes a big difference.

Happy creating!

Beginner and Shelley Bra Classes

I recently saw a notice from Central Sewing Machines for a Beginner Bra-making Class. Well, I know how to sew a bra, but… There was one part of the ad that stood out – the instructor would draft a pattern to fit me.Oh, a pattern drafted for me? Yes! I was interested. I signed up right away.

Jeanette, of Sew Uplifting Bras, was the class instructor. During the two-day class, she was giving tips and tricks on how to sew the bra. There were some new bra-making gems in there too. I’m not sure how many times I blurted out, “That’s brilliant!” A pattern drafted for me, and new techniques to incorporate into my bra-sewing? The class was totally worth it!

First Bra

The first bra, a Pin-up Girls Classic pattern with a split lower cup, came together with no problems. However, it still needed a couple of adjustments.Although this first bra didn’t fit perfectly, I was so happy with it. Let me show you why.

For me, this is the most exciting part of of the whole class – the cups fit perfectly into the frame!

Jeanette adjusted my pattern for my Omega shape and it fits perfectly in the frame. There are no puckers. No gathering along the seam line either. Just a cup and cradle that fit perfectly together. Oh, it’s so pretty! Do you see how the cup meets the cradle and they’re both the same length? I haven’t had that happen in a bra since my second or third bra when I found out I had an Omega shape. I am so excited about that.

The back is pretty basic. Jeanette uses sliders only for joining the fabric straps to the strap elastic. It makes for a very neat joining. Don’t ask me why, but it did throw me during the class. I had to really think how to sew them together, and it’s not that hard.Overall, even though I could already sew a bra, I’m so glad I took the beginner class.

Shelley

Right after the Beginner class, Central was holding a Shelley class. My hubby said to sign up. I was over-the-top excited.

We took my drafted-for-me pattern and converted it into a Shelley pattern. I’ve done this before too, but Jeanette was sharing more brilliant tips along the way. Again, totally worth taking the class.

 Here’s my lovely fuchsia Shelley bra.On this bra, we’ve lowered the bridge, adjusted the cups for the lowered bridge, and adjusted for my Omega shape. I also added a Gothic arch, but that wasn’t part of the class. However, as a class, we thinned the band.

The side again – with its perfectly matching cup and cradle. I’m not going to get tired of this at all.Another lovely feature that shows in the side view is the power bar. It’s an S-shape. That was a first for me. It’s so pretty.

   And the back.Again, on this bra I’ve used sliders only rather than rings and sliders. It does give a neater line on the back, but I have a lot of rings and sliders in my stash, so I will be using those still.

So, after taking these classes am I giving up on drafting my own bra? No way! I’ve been busy drawing away, and incorporating the new knowledge I’ve gained. In fact, later this year, Jeanette will be teaching a Drafting course at Central Sewing. I’m already saving up for it.

 Happy creating!

A Pretty Ivory Bra

Just before I heard about the Bra-Makers Supply’s Challenge that started in January, I was finishing up some touches on my bra draft. So this post is actually a make that’s a few months old now. The challenge created so many posts, but I didn’t want to leave this make out.

Here’s my draft again.I wanted to change the cups on this to make them a little rounder. I also wasn’t completely happy with my power bar. Something seemed a little bit off where the strap tab and the underarm were meeting. I also changed the band to a downward hike, but it needed work too. More on that later in the post.

All Those Details

 Before the BMS Challenge, the last number of bras I’d made had been slapped together. No top-stitching, no taking time with details. It was so nice to take my time and focus on some of those details again.

One detail was which sheer cup lining I wanted to use behind the lace. I have both white and beige. Hmm. There’s really very little difference between these two, but I decided to use the white. Seeing as my lace is a little bit darker than the ivory duoplex I’m using, I thought the white behind it brightened it up a bit. I even enjoyed taking my time with all the top-stitching. I was only finished the cups in the above photo, but they were so pretty I had to take a photo.

 My New Bra  

My bra looks perkier on the clear display form, and less East-West looking too. Catherine’s days as a bra display may be numbered! Especially now I have a display I can use for bras and panties.

Oh, but Catherine is my only display that is pinnable. She’ll still be getting use.

Do you see the upper band on this bra is a little slack? It’s that way on me too.

I used this band again on my red bra for the February Challenge after looking at all my measurements. This should have fit. The only thing I could think of was the I didn’t pull on the upper band elastic for this one. On the red one, I pulled on the elastic and it fits just fine.

Happy creating!

Bra-Makers Challenge – February

As soon as I saw the Bra-Makers Ultimate Challenge, I decided it was something I wanted to do. For most of January and February, I’ve been turning things down. No, I don’t want to do that, try that, or join that. However, the Challenge fit with what I wanted to do – focus on building my skills.

 February’s Challenge

Here’s the challenge for February:

February –  Love yourself – make any bra, bralette or panties using red stretch satin. There were a few more guidelines on the BMS website.

Isn’t this a sumptuous color? Just click on the link or the photo to go to the BMS website and see it for yourself. I’ve never worked with stretch satin before. But I’m game.

Plans

 While I’m trying some of these new fabrics and patterns, I’m going to incorporate ideas I’ve picked up along the way. One of those ideas is to try the ‘better Shelley strap extension‘. Beverly wrote a tutorial on how to make an extended strap attachment.This photo is from the BMS blog. You can read the post here. I thought this looked lovely when I first saw it.

Here’s was my sketch trying to decide what to make for February. Did I want to add lace over satin for the power bar? I even entertained using red mesh finished with fold over elastic instead of lace on the upper cup.

All I had decided for sure was to add sheer cup lining to the cups as the satin is a stretch material.

I also drew some new panty ideas for the challenge.I planned to use my mashed-up Aphrodite pattern, but I wasn’t as happy with it as I hoped. I didn’t like my mash-up. The original pattern is so lovely. Unfortunately, I don’t like elastic at the waist and leg openings.

Putting Plans into Action

I ended up using my drafted panty pattern. These are stretch satin and cotton Lycra. Then finished with stretch lace at the waist and leg openings. I’m loving these!

I added a lace garment tag to the side. I’ve added these tags to panties I’ve made in the past.Here’s the side view.  And the back. I was almost out of cotton Lycra, so had to make these with a seam in the back.I love these! Next I made a the bra to match.

Matchy Matchy

There are so many things I love about this bra! Well, let me show you.The whole bra cup and cradle is stretch satin. I’ve lined the cup and cradle with beige sheer cup lining. That little part on the upper cup that looks like there’s nothing there? That’s sheer cup lining. It disappears against the skin.

A Few Features

The pattern I used for this bra is cloned from a RTW bra. I loved how the cups fit, but there are a few elements about the bra that are uncomfortable and don’t fit.

So, I lowered the bridge and the underarm to help make this more comfortable than the original.

Another change was for design only –  to split the upper cup. The lower half of the upper cup is stretch satin and sheer cup lining. The upper half of the upper cup is sheer cup lining alone, then finished with fold-over elastic.

Lastly, I extended the strap as per Beverly’s instructions in this blog post.

Below you can see I only pulled on the elastic in the underarm area where it’s usually pulled. I marked on the strap extension where the power bar ended and the extension began and made sure not to pull the elastic beyond that point.

Here’s the side view:Do you see those puckers where I gathered the cup to fit into the cradle? I don’t like that! Those puckers aren’t so noticeable when I’ve used duoplex. That made me sad.

Here’s the back:Oh, the back looks perfect! The red power net really matches the stretch satin well. I debated using the satin for the band too, but had some red power net in my stash, so went with that.

  What I Love

 I’ve shared with you what I don’t like (those puckers). However, when it’s on me the cup is more filled out than on the display. (I still don’t like them.)

So now, how about something I love about this bra? I love the upper cup!I love this sheer cup lining detail. It turned out better than I had hoped.

I did make a second pair of panties to go with this bra. I’ll share those next week.

Happy creating!

What is a Tester Frame

A few posts back I’d shared a recent draft. I also mentioned using a tester frame for my bra. Let me share a little about tester frames here in this post.

First Impressions

I first read about a tester frame in the Bra Makers Manual Vol. 2. I remember I made one and tried it. I also made a note in the manual. I found it hard to sew the cups into that frame, and I didn’t try it again for quite a long time.

Yes, my manuals are filled with my thoughts in the margins alongside the actual instructions.

My note may say ‘fit’, but I was meaning it’s awkward to sew the cups into the frames. However difficult I found it to sew the cups into the frame after the channeling and wire have been added, it’s still a great way to check and see, first, if your frame is going to fit. And once you have your frame, if the cups fit.

I just had an idea to take the wires out for sewing and it might make it easier to sew in the cups. I’ll have to try it.

Second Exposures

My second exposure to a tester frame was from Merckwaerdigh’s blog. This is her photo.  Margreet took us through the steps of designing a bra, and part of that was testing the cups in a frame. You can read about it here.

My Take on a Tester Frame

   For my second take on a tester frame, I had drafted my cradle, band, and cups and sewn up the bra. I knew the cradle and band would fit and they did. I didn’t expect the cups to fit, and they didn’t. They were too small. Yet I still sewed up the bra.

Let’s talk about those cups for a minute. The cups’ measurements were taken while wearing a RTW bra. That bra cups are made with stretch material. That gave me measurements that were too small because I wasn’t using  stretch material now; I was using duoplex. 

So why would I make a bra when I knew the cups wouldn’t work? Well, I knew the rest of the bra would be fine. I also knew I now had a bra that was more supportive which allowed me get new, better measurements.

Once I took my new measurements with this new bra, there was no use left for it. I could simply cut the hardware out of it, unpick all the elastics, and throw the rest away. I could donate it. Or I could use this frame for a tester frame.

Repurposing that Ill-Fitting Bra

If you have a bra that doesn’t fit the way you want it to fit, and want to make a tester frame, you have to remove the cups.

Here’s what I did.

On the bra, I measured from the seam along the bottom of the cup into the cup by a half-inch, Then I cut along that line.

See the black on the edges? That’s the 1/2-inch mark. That little bit of material sticking out is what is left of those too-small-cups that I’d cut out.

I also cut the seam where the strap joins the cup.

Now what’s left is a tester frame. It has straps, hooks and eyes, elastics, a bridge, the cradle for new cups. It has everything a bra has, except the cups.

What was left of the too-small cups I threw away. There was no use for them now.

Testing the Frame

I sewed up new cups and marked the 1/4-inch seam on those. In the photo above, you can see the bright pink line on the cups – that was going to be my seam line.

I got out some black thread and a needle and started sewing them into the frame by hand. Remember I found it hard to sew them in by machine. If you do try using your sewing machine, take the wires out, and move your needle over to the far right. Those two suggestions should make a difference. Oh, and use lots of pins!

Or sew the new cups in by hand.

I sewed the new cups in as closely as possible to the original seam in the cradle on the tester frame.It wasn’t pretty, but it was completely functional for its purpose – to see if these cups would fit. And they did.

Happy creating!

Ultimate Bra-Makers Challenge

I had it all planned out. I bought some lovely ivory duoplex and power net to make both my tester bra and my first bra once the ‘final’ draft was completed.

Then something fun happened.

The Ultimate Bra-Makers Challenge

  Beverly, from Bra-Makers Supply, announced the Ultimate Bra-Makers Challenge starting in January 2018. Have you seen it? Here’s a blurb from the BMS site:

Our idea is simple – each month starting on January 1, we will give you a theme with a challenge to complete by the end of the month. The challenge will be to use a new fabric or a new pattern chosen from Bra-makers Supply (yes, we will discount those items!) You can submit photos of the finished project to enter the challenge. Tag us on Instagram and Facebook @bramakerssupply and use the hashtag #bramakerschallenge2018… Each monthly winner will receive a $25 gift certificate from Bra-makers Supply. How easy is that?”

January’s challenge is the Pantone color of the year: Ultra Violet. SO pretty! I just happen to have a lilac kit from my trip to Ontario two years ago. I was saving it for when I got my draft just right.

The kit is one my hubby picked out. It had the paler lace that is on top in the photo. Something I’ve learned about myself in this bra-sewing journey is I prefer tone-on-tone bras. So if I’m going for red, I want all the tones to be close to the same shade. So I wasn’t over-the-top in love with the paler lace. I dug into my stash and found this darker purple, which was really nice. Then I saw this  lilac one on the BMS website. Love. That was the lace to go with my kit.

Pattern

I’m using my self-drafted pattern for this bra. I am so happy. This fits perfectly, and I love the color!

I used Beverly’s CD Designer Bras by You to create my own Shelley-style pattern from my draft.

Here’s the side view: Even though I’m drafting the pattern so there shouldn’t be any difference between the cups and cradle, I still find I’m having a tiny bit of a length difference. A quick little gathering stitch running along the bottom of the cup, and it fits in just fine. Also, there are no wrinkles on me, but a few on Catherine.

Here’s the back of the bra.When I was taking the photos for this, I noticed I missed catching the very bottom edge of the strap elastic under the eyes. I’ll have to take that back to the machine and tack  it down.

I love the lace detail on the back.

Road Bumps Design Elements

I had fixed everything on my pattern, and had my bra cut out. The cups were sewn. The lace was sewn on the band. The band was attached to the cradle. It was time to get the elastics out of the little finding kit and sew them on the band. Then I realized I had drafted my pattern for the ‘soft’ elastics. The new elastics I had in my kit weren’t going to work for this band.

I wasn’t happy.

The bra went into a time out.

I’ll have to draft a new band and label both bands – one ‘soft elastics’ and one ‘firm elastics’. That will save any future frustrations.

The next morning I pulled out some elastics from my stash. I tried some beige elastics behind the band, and then some black.

I decided the black looked better. Those little picots were almost a shadow behind the band. To bring all the elements together, I added a black bow behind the lilac one at the front.  The Gothic arch looks wonky here, but that’s just on Catherine. I tried to get it to lay flat, but it just wouldn’t.

I’m still deciding on the strap bows. I think I like the depth the black adds to the bows. I’ve made another black bow, so sewing them on is next.

Next panties to match.

Happy creating!

Another Draft

I just finished another bra draft. And it’s not perfect, but it’s awfully pretty.

Draft Six?

To be honest, I’ve lost count of exactly how many drafts I’ve done. I’ve drafted a whole bunch of times to practice what I’m doing, but haven’t made them all up.  This is an ivory bra with a lace upper cup. It looks lovely, but the cup is a little bit too small.

Here’s the side view.

Despite this not fitting perfectly, I’m pretty pleased with how well it all turned out. I’m definitely learning with each draft I draw and sew up. This time around there were no oversights or mistakes like in previous attempts.I used gold-toned rings and sliders. I thought they’d look really pretty with the ivory, and they do!

The Good News

This bra not fitting perfectly isn’t all bad news. The band fits perfectly. I won’t need to make any changes to that at all. The previous bands were all a bit too big, or gaping here or there. This one is good.

 In the Bra-Makers Manual Vol. 2, Beverly Johnson says measurements should be taken while wearing a good fitting bra. This has been a big part of my problem.

Although the Conturelle bra I have fits, the cup material has stretch, so taking measurements in this bra gives me great measurements for another stretch bra, but not for a more supportive one made from duoplex.

With this sixth draft, I was able to take my measurements, and re-drafted one more time with those new measurements.

Things I Did Right

   So, how did that seventh draft work? It fits! It FITS!

I can’t even begin to express how happy I am right now. I never dreamed I’d make my own pattern from measurements, sew it up, and it fit.

  It looks a sight though. I said it looked a sight!

Number six became my tester bra frame because the frame fit but the cups didn’t. I re-drafted only the cups, and sewed them into the tester frame. It’s the tester frame that’s sticking out on the outside. To make things look even worse, well, actually, to make it easier to unpick to reuse the tester frame, I used black thread. 

If anyone is interested in how I made the tester frame, let me know and I’ll do a post on that.

Now to break into my stash and celebrate with a new bra.

Happy creating!

Taking Advantage

I took advantage of the Craftsy two-week trial Membership. Have you?

A new lingerie class came out. I bought it as it wasn’t part of the Membership. However, the next day it was. At first, I thought, ‘Well, I’m sure I’ll want to have this class anyway.’  This was a class I started to watch right away. Then something unexpected happened. I quickly went through the class and then returned the class the same day. I thought you might want to hear some of my thoughts on the class.

The class, Lingerie Essentials: Bralettes with Alison Smith was a bit of a disappointment for me, and I really didn’t want it to be a disappointment.

I have most of Alison’s classes and I love them. I love her style of teaching and all the details she includes in her classes.

 Basic Class Information

It was too soon for there to be any reviews for this class at the time of this writing. The class had only been out for a few days.

Here’s the lesson outline.

First Thoughts on the Class

This class may be great for a beginner because Alison does take her time and explain a lot about the materials, how to handle them, cut them out, and sew them – all in great detail.

She also explains about the difference between measuring for a bra and a bralette. It was about here, I became disappointed with the class.

What could possibly be disappointing? Well, the class comes with a pattern. The pattern Alison has designed for this class is for a B/C cup. She does show how to grade up two sizes, or down a size, but that’s it. I’m still outside that size range; and disappointed.

As well, the pattern does go to a 42, but I don’t need a bigger band. The larger cup/smaller band fit was never addressed.

Here’s a screen shot from the class showing how to grade up two sizes from the B cup. Unfortunately, there was no mention at all what to do if you fall outside that range. I knew then, this class just isn’t for me.
 Here’s the bralette on a model.

Looking on the Bright Side

My disappointment over the pattern being said, there were positive aspects to the class. So, if you’re a B/C cup, or even a D, you may just love the class.

Alison shows how to make the bralette a few different ways: Unlined lace, lined lace, and stretch jersey, shown in the photo above. I really liked the different ideas she covered with information on each material.

Alison is a wonderful teacher. She has a calm manner, and explains everything very well.

Alison does show some great ideas for how to use lace to embellish your bralette, and I did like that. Isn’t this lace detail on the back lovely?

 The last lesson in the class shows how to make some matching knickers and suspenders (panties and garter belt). Both of these patterns are included in sizes S – L. Alison does say you can make the patterns larger, but doesn’t give a lot of detail on just how to do that.

Here are the knickers Alison makes in the class.And here are the suspenders.

Personal Recommendations

Alison is a lovely teacher. I really like her style and think she has a lot to share with us. If you’ve never made a bralette, this could be a great first class to learn some basics.

As well, if you aren’t an A, B, C, or D cup, then the bralette pattern will likely be disappointing.

I bought this class and returned it. I was disappointed. There are other lovely bralette patterns out there with a fuller range of sizes, like the Sweet Sixteen pattern I just made.

Here’s the size guide (from Beverly Johnson’s blog) for the Sweet Sixteen bralette pattern:It goes up to an M cup! And the band goes up to a 38, but it fits loose, so probably more like a 40 or 42 band. So, conservatively that’s a range of 28 A – 40 M! That is a size range!

If you’re taking advantage of Craftsy’s two-week free trial Membership that’s available when you first sign up, then I’m sure there are things to take away from watching this class.

 Happy creating!

Canada Cups – Coming Unwired in a Bralette

Hello! Welcome to my stop on the Canada Cups – Coming Unwired blog tour.

This tour is all about soft cupped bras in their many forms, whether it be bralettes, camisoles, or actual soft cupped bras – all designed by Canadian Designers. For my stop, I’m making a bralette from the Pin-up Girls Sweet Sixteen Bralette Collection.

The Pattern

Beverly Johnson is the designer of this pattern. Beverly owns Bra-Makers Supply here in Canada, and is one of our amazing sponsors! Beverly was willing to provide a pattern to a reviewer, but I’m such a pattern hound, I already had a copy of this pattern. Rachelle of That’s Sew Venice gladly accepted that offer though, so we are both making the Sweet Sixteen bralette pattern. You can read Rachelle’s post here.

A Few Details About the Pattern 

Beverly says, “Most would not say “support” and bralette in the same breath, but oddly enough, this one can be very supportive. With the options this pattern offers, this bralette could become your new breast friend! The typical ready-to-wear bralette is only available in smaller sizes..not ours!”

It’s because this pattern offers both support and a fuller range of sizes, that Rachelle and I both wanted to make this bralette. Just so you know, there are 72 sizes included in this pattern.

A little later in the post, I have some ideas to share with you about making this bralette more supportive.

Another Sponsor – Club Tissus

Another of our fabulous tour sponsors right here in Canada is new to me: Club Tissus. They very generously offered the tour bloggers a discount and free shipping to try their merchandise for this tour. Thank you, Club Tissus!

My thoughts were, ‘A deal on lingerie supplies?’ I went to their website right away.

My first impressions were, well, it was all in French. I do know some French, but am not familiar with French material names. Then I found the box in the upper left corner that allows us to switch from French to English. (Whew!) That was better. I had no trouble navigating their site after that.

I bought this gorgeous mesh to use for the cups.

I found everything I needed to make my bralette there except neckline trim elastic. I had some of that in my stash.

Living across the country, mine took four business days to arrive. That’s still really good. I did have one mistake with my order, and after emailing them, they had the right item in the mail within a day.

Set Backs

I had a couple of set backs with my plans for my first bralette (okay, there were three all together) – which is not something you want to happen when a sponsor has donated your material!

My first was mistake with this material wasn’t a mistake, and I should have stuck with it. I simply cut out cups from the material – no matching, just random cut outs. But no, I decided I could do better and I tossed those cups out. (Remember this bit for later.)

Then I decided to use the colored part of the mesh. I didn’t like that once it was cut out and sewn. It was too multi-colored. Those went in the garbage.

Next, I was going to match the patterns. It turned out I wasn’t able to match the print exactly for each cup. No matter where I laid my pattern pieces on the remaining fabric, I could not get a match. Unfortunately, I had already cut out one half of the bra and matching pattern designs takes a lot more material than not matching.

I let that idea go, and just cut out another set of cups – I was right back to what I first did, except it’s three cuts into the material later. I was on my way.While sewing the cups, and then top-stitching them, my machine decided to eat my material and made a big knot! As I gently tried to unpick the knot… I made a hole. 

Sadly, there’s no repairing that, and by this time, I didn’t have enough of this mesh to make new cups. I had to start over.

Take Two

  Thankfully, I was able to make this beautiful bralette with a stretch lace cup, and power net for the band from materials in my stash.

Oh, I love these colors together. This is the Platinum duoplex, power net, and strap elastic from Bra-Makers Supply. The lace is some gorgeous lace I found at Fabricland in Ontario. I really love these together.

I couldn’t find a 4 x 3 hook and eye in Platinum and I didn’t like it in black, beige or ivory, which were all I could find. So I lowered the back where the straps attach to use a 3 x 3 hook and eye.

 Here’s the side view. So very pretty.

 How does it fit? It fit quite well after I shortened the back band.

Here’s the band I cut out based on what I thought were my correct measurements. After re-measuring, I was an inch smaller than I thought. However, I ended up shortening the band to that red broken line. That’s more than just the inch difference. So if you’re making this pattern, which is a great pattern, just know the band fits big.

Once I had the band shortened, it was perfect. I’ve worn this for full days, and it’s very comfortable.

Support 

Using only stretch lace for the cups, I wasn’t expecting this to be the most supportive, but I would say it’s actually better support than any other bralette I own.

I thought of some options to make this pattern more supportive: Lining it with foam, which is an option mentioned in the pattern, but not my preference. Other options could be to line the lace cups with sheer cup lining, or some firm stretch mesh, or even duoplex. All of these would make this very supportive.

PHDs

  There are always the Projects Half Done. This was one of them. A lovely camisole pattern.  I bought the material for it; a gorgeous cotton/silk blend, and this lacy material I thought went well with it. I received the High Neck Camisole pattern from one of our wonderful sponsors, Lingerie Secrets.

As it turns out, I’m actually glad I didn’t get this completed because just before the tour started, I found an even better lace in my stash!The lace is a cotton lace too. I like this so much better than the original material I bought for this.

Thank You

I  want to express my gratitude to these wonderful sponsors for our tour! They’ve donated patterns, fabric, and findings to our bloggers, and have gone above and beyond and donated prizes for you – our readers.

Tour Discounts (These discounts have ended.)

  • Funky Monkey Fabrics is offering a 10% discount for the duration of the tour. Use code: CC10 for 10% off store wide until October 22nd. Not valid on already discounted full bolts.
  • 20% discount storewide at Fabric Please. Use code CANADACUPS.
  • 10% discount from Central Sewing Machines (email your order directly to Muriel@centralsewing.com to receive the discount)
  • 10% discount from Midnight Mountain Fabrics. Use CANADACUPS10 for the code
  • Free shipping from Club Tissus on all orders over $100. Use code: livraison100

 Come back here for our wrap up to enter into a draw for one of the prizes! Just look at these prizes!

Happy creating!


Tour Schedule

Hang with us as we reveal our inner secrets. 😉


// Please note that none of these post links are available before the scheduled date. If you click on one too early, you will get an Error 404: Page not found. You know about those, right? //

Sunday, October 15


Monday, October 16


Tuesday, October 17


Wednesday, October 18


Thursday, October 19


Friday, October 20


Saturday, October 21


Monday, October 23

  • Giveaway winners announced on all the blogs:

Little Heart Threads, Glitter in my Coffee, Michelle’s Creations, Mrs. Weaver’s Finest Unmentionables, Gracious Threads, Élégantine!, That’s Sew Venice, Sprouting Jubejube, Flying by the Seam of my Pants, Filles à Maman


Another Watson for Em

There is nothing so comfortable as a comfortable bra! Or in this case, a comfortable bralette. When a bra is comfortable, there is no feeling of can’t-wait-to-take-it-off. You really forget you have it on. That’s how Em was feeling. She kept telling me how much she loved her Watson, and that she didn’t get home from work and want to take it off right away. I’m so glad.

Em’s last Watson.

This was all just bits of this and that I had in my stash. Despite that, I think it turned out quite lovely.

Hints 

As well as telling me how much she loved it, there were all the hints of what her favorite colors are, that she’d love another one, this was all she wanted to wear…

I got the hints. I dropped a few myself, like you have to buy some materials if you want me to sew you bralettes. Still, I really enjoyed making her something she loved. So… I’m making another one to get my sewjo back.

  Sales

 B,Wear has recently had a few sales. The first one I was aware of was a 35% off sale. I took advantage and I bought some elastics. I’ve found elastics were always what I was seemed to run out of first because I wasn’t willing to unpick it all, especially triple-zigzag stitches!

Along with my elastics, this lovely lace came from Bodil’s B,Wear shop. I used this for Em’s Watson. It’s gorgeous.

I’m matching it up with black to make a striking combination. White lace cups and cradle, black band, straps and findings. Em did say black and white were her favorite color combination.

Other Plans

Originally, I was going to use some more ‘bits’ that were left over in my stash for another bralette. However, once I was sewing with these ‘bits’ I realized the material was terrible! My machine hated it, and I didn’t want to sew with it anymore. After fighting with it and my machine for the better part of a morning, there was one more part that just wasn’t right; I couldn’t face unpicking it again. I turfed it and it felt great!

This is a really thin Lycra material. I still had some leftover after cutting this out, but it’s in a give-away bag now. Someone else might love it, but not me. Not anymore. Along with this, two other very similar Lycra materials are leaving my stash too.

Em’s Second Watson

    Here’s Em’s Watson. I really love how this one turned out as well.

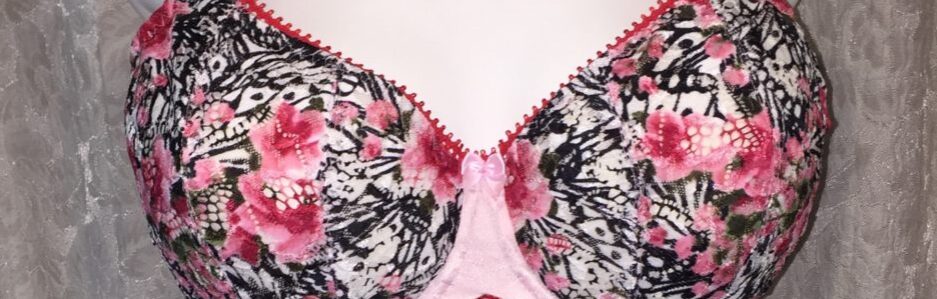
Oh, it’s so pretty. The black and white is so classic.

Here’s the side view: There was a lot of switching thread for this bralette. I only made one little mistake on the first color change. I went over the seam by a couple of stitches.

Other than that, I was quite pleased with all my switching back and forth.

Here’s the back of the bralette.

Seeing as I know this size fits her, I sewed the bow on already. I took advantage of the black and white color scheme to put a black bow on the front.

 Here’s a little tip for keeping these bows in place while getting it all under the presser foot – use a little bit of double-sided tape. You hardly need any, and it will wash away in the laundry, but it keeps it right where you want it until you sew it in place.

There’s only one thing I don’t love about this lovely bralette. The rings and sliders are one size too big. I don’t have any 3/8″ ones. Well, I did have a few but they were plastic, and I know plastic won’t survive being stepped on. (I never asked. I didn’t want to know.) The smallest size I have are 1/2″ ones, and as you can see, they’re a bit too big. I did try moving them, and they seem to stay in place quite well.

The most fun I have sewing for Em is hearing the exclamations coming from the other room when she’s trying something on: “It’s so cute!” I just don’t yell like that over any of my makes for myself. I might have a little more sewjo if I did.

The lace for this bralette came from B,Wear, the elastics from Bra-Makers Supply, the straps from Merckwaerdigh, and the power net from a new supplier to me – Club Tissus.

Happy creating!