Wire Comparisons

I’ve been keeping myself busy with canning, and even a little dehydrating. In fact, I have six trays of peppers drying right now.

I haven’t been working on my drafting, but do want to get back to it soon. I haven’t even been sewing.

But I have been looking at wires, trying to decide the best wire for me.

Here are the wires I’m looking at so far.

Here’s my adjusted BMS 38XL wire (bottom) with the Orange 38 wire (top) from Emerald Erin. I’m noticing that they are a different shape. Part of my problem all along may have been the shape I’ve been using.

I do like that Erin is in Canada. I am too, and that will make shipping costs better.

I will say, I haven’t tried this wire yet. I’m still just looking at wires.

The next wire is the 38 Regular wire from Porcelynne.Oh! I like how thick these wires are! They look SO supportive!

This wire is rounder like my adjusted wire, but a bit narrower on the inside. And as I’m thinking, although this wires matches the adjusted wire, the shape may still be wrong for me.

I will tell you, I want to like this wire though. 

Here are the three wires. The adjusted BMS wire is at the top. Then the Orange wire is over the Porcelynne wire. This photo is the one that got me really thinking about the actual shapes. So rather than compare wires to wires, it was time to look at my trace again. 

Looking at my actual trace, the Orange wire is the right shape. I think the first wires I’ll try are the Orange 38s.Happy creating and may your wires never hurt you!

A New Ruby

I wanted to make another Ruby. I am really loving the new patterns that are available. I’m thinking after this, another Angie, or maybe I’ll try the Jessica, and then the Amethyst pattern. Well, maybe I’ll do some of these fun new patterns in-between Christmas gift sewing and the Bra Drafting course I’m taking. I’ll share more on that next week.

Lace

 I did have a Ruby all cut out, so was working on that first. For my lace, I’m using some from Kantje Boord again. In fact, I’m using the same lace I used on my last Angie. The first photo below shows the lace on black Lycra (from the Kantjeboord website). The second photo is my black cherry bra with the lace flowers cut out and appliqued. I thought it would be fun to see how the same lace can look very different used in different ways. I’ll be using black duoplex and power net for my newest bra.

Ruby

For this Ruby, I did make one small alteration to the pattern. The straps felt a little too widely set for me, so I’m moving them in just a bit. I’m using my TNT cradle for this Ruby too. Other than that, the only alterations I made were for my Omega shape.

Here’s my Ruby:I am loving this! I love the colors. I love the shape and fit. Oh, these new patterns are so nice.

When making this Ruby, I did make another change – this time to the style of this Ruby. I decided in order to show the lace off as much as I wanted, I wouldn’t use fold-over elastic along the neckline edge. I changed the neckline to allow the lace scallops to show, and did what I usually do to stabilize a lace upper cup – sheer cup lining and some of that wonderful upper cup elastic from Kantje Boord.

Here’s my Ruby from the side:

And my Ruby from the back:I really do love this bra. It’s kind of funny, but my hubby is taking all the credit for this bra because he brought the lace back from Amsterdam. We all know there’s a little more to the bra than just lace. But he’s having fun taking credit.

To add a pop of color, I used a black cherry bow and added a black crystal to the bow’s center.It’s a very pretty pop of color.

Lastly, here are the two bras together:Even though I used the same lace on both of these bras, they definitely look different. Do you have a preference? Let me know which one you like best.

Happy creating!

Comparing Kits

I shared with you the lovely laces and lingerie kits my husband brought me from Kantjeboord when he was in Amsterdam. That was such a treat! As I was looking at them, I thought I’d share how the kits differ from kits I’m used to buying.

Kit Differences

 For the most part, I order from Bra-makers Supply. Their kits are what I like and what I’m used to using. Let me share with you how the BMS kits differ from the Kantjeboord kits my hubby brought me.

1

Firstly, BMS has a few options for kits. There are Bra kits (this kit includes bra findings), Trios (this doesn’t include findings), Quartets (this includes a choice of findings), and they have panty kits too. Kantjeboord has a lingerie kit and it includes findings for a bra and panties.

I was looking at the BMS website, and here’s what they offer when you purchase a Quartet:You can choose the size of findings you want, and then there are four options for those findings depending on the pattern you’re making.

2

  As I just mentioned, BMS offers Small and Large findings kits. You pick which size of findings you need based on your bra size. The Kantjeboord kits have one size of findings in their kits. What I have come to know as ‘Small’. I don’t know whether they have Large findings at all.

Here is a  photo showing the larger elastic from a Large BMS findings kit and the smaller ones from the Kantjeboord kit. The elastics in the Kantjeboord kits are the same size as the upper band elastics in the Large BMS kits. The elastic is 1/2″or 13 mm; or this would be the size of bottom band elastics in a Small findings kit.

3

BMS kits have upper and lower band elastics of differing widths. The Kantjeboord has one size of elastic in their kits – and a lot of it. I’m thinking it must be used for the waist and leg openings of panties as well.

4

BMS has ‘firm’ and ‘soft’ elastics. Their findings kits usually contain ‘firm’ elastics, however, you can make up your own findings kit with ‘soft’ elastics by buying everything individually. The Kantjeboord elastics are all ‘soft’. The ‘soft’ and ‘firm’ refer to the amount of stretch from what I’ve been told.

5

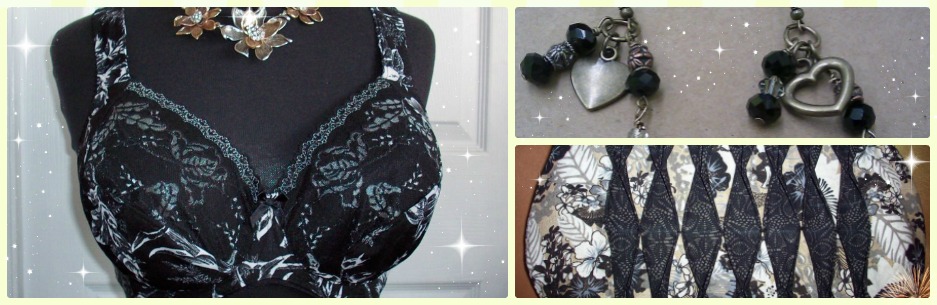
Another difference with the findings is BMS has all one color for their findings kits. Kantjeboord has two colors in each of the three kits I have here. Purple and black were in the first, brown and purple in the second, and pink and silver in the third – all colors complimenting the lace in each kit. You could do this with supplies at BMS – make your own findings kit using different colors, but the pre-made kits are all one color.

6

 Both kits have strap elastic included. You can see below an example of the second color in the Kantjeboord kits. Above the elastic was dark pink, but here the strap elastic is silver. The Kantjeboord elastic would be the same size as what is found in the Small findings kit from BMS – 1/2″ strap elastic.

  7

BMS kits are for bras or bralettes primarily – they sell panty kits (and other kits) separately. The Kantjeboord kits are for bras and panties. The first thing I noticed when I opened the kits was there was a lot of lace. Two meters of lace in each Kantjeboord kit! That’s enough for a bra and panties. There is also a lot of elastic in the Kantjeboord kits, and cotton gusset material.

8

BMS kits have duoplex and power net in them. The Kantjeboord kit has some firm Lycra in the kit. Again, I’m thinking the Lycra must be for the bra cups, the bra back, and the panty too.

Below on the left is a Trio from BMS showing the duoplex and power net with the lace. On the right is the lace and Lycra from one of the kits from Kantjeboord. There’s more material in the Kantjeboord kit, again, I think to make a bra and panty.

9

BMS findings kits have either 2 x 2 hooks and eyes, or 3 x 3 hooks and eyes, depending the size of kit you order. They also have matching metal rings and sliders (again either Large or Small), a bow, and trim for the upper cup. The Kantjeboord kit has some sheer cup lining, cotton for the panty gusset, three bows, 2 x 2 hooks and eyes, smaller rings and sliders (some plastic ones) and some upper cup elastic.

Here’s the sheer cup lining and cotton for the gusset from the Kantjeboord kit.And here are the hooks & eyes, rings and sliders, and bows from both kits. You can see in the darker pink from Kantjeboord, the rings and sliders are plastic.You can also see the two colors used again in the Kantjeboord’s kits with the dark pink hooks and eyes, and the silver bows.

Lastly, here you can see the trim in the BMS kits, and that narrow upper cup elastic in the Kantjeboord’s kits.The bag-full of upper cup elastic my hubby brought me home is a little wider than this one pictured above, but not much wider.   Both suppliers are wonderful, and all of us bra-makers would be lost without suppliers like them! Neither kit is right or wrong – they are just different.

I’m used to the kits from Bra-Makers Supply – I love duoplex and power net! However, I do like some of the differences I’ve found in the Kantjeboord kits. I like all that lace! I like the upper cup elastic, and the matching sheer cup lining.

Happy creating!

That Dress Revisited Part 1

My hubby and I are part of a dinner group that meets once a month. We’ve been meeting for the better part of 10 years, and have a lot of fun. We’ve tried recipes from all over the globe. Sometimes we get dressed up, sometimes not. There was one PJ night; we all brought our favorite comfort food. Conversely, there was an Academy Award Night. Everyone wore black tie, and one couple arrived in a helicopter! Another special night you might remember was our Valentine Dinner almost two years ago.

 That Dress

My dress-shopping-friend is part of our dinner group, and after trying on all those gorgeous dresses, I suggested we dress up for our Christmas dinner. She was hosting, and said no. She had too much work to do to get everything ready. I understood.

I found out I wasn’t the only one who wanted to dress up. One of the husbands in our group requested we dress up too. My friend decided since a few of us wanted to dress up, we’d dress up.

I was hoping to make the McCall’s 7684, but by time this was announced, I had less than a week to make it! I still tried.

The Pattern

I’ve already shared a bit about how closely this pattern matches the dress I saw and loved.  Here they are side-by-side. That’s the same skirt, same tie, same pockets, same zip in the back. The top is a little different, but that’s it. What a wonderful pattern!

My Materials

 I got the pattern. I bought some gorgeous materials too. I bought a lovely stretch velour for the top, which is closer to the original dress’ design which is a knit top. I also bought a gorgeous rich black and red brocade for the skirt.

 Pattern Hack

The first thing I had to deal with is the pattern has a dart in it and I know I’m going to need a Full Bust Adjustment (FBA). That’s fine. I’ve done FBAs before, but never on a waist dart. I think I drew it out four or five times, and still wasn’t sure. I didn’t have time to make a muslin either. By time I was ready to cut, it was three days until the party.

I decided to change the pattern. I pulled out my hallå Agnes pattern and traced off the top. I’ve used it to make a few tops. It’s designed for a knit, and my material is knit. I’d decided it would work.

First Attempts

Well, it was a sad, stressful day of sewing. The first top I cut out of the stretch velour was a bit tighter than I wanted. The stretch velour didn’t have the same amount of stretch as the cotton Lycra I’d used in the summer, and in my rush, I didn’t even check how much stretch the velour had.

I added a little more seam allowance to the pattern and cut out a second top from the remainder of my fabric. This second one was just fine.

Then, I messed up the neckband.

I didn’t think about the direction of stretch when I cut the band. I only had a little bit of material left, and I was rushing and feeling stressed. There was only one direction I could cut the bands for the neck and arms, and it was the wrong direction.

I only realized it was the wrong direction after trying to serge it to the neckline.

My Hubby

I called my hubby and told him I’d messed up the top. Twice. By this time I only had one day left to make the whole dress. Not one to give up, I ask him, ‘Should I go buy more material for the top?’

He didn’t think I should – at least not to try to make the dress for the party. He suggested I buy more material and make a muslin, and in the meantime we go dress shopping. What a sweet hubby!

Guess what I found on sale? My dress! The dress I loved from first look, and made me feel beautiful when wearing it.

I think you know what I wore to my Christmas dinner. Next week I’ll share all about our dinner.

Plans

I am not giving up on sewing myself the McCall’s dress though. I have some new material for the top, and it’s one of my projects I have planned for this year.

Happy creating!

Oh That Dress!

Recently, a friend asked me to go ‘Black Tie’ dress shopping with her. That sounded fun, so we made plans.

She had a shop in mind, so we went through all the dresses there to see what was appropriate for a black tie event.

  Gorgeous Dresses

 My friend tried on a number of dresses, but only two were lovely enough to really consider.

This adorable cocktail dress looked great on her, but wasn’t suitable for a black tie event. It just looked too good on her not to be included in her final list. This is the evening gown she bought for the event. It’s gorgeous and it really flattered her figure.  

Having Fun

 After helping my friend pick out so many lovely dresses, and seeing her try them on, I couldn’t resist trying on a dress or two.

This was the first gown I tried on. I loved this, but it did not love me back. I should know this styling is not flattering to my shape as I’ve been curvy all my life – even when I was a size 5. You can see on my croquis below, it isn’t flattering. It looked worse in real life.

No, that was not the right style for me. It was very easy to pass it up no matter how nice it looked on the hanger.

The next dress was a lot harder to pass up.  

While my friend was debating her dresses, I tried this one on.

I had to snap a photo of me in the dress too. When you try something on and feel pretty… it stands out.

Here’s the dress from the back:  

Ooh, it’s so lovely.

 I came home and looked for a pattern that was similar. I didn’t have to look far.

McCall’s 7684

McCall’s 7684 view C looks almost exactly the same. Same skirt, belt, zip up the back, pockets. The top is different.

I phoned the fabric store to see if patterns were on sale and they were! I was off to pick it up right away.Here are the dresses side by side:Here’s just view C:
 I’m so happy I went dress shopping with my friend. We really did have fun! I’m even happier I found this pattern.

That’s enough dreaming for me. It’s time to get back to work on all those Christmas gifts I said I’d sew.

Happy creating!

Rad Patterns Panel Undies

I realized very early on in my lingerie-making journey that I wanted ALL the lingerie patterns and books out there. I wanted them all so I could learn something from each one, and also have a very nice pattern stash.

That hasn’t changed a lot. I’m still buying patterns, even ones I said I’d probably not buy (she says, thinking of the new Harriet pattern – that is really similar to 2 other patterns she already has!)

Yup. I bought the Harriet pattern just so I can have it and look at it, and I’m sure, learn from it. It was just too pretty to pass up.

However, I’m not making a Harriet right now. I’ve still been working on my draft.

The pattern I’m trying now is an adorable pattern for panties or undies as the designer calls them.

Aren’t these just adorable? These are Rad Patterns’ Panel Undies. I’m looking at these and wishing I could find some adorable cotton Lycra (CL) in a print like that.

For now, I’m using some very basic CLs I have, both in a basic beige. I have two different tones, and decided to play on Paint to see which way I wanted to use them.

I have a lighter beige and a darker beige. I like them both, but am thinking of putting them together with the darker beige in the middle as shown on the high cut brief shown above.

Here’s the first look at them, and I like the color blocking look to it.

However, looking at them once they were sewn together, they looked even huger than normal. Have you ever made your own panties? Everyone warned me they’d look huge before they were sewn up. These looked huge even after I sewn them.

Before I went any further with them, I pulled out a pair that do fit me.

These aren’t going to work out. My next step is going to be to take my Master Pattern from Sewing Panties: Construction & Fit and use that to make a similar style. I know that way they’ll fit.

So, it’s back to the panty drawing board for now. I do have something to share about a future project that’s in the works. Here’s a little peek.

I love these fabrics! It’s Canada’s 150th birthday this year, and I’m celebrating. You’ll have to wait for a bit to see the finished project though.

Happy creating!

Making a Personal Croquis

Have you used a personal croquis? Last year I decided I was going to make one. This is one of my UFOs that I’m completing this year. If I’d had any idea of how much fun I would have, I’d never have put it off!

To me, a croquis is a basic drawing used to see how clothing will look on a body – in this case, on my body.

Adjusted Hourglass Figure

I think croquis are a great concept, except I don’t look like them, not even the hourglass ones. You almost never see a croquis with shorter legs! You definitely don’t see them with a little more padding than they need, or with curly hair! I found the image on the right online and played with it to give her shorter legs, more curves, and curly hair!

I have to say, I’ve been having fun with my curvy curly girl.

Digital Paper Dolls

Here she is trying on a couple of outfits.

Here she’s wearing the top from McCall’s 7538. The original is below for comparison.I’ve been wondering about this pattern because of the emphasis at the waist. There’s a fine line between defining a curvy girl’s waist and looking like Jessica Rabbit.

Here she is with the same pattern, but wearing one of the dress options.

I’m not loving this dress on her. It makes her hips look even wider.

However, this dress shape is from the same pattern. I can see right away this is a better shape for my curvy curly girl.

For all three of these clothing images, I copied the image from the web, played with it in Photoshop to remove the background, layered it over a photo of my girl, then adjusted the height and width to fit her figure. It sounds like a lot of work, but it only took a few minutes for each image. I found it rather fun. It really is like playing with digital paper dolls.

It was also very helpful in seeing how the dress design would look on my shape.

Beautiful Croquis

Gwen, a fellow blogger, goes beyond a simple croquis outline and does an illustration of herself in the garment she plans to make. I love it! Here’s an image from Calm Under Tension (used with permission).

Isn’t this fabulous? I marvel at Gwen’s drawings as much as I admire her makes. Gwen is a fellow lingerie-maker, so I know you’ll love her blog too.

Personal Croquis

Where did this whole desire to make my own croquis even get started? I received an email with this video. This is a great tutorial that takes you through the steps to create a personal croquis. It’s on the Threads website. The video goes through the whole process. I love seeing how something is done rather than reading how.

Making a croquis has been a goal of mine since this tutorial came out, so I finally did it. Here’s the beginning of mine.

In the video, the next step is to learn to draw your figure out, much like Gwen’s above, and draw the dress, or clothing on it. Here’s the final image from the Threads’ tutorial.

Yes, this is very much like what Gwen is doing. I may try it at some time, but I have to admit, I’m pretty happy playing with my digital paper doll and using the simple outline. It does exactly what I’m wanting as an outline.

Here’s my very basic croquis. She’s my measurements and my proportions, which I was quite surprised to find out were very close my curvy curly girl above. The curvy curly has a more exaggerated waist, and her legs are longer. I gave my croquis nicer curly hair, which resembles mine.

This last image gives me a really good indication of how that same McCall’s dress will look on me. I like it! Happy creating!

Using My Sample Packs

Something I’ve had for a while now are the Sample Packs from Bra-Makers Supply. When I first ordered them, I was more excited about them than the rest of my order. I could see all the colors of Duoplex at one time, in one place. The same for the Power Net. Only a bra-making geek would be excited about this. There’s a link in the photo if you too want your own sample pack. (No affiliation with Bra-Makers Supply – just love.)

swatch-pack-duoplex

That’s the photo from the BMS website. Here’s my own Duoplex Sample Pack.

bms-sample

Here are all my samples:

all-samples

These are the Duoplex, the Regular Power Net, The Cotton Lycra and Tricot Samplers. They really are such fun and very useful.

In the past I’ve show you how I’ve used them. When I purchase a lace or other bra-related material, out come my samples right away to see what I can use to match my purchase.

Here’s a recent one. Merckwaerdigh‘s Etsy shop had a gorgeous Devore Cotton knit bra kit. I’ve learned to not even think about these things. She only ever has one of these treasures, so scoop it up quickly.

devore-cotton-lace

These two photos showing the Devore Cotton are both from Merckwaerdigh’s store.

devore-cotton

Isn’t that pretty? Devore Cotton is also more commonly known as Burnout Knit. Devore Cotton sounds so much more exotic.

However, I know from experience, I need a little more support than this kit will provide. That’s where my Sample Packs come in.

Here are a few of my Duoplex options.

Here’s the Devore Cotton and Light Beige:

dc-and-light-beige

In this photo that looks like a pretty good match, but in person the Duoplex is a little bit lighter than the beige in the cotton.

Here’s the DC with Dark Beige:

dc-and-dark-beige

Hmm. This still isn’t what I’m envisioning. But the beiges are a good match.

Here’s the DC and Platinum:

dc-and-grey

This  was what I was thinking for the kit. I do like this one. The greys are not the same, the BMS one is a little lighter than the one in the DC, but I might be leaning towards this one. I’ve been wanting to make a Platinum bra.

And the DC and Black:

dc-and-black

I think the black makes the DC look washed out, which is definitely not a look I want!

I think I’m going to go with a platinum band and use Sheer Cup lining behind the DC.

Do you have any of the BMS Sample Packs? Do you love them too? Do you have a favorite? What would you use behind the Devore Cotton? Duoplex or Sheer Cup Lining?

Happy Creating!

A Visual Comparison of Two Patterns

Every since my hubby’s business trip to Germany when I placed an order with Sewy, I’ve been thinking about the Sewy Rebecca pattern.

sr

I’ve been wondering exactly how it differs from the Pin-up Girls Shelley because both patterns are very similar – power bar, lace upper cup, full band…

il_570xn-435956745_35r4

When you have a question like this, it’s just the kind of question to ask your very own Fairy Bra Mother. So I did. I asked her, “What is the difference between a bra that fits more shallowly (from my experience) and one that doesn’t?”

Beverly Johnson, (The Fairy Bra Mother), said she thought it all came down to bottom cup depth. Hmm. That gives me something to check into.

Now, let’s take a look together to see how much of a difference there is between the two patterns. I’ve compared them by wearing them, but not pattern piece to pattern piece. Well, there was one day when I measured all kinds of things on both patterns… but I didn’t trace them both out and compare.

Anyway. I’ve had a cold, felt terrible and didn’t want to do anything, but still wanted to get something done… so I pulled out my patterns and traced them off.

The Results

Here are the upper cups one on top of the other. The Shelley is traced onto  purple paper, and the Rebecca, yellow. Since the Sewy patterns don’t have a seam allowance, the Shelley has been trimmed of its seam allowances. I also made the split lower cup into one pattern piece.

no-really-upper-cups

The Shelley pattern piece barely peeks out from under the bottom of the Rebecca pattern piece, so to help us all out visually, I traced the Shelley onto the Rebecca with the dotted line. You can see the Rebecca is also straighter along the lower edge of the upper cup and is longer too.

You know how I said I had a cold? I had a little trouble naming these photos when I was saving them. I kept calling them all ‘Upper Cups’, so this one has the creative name of ‘No Really Upper Cups’.

Here are the lower cups of both which were saved under the file name ‘Upper Cups’. Sigh. upper-cupsThe Shelley definitely has more bottom cup depth. The Rebecca is longer along the lower edge. Again, The Shelley pattern is on the purple paper in behind.

Lastly, here are the power bars, which I caught before I saved and changed their file name from Upper Cups.

power-bars

I hope this helps anyone else wondering about the differences between the two patterns.

Happy creating!