The Great Canadian Craftsy Bag Tour

Craftsy 1200x627_social

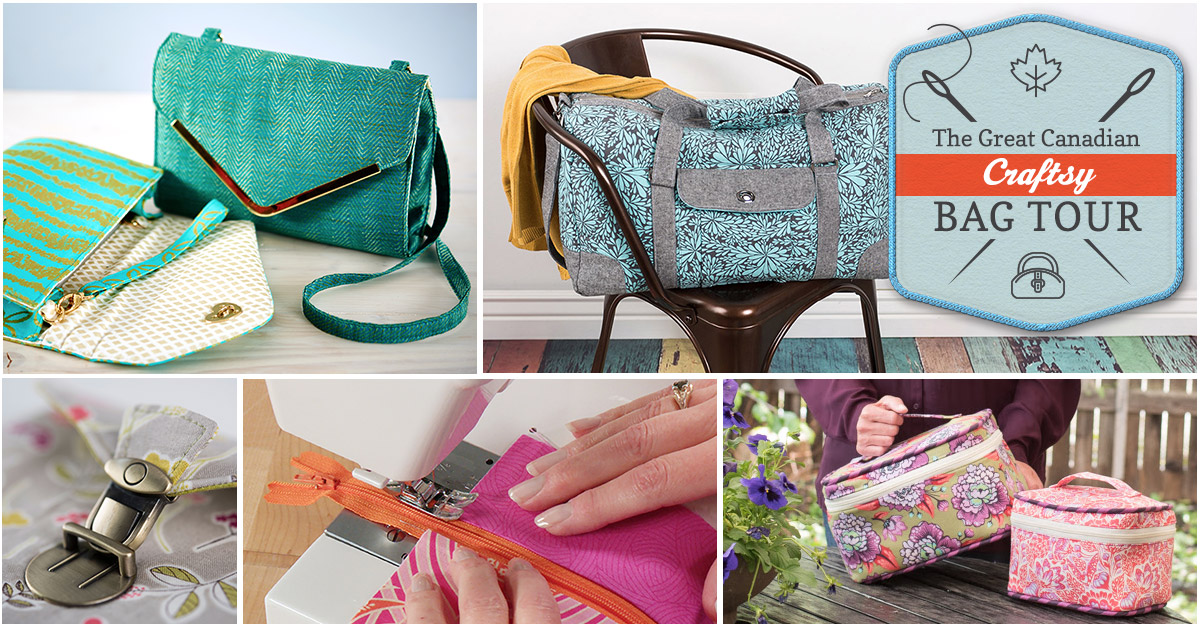
Welcome to my stop on The Great Canadian Craftsy Bag Tour! Our tour is made up of Canadian Bloggers, hence the name The Great Canadian… Only in Canada you say? Pity! Well, no, not really. We’re all in Canada, but you can join the tour from anywhere in the world! Sit back and enjoy – no tariffs, no shipping costs, no exchange rates. (Oh, Canadians know about exchange rates!)

Making handbags is something I’d wanted to do for a long time. After hearing of Craftsy, and signing up for my first class with them, I was hooked. I think my first class was Fab Felt Holiday Crafts with Betz White (you’ll see more of Betz on this tour), followed quickly by Design Your Own Handbag with Brett Bara. Brett’s class was the first of many handbag classes I’ve taken on Craftsy. With Craftsy, I’ve found a great learning platform, and I keep going back for more. I love that the classes I purchase are there for me anytime I want to access them, and never expire.

This year I became an Affiliate with Craftsy. On the right side of my blog, you’ll see some links to a few of my favorite classes, including the class I’m reviewing here (which Craftsy very graciously gave me to review for this tour). This list is by no means an exhaustive list, but just a few favorites. I can recommend these classes with confidence as I’ve taken them.

For my part in The Great Canadian Blog Tour, I’m reviewing Janelle MacKay’s class Mix & Match Clutch Bag Techniques.

titleCard

Janelle is a wonderful instructor. She’s very thorough, but without that rushed feeling we can get from having too much information thrown at us. She calmly takes us through each step, all the while giving us so many details of what we need to do, and options to change things up.

Janelle is composed in front of the camera. She definitely knows her material. Her knowledge and warmth come through on the question board too. She’s interacting with participants, telling them she loves the material they’ve chosen, encouraging when someone posts a question and figures out the answer on their own.

The class was a good pace for me. I’m not an overly experienced bag-maker, and I felt very comfortable with the pace of Janelle’s class.

Craftsy rates this class for an Intermediate skill level, and I would agree with that. There are some techniques that aren’t hard, but have a lot of steps that might be a challenge to a beginner sewist. I have read lots of comments on forums where people said how much they learned taking this class, and all the new tips they didn’t know before. There are tips in the class that can be used in any sewing. I loved how Janelle showed us how to deal with thread ends, and how she attached zippers. Both of these, and many more of the tips she shares can be transferred to non-bag-making sewing projects too.

The only difficulty I had with the class was having to draw out some of the pattern pieces. I need all the pattern pieces – even the ones that are simply a rectangle with the measurements given. I have some trouble with numbers. So for me, to have to draw out a rectangle piece… well, it’s a challenge. I have to look at the numbers, check them again, and then again to make sure I have them right in my head. Then a few more times because they can easily get mixed up in my head. It took me three tries to get those simple rectangles. I’m not talking just getting the numbers right, I’m talking drawing out those pieces. (Sigh) Now to be fair, I’ve read many comments on some of those same forums where others have said they hate to see something so simple included in patterns. For me, this is not so simple. I did get it done, and now going forward, I have all my pattern pieces cut out and labeled so I won’t have the same trouble.

Reece, of Happy Okapi, just reviewed the class Sew Sturdy Travel Organizers. One of the comments from Reece was there were no pattern pieces included with that class. Right away, I know it won’t be a class I want to take. Drawing out all the pieces would put me off before I started.

Back to things I love about this class. Here’s my clutch bag:

purse on cutting board

Oh, pretty, pretty. The inside of the bag is as beautiful as the outside. There’s a card slot that holds three cards, and a deeper pocket behind it. There’s a lipstick holder. There’s also a beautifully finished zippered pocket.

inside empty

Here’s the inside with a few basics in it. Sunglasses, keys, a few credit cards, lipstick. The red card is in sideways to show the deeper pocket behind the card slots. I didn’t even need to put anything in the zippered pocket. There’s lots of room in this little clutch! Look how pretty the zippered pocket is too. Janelle takes us through all the steps to make a beautiful, professional-looking finish on everything – inside and out. Here’s a confession: I thought the inside of the bag was so pretty, I took photos to send to a few friends before the bag was done. It looked so nice.

inside purse

pocket

Here’s the clutch on my dress form (Catherine) so you can see the size.

purse on Catherine

It’s a beautiful size and shape. For my first clutch, I chose a fairly basic design. If you look at the Craftsy image for Janelle’s class (above), you can see there are a few different options for the front of the bag, and for the flap. The variety offered is very nice.

One more comment on this clutch bag – I followed the Craftsy course alone to make this. I did use the pattern pieces that came with the instructions, but the class is so very thorough, a bag can be made following along with class instruction alone. It’s a really great class. I definitely recommend Mix & Match: Clutch Bag Techniques by Janelle MacKay, and I can’t wait to make another clutch bag.

Thanks for joining me on this stop of The Great Canadian Craftsy Bag Tour. The next stop is: 20 Essential Techniques for Better Bags with Fiona of Tangled Blossoms Design. If you’ve missed any of the reviews or stops along the tour, here’s the full listing of them:

Tour Dates

Monday, April 4

Seam of my PantsBag-Making Basics: Reversible Tote & Zipper Pouch with Kristin Link and Learn to Sew: Simple Bags with Nicole Vasbinder

Tuesday, April 5

Sprouting JubeJubeSew Sturdy: Home Organizers with Annie Unrein

Lulu & CelesteSewing With Oilcloth: Bags & Baskets with Kathy McGee

Wednesday, April 6

Happy OkapiSew Sturdy Travel Organizers with Annie Unrein

Thursday, April 7

Michelle’s CreationsMix & Match: Clutch Bag Techniques with Janelle MacKay

Friday, April 8

Shelaine’s DesignsSew Better Bags: The Weekend Duffel with Betz White

Tangled Blossom Designs20 Essential Techniques for Better Bags with Lisa Lam

Saturday, April 9

Emmaline Bags — Recap/Roundup

Sunday, April 10

Sur “prizes

Our tour has some amazing sponsors! Craftsy. Emmaline Bags. (Emmaline Bags donated the hardware for my gorgeous clutch) Tangled Blossoms Design. Blue Calla. Sprouting Jube Jube. Lulu & Celeste. Happy Okapi. Seam of my Pants. Thanks to all of our sponsors for generously providing prizes for the tour. You’ll have to wait until Sunday, April 10th to find out more about those. So make sure you come back on Sunday to find out what they are and how you can enter for your chance to win!

Prize Sponsors

Happy creating!

Please note, all contest links have been disabled as the contest is now over.


Announcing The Great Canadian Craftsy Bag Tour

Craftsy bag tour image b

The Great Canadian Craftsy Bag Tour starts today! Just what is the GCCBT? To sum it up, we’re all Canadian bloggers, we all sew, we all love Craftsy, we all reviewed some of the bag-making classes on Craftsy, and we put it all together for you to read over the next week.

The whole time the tour was being put together, I keep remembering an old television ad for Red Rose Tea: “Only in Canada you say? Pity.” Well, the bloggers all may be in Canada, but you can read along from anywhere in the world with no duties, tariffs, or shipping costs.

Head over to Emmaline Bags to start the tour today. And join us every day for the next week on our tour. It’s going to be fun, informative, there are prizes, and discounts too!

Happy creating!

The Cotton Spandex Opportunities

On a sewing forum I follow, someone posted a cute pair of panties and had lots of response. ‘What pattern are these? No elastic? I have to know what pattern, …’ It went on for a while. We were told they were Scrundles. Off I went to search the web for Scrundles. I didn’t find any Scrundles, but a little more searching and I found Scrundlewear Ladies Underwear by Stitch Upon A Time.

I looked at the first photo to show up and thought, that doesn’t look like what I saw. This photo is from their Etsy shop. These are boy shorts. What I’d seen were more of a classic brief shape.

boy short

Then I scrolled through the photos and saw this:

brief

These were more along the lines of what I’d seen posted. Super cute!

The pattern offers five styles of panties in one.

pattern

Hmm. Now I’m thinking. I really love my TNT Kwik Sew 2286s, but I did think these were super cute. Here’s what they say about their pattern:

2 different styles included, Briefs and Boy shorts
4 different waistband options
2 different leg band options
3 different trim options, faux fly, lace and ribbon bow
You can make more than 16 different underwear with this one pattern!

They were sounding better and better.

Then things got more tempting for me. On the same forum, all these people started posting about the cute printed Cotton Spandex they were finding at a Canadian fabric store, Fabricland. Off I went to my local store to see if they had it. Nope. It seemed to skip my Province. From what I was reading, it was in the Eastern stores, and the stores in the Province west of me too.

I put the thought of those cute panties on hold. If I was going to make them, I wanted mine to be cute with some patterned material too, not just the solid colors of Cotton Spandex I’d found.

Then there was that unexpected trip to Ontario. After visiting and spending time with family, a very quick trip to Bra Makers Supply, and more family visits, it was time to go to Fabricland.

There is was! The same cute patterned Cotton Spandex I’d seen on the forums.

cotton for panties

My first trip to Fabricland was a quick trip, so I grabbed a meter of each with plans to go back and get a little more while it’s on sale for half price.

At this point, I had the material, but not the pattern. Then came Jennifer Getter’s birthday (Jennifer of Stitch Upon A Time). On the SUAT’s Facebook page, she said she was celebrating by offering 40% off patterns that day. What a great opportunity! I’d bought some material, so with 40% off, there was no reason to hesitate anymore.

Another of my goals for this Spring is to make myself a T-shirt that really fits. Sewing with Nancy had a few episodes on sewing the perfect T-shirt. After watching, I purchased my pattern. It’s from Pamela’s Patterns.

perfect t-shirt

This is a darted T-shirt, so should really help when it comes time to do a Full Bust Adjustment on it. It’ll be like the work is half done for me. Rather than starting from scratch and adding a dart, I’ll only have to adjust the dart that’s already there. On the show, they even show how to adjust the dart higher or lower as needed. Great!

However, it was another of those projects that needed Cotton Spandex, so it’s been waiting.

These are the materials I purchased to work on a few Summer tees. I may mix and match things up too.

cotton for tees

I had hoped on my second trip to the store, I’d find some brighter colors. They did have a couple, but the prints were huge. They weren’t anything I’d want for panties or Tees. I’d even brought my hubby in with me to help me decide. He didn’t like the other prints either, so I’ll have to be happy with all these nice new black and white prints.

While I was there I did see one more wonderful fabric.

african print

This is part of an African Prints collection. I grabbed what was left (not even a full meter), and will use it for a Swoon bag, or as a feature on a bag. So pretty.

Happy creating!

My Spring Lingerie Wardrobe Plans

We all have plans of things we want to make or sew, but last fall I realized I had so many projects to make on my list that I needed to break things down a little. I made a Fall/Winter list and left everything off that I wouldn’t be wanting over the winter. That helped me tremendously.

I did the same again just recently when I was planning a trip to Bra Makers Supply. When I started to make my list, there were a lot of darker colors on it like Black, Black Cherry, Chocolate… I took a look. Well, I took a look after I added up what it was going to cost me if I bought everything on my list, and I decided to re-do it for only Spring and Summer.

The first thing to do was to go through my stash and see what I needed to complete what was there already. I have a Pink Bra Kit but I didn’t have a Finding Kit. I had an Ivory Bra Kit too, but again no Finding Kit.

Finding Kits were on my list.

findings and bra kit

As well as the Finding Kits, I picked up a Lavender Bra Kit and Finding Kit. All of these will make a lovely light-colored Spring and Summer bra wardrobe.

While at home I looked at the cotton I had for panties. I had some Beige, and some Pink. So I needed some Ivory. Bra Makers doesn’t have Ivory in their Cotton Spandex, but they do have lovely Modal in an off white that looked nice with the Ivory Duoplex. I loved placing the fabrics beside one another and seeing how close the colors were for myself.

bamboo 2

I had my hubby with me (he was the one rushing me out of the store), and I told him to look at the Bra Kits and pick the one he liked. On his third pick, we agreed. We chose the Lavender Bra Kit and Findings, with Lilac and Lavender lace. The kit is showing above, but here’s the lace.

LS-63.5355%20Lilac%20and%20Lavender

Oh, it’s so pretty! I did realize after I left the store that I didn’t buy the Lilac Cotton Spandex, but BMS does carry it, so that will be something I still need to purchase.

Two more bras will round out my Spring and Summer wardrobe and they’re both Beige. I bought some Beige Polka Dot Tulle, with Beige Sheer Cup Lining, and a Beige lace to make Beverly Johnson’s Heather bra that was shown in her Craftsy class.

Heather on Ashley smaller

This photo is from Beverly’s blog. You can read how she made it and what pattern adjustments to make here. It’s such a beautiful delicate looking bra. I can’t wait to make my own version of it. Here are my materials for it.

beige lace beige tulle beige sheer cup lining

For the last bra on my Spring/Summer list, I chose Beige Cut and Sew foam with a gorgeous Beige and Copper stretch lace.

beige lace over beige cut and sew foam

It was love at first sight when I saw that lace. Just imagine of my delight when watching Beverly’s last bra-making class and I saw she used the same lace over a beige foam cup! It’s beautiful together.

One last purchase and (gulp) possible plan – a bathing suit. Bathing suits simply don’t fit me. If I buy them to fit the bust, they float around me. If I buy them to fit my frame, I’m spilling over the top. They have not been one of my favorite things.

The Princess Tankini Pattern.

tankini 2

Sewing a bathing suit is at the bottom of my list, so if I don’t get to it, I won’t feel overly upset about it. In fact, I didn’t buy any material for this project. The pattern is enough for now.

I can’t wait to start sewing. Happy creating!

A Trip to Bra Makers Supply

We all have plans and we all have schedules. Mine changed suddenly last week, and my husband and I found ourselves flying to Ontario, Canada with only a day and a half notice. I knew right away though, there was no way I was going to be within hours of Bra Makers Supply and not go there. I started to make plans right away.

So here’s a little post about my trip to Bra Makers Supply. I was so excited to go, and to meet everyone. However, I arrived the same morning everyone was leaving for the Bra Makers Cruise. That was a small wrench in my plans, but I did get to meet Beverly and some of the staff. It all worked out great.

Beverly and M

Beverly is as wonderful as you think she is, and so is the store! Due to our schedule, my DH had to rush me a little to get me out of the store. I arrived with a list in hand, and wanted to take my time and enjoy the whole process of being there, looking at everything, selecting what I wanted, taking photos all along the way. Our schedule demanded otherwise.

I did buy all the things on my list, but I didn’t take anywhere near as many photos as I wanted.

There were shelves that went almost to the ceiling. Everything is wonderfully organized; truly a bra-maker’s delight. Along one wall there were plastic baskets of rings, and sliders, and wires, oh my! Along the opposite wall were more shelves with laces, elastics, simply everything we need.

shelves

Just imagine shelves of laces!

wall of lace

Next to these were the Stretch Laces. I really could have spent a lot more time there. Well, my money would have run out eventually.

Below are just a snippet of the elastics. Right in the middle of the lower shelf that’s showing in the photo – the new Grey and to the right of it, the new Black Cherry. Oh so pretty! I heard they are going to be part of complete Finding Kits in those colors. Yay!

elastics

It was so fun, but DH was keeping me to my schedule. So a few quick photos, and it was time to seriously shop and hit the road again.

I bought everything I need for my Spring/Summer bra and panty wardrobe. That will be another post.

haul

Oh, just look at that wonderful stash and me not at home with my sewing machine.

After we went to Bra Makers Supply, we made another quick stop: the location of the original Tim Horton’s restaurant. This may be the original site, but a new building has been put up.

building

This location is part restaurant – you can buy your coffee and whatever else Tim’s offers – but it’s also a museum. It was really a fun walk-through. Here are a few photos from the upstairs.

Does anyone remember these prices?

prices

Here are the original donuts that were offered. I don’t remember any of these.

donuts

I thought this was a cute sign, so took a photo of this too. I have no desire whatsoever to be a Donut Maker, but a Bra-Maker. Yes, please!

sign

This poster was great. I love how it tied the donuts to hockey. For all the non-Canadians reading, Tim Horton was a Canadian hockey player, who after that career, opened this chain of famously popular coffee shops, that are still very popular today.

wall

My hubby is a Timmies fan, so this part of our stop in Hamilton was a highlight for him. With me not shopping, I had a little more opportunity to take  few photos.

D and sign

I can’t wait to get home and start sewing. Happy creating!

Pattern Testing the Minimalist Wallet

I was given the opportunity to test a new pattern, and I jumped at the chance to do it. It’s The Minimalist Wallet Pattern. The pattern was released on Sew Modern Bags.

I wanted to try this pattern because the designer wanted to see it in leather and I had just scored that great leather stash. Now I had the opportunity to use some of it. Win-win

pattern

This pattern is very easy to make, and working with the leather was delightful. It is so soft. It cuts so easily. It sews really easily too. I did use a leather needle, which I’m sure helped a great deal. All in all, it was great to work with leather. The only part about working with leather that wasn’t a delight was using Wonder clips. They have little teeth in them, and those little teeth were showing on my leather! I ended up using office clips. They still left a little bit of a mark, but it didn’t look like little bite marks.

Here’s the wallet. I added a second snap to the closure tab. I’ve seen that before and liked that option. When your wallet is full, use the outer snap; when the wallet is less full, the inner snap. It keeps your wallet from feeling like the closure is loose fitting.

wallet-closed

Here’s the wallet from the inside:

inside-no-cards

The wallet has eight card slots. Each of the four you can see with the little crescent cut into them has one behind as well.

Here’s the wallet showing the billfold. Bills, receipts, shopping lists all fit in here easily.

bill-fold

The only real problem I ran into when making this was using the snaps. I actually had two problems with the snaps. The first one was the outer snap that’s attached to the body of the wallet simply would not attach. I went through four snaps before I gave up on reinforcing it as the instructions say. There was just too much thickness there for it to work with the leather. It’s been behaving just fine now without that reinforcement.

A second problem I had was entirely my fault: I attached both of the snaps at the same time – the one on the body and the one on the tab. The instructions say to attach the one to the outer body and nothing at that point about the tab, but I didn’t read the instructions. As things quickly began to not make sense, I started reading the instructions again. I threw out the first tab I’d made and cut out another tab and started sewing again where I’d veered off. There were no more problems from that point on.

I don’t think the first problem I had with the snaps was an indication of the pattern though. The pattern is designed for Kraft Tex. The Kraft Tex may be thinner than leather, and the reinforcement needed.

Happy creating!

Basic Black And Not So Basic Black

I’m happy to say, as of this blog, I have no RTW panties in my drawer. Yay! That means all my panties are now very comfortable, pretty, and me-made. I like that.

So, what did I make? It was time to make some more black panties.

Untitled-1

Here’s some of my stash. The Cotton Spandex is all cut out and ready to be sewn. The gorgeous wide leopard lace was a find eBay. Oh, it’s nice. So I’m building my black panty wardrobe here.

I’m using my favorite TNT pattern, Kwik Sew 2286. They don’t call it a hipster, but that’s how it fits me. It’s hard to find, but if you can find it, grab it up. It’s a great pattern.

Untitled-1

What really sold me on this pattern was it’s almost exactly like my favorite, now-discontinued, RTW panties. Both have elastic lace trim at the waist and leg opening. It’s almost the exact same shape too. The pattern sits a little higher, and I found I preferred that.

Untitled-7

Here are the first couple of pair done. I really love that leopard lace! And although it’s not a perfect match for my Pin-Up Girls classic bra with the leopard mesh trim, it’s close and I’m happy with it as a set.

front-2

The next pair was made to match too.

Untitled-8

This one is black with red lace at the waist and leg opening. I couldn’t resist putting a little of the Lycra on the panty to mimic the Lycra on the power bars and bridge of the bra.

100_2686

This is another fun set for me.

I am making four pair of basic black with black lace trim. I ran out of lace after making the first panty, so off I went to the fabric store and I found this wonderful lace on sale for 65% off. I bought 15 meters! I think it was $2.20 to start, so I pretty much cleared the bolt.

Untitled-10

The lace trim wasn’t the only great deal I got that day. I wandered into the discount area, and walked by some lovely bright crinkle cotton. I walked by it, and then back to it. It was only $3/meter. I think I walked away three times, but kept going back. Am I ever happy I did! When I went to get it cut, I found out it was half price! So I took what was left on the bolt, just over two and a half meters. This will make a lovely summer top.

cottoon

As for the lace I bought, I think I’ll have enough for a little while now. Before I even found this lace, I knew I was getting low, so had also been looking on Etsy and eBay for laces too. I found this lovely scalloped lace that I plan to use on two of the basic black panties.

Untitled-12

This will make my favorite panties almost exactly like my former favorite – they had scalloped lace trim at both the waist and leg opening.

Untitled-7

I bought a few meters of that too. The next time I’m looking for black lace trim, I should be set!

Happy creating!

Coraline Clutch

Oh, I think I love bag-making as much as I love bra-making. I made another Swoon. I must say, I love it. I used it the same day I finished it, and was so happy with it. Here’s my Coraline Clutch shown with the pattern.

with-pattern

I made this out of the same fabric I used to make my Agnes-inspired skirt, and the temporary dog boots. (I told you you’d see more of this, but I think I’m pretty much done with the material now.) This is a thick flocked knit. I really do love this material. I have a little more in black. I also have a similar black flocked stretch denim. So many things to sew still!

Back to Coraline. Here’s the inside of the bag.

Inside

The pattern is a great pattern, and it all comes together easily. Swoon has a Facebook group for support, and that group lists a bunch of files. One of those files is a video tutorial that I used to help me make this bag – just to make sure I was doing everything right.

I added a fun little bracelet charm to the zipper to give it a little more oomph, and to make it easier to pull that little zipper.

zipper-pull

Here’s the backside of the zipper pull:

back-of-zip-pull

I love that it is two-sided. Regardless of which way it shows, it looks pretty.

I worked to pattern-match the fabric so I’d have the same pattern showing on both the front and the back. I could have done a tiny bit better with my pinning because I noticed the bottom seam doesn’t match perfectly, but I’m pretty pleased with it overall. Most of the time I won’t be looking at it from the bottom, so the sides match well. There’s always something to work on for the next project, isn’t there?

pattern-matching

One change I made to the pattern was to simply attach my strap into the bag’s seam. The pattern calls for a 1″ D-ring and a 1″ swivel clip. I didn’t have those on hand, and didn’t have time to run to any store. I made this up, showered, and went out to a banquet. I love it as is, but also think I’d love to see it with the D-ring. I have another planned already.

Here’s my new Coraline with Catherine, just to show you the size.

On-Catherine-with-new-drape

Catherine is draped in some lovely fabrics that I’m hoping will make it into a holiday skirt.

Happy creating and have a very Merry Christmas!

Dog Boot Update

I’m on pair number five of the dog boots and I’m really hoping I’m done. Some good news: the boots I gave to a friend for her dog fit perfectly. Yay! Some not so good news: we’re now down to three of the boots I’d made last week, and three of the boots my friend gave to me.

Right there, I need to fix something because there is no way I want to spend my winter making dog boots. I’d much rather sew for me.

Here is the pattern I used:

boot-with-pattern

You’ll notice my boot looks a little bit different than the one in the photo. I used Velcro all around the boot, which is one change. I also added a long strap and pin to the end of the boots. If my little pup is going to lose his boots then I’m going to pin them to his coat just like we pin mittens to kids’ coats.

Here are all four new boots. Having an actual pattern helped so much in making them all the same shape. You can see two of them from the top with the Velcro wrapping around the front of them, and two from the back with the soft microfiber pad to help keep my pup’s feet dry.

four-new-boots-with-straps-

Here’s one by itself with the strap and pin. I may end up shortening the strap, but until he stops losing his ‘mittens’, I’m going to pin them to his coat.

Dog-boots-with-strap-and-pi

Happy creating!

Dog Boots I, II, III, and IV

Can you guess what I’ve been working on? Our sweet pup came to us 10 months ago from California. From Cali-Can Rescue Foundation. Oh, I love him. I tell people, ‘We stupid love him.’ We’re all just over the moon for this little pup, He had to acclimatize coming from California; he needs to dress warmly now he’s in Canada.

We got him a coat last year, but it was almost the end of winter and we couldn’t find dog boots anywhere. This year, there were lots of them, but they’re $50! That’s more than I paid for his coat! I started looking for patterns.

The snow came before I had anything made, so I used some left-over material and made some quick little boots just to help keep his feet dry. They didn’t help a lot, but a bit.

First-pair-front

Just to keep them on, I sewed on some elastic as I didn’t have any Velcro floating around. As you can see, I really just threw these together, and we lost one after a couple of walks. On the far right one, you can see holes starting already. These are from skirt material scraps  and really weren’t suited for this project. Just a hint here: you’re going to see more of this material before I’m done with it.

A dear friend, who happens to run a cat treat and toy company, saw these temporary boots and said she’d get me some boots for our pup. She gave me these boots and a matching coat. The coat is great – it has a water-proof layer and then the fashion fabric. The coat is too big though. I could move the Velcro over a bit and make it work, but she wants to get us a smaller coat, so that will be great, especially for rainy days.

Gifted-Pair

IMG_0215

Oh, there’s my sweet puppy baby! I just love him so. I could sit here and just look at that sweet face. See, I told you – stupid love.

Back to the doggie boots.

While I was waiting for that wonderful gift to come, I kept working on the doggie boots. I found a video on YouTube, and it looked great! I thought I’d give it a try, but without an actual pair of boots to look at, I really wasn’t sure how I was going to attach the Velcro. Here’s the video.

My pup doesn’t really like anyone to hold his paws, so measuring his paws was a bit of a hassle, until I decided to just put his paw on my fingers and use them to measure. His paws are two-and-a-half of my fingers wide, and two-knuckles long. It worked. That was what I’d used for the first red booties.

Third-Pair---too-small

They look cute and all. I added some faux leather to the back of them from an awesome leather score I got.

leather-pile

I’d stopped in a second-hand store and saw these sitting in a box. I asked how much they were. Five dollars for the whole box. Yes! About one-quarter of this is faux leather/microfiber, which was perfect.

So these fleece booties are better for the weather, but I didn’t take into account that the material is thicker and the boots would need to be a little wider. These will go to another sweet Californian pup who came up to live with a friend of mine.

These are the last pair of boots I made this week:

forth-pair

This time instead of faux leather they have microfiber on the back. These work well enough, but I think there will be a fifth pair of booties where I take what I learned from each pair, and add a little more.

The video, which really is great, didn’t show me how to attach the Velcro. The boots my friend gifted us does allow me to see how that goes on.

The video also didn’t have a pattern – she just winged it. And all my boot parts were cut out following the video’s information.

The next pair I make, I will use a pattern that is pre-cut, so pre-shaped. That way I’ll get a more uniform shape (which clearly I can use). I will continue to add the faux leather/microfiber to the bottom to give a little more insulation to my pup’s paws. But I will change the elastic out for only Velcro – it gives a stronger hold around the boot.

Happy creating!