I recently found the most gorgeous lace. I had to get some, and had to make a bra with it.
This Lace 
It is even prettier in real life with those gold leaves on the blue. I found this lace on Etsy. (This is their image too.)
My New Bra
I used my Shelley pattern that’s a combination of my self-drafted pattern, and the pattern from the sewing class at Central Sewing. I’m loving this. You might have noticed, I haven’t added any bows. It’s not because it’s not bow-worthy this time. I’m not sure I want bows. I made some. I pinned them on to see what I thought, but I wasn’t over the top in love with the bows on it. I may look for a little golden leaf charm. I think that would look great on this bra and mirror the gold leaves in the lace.
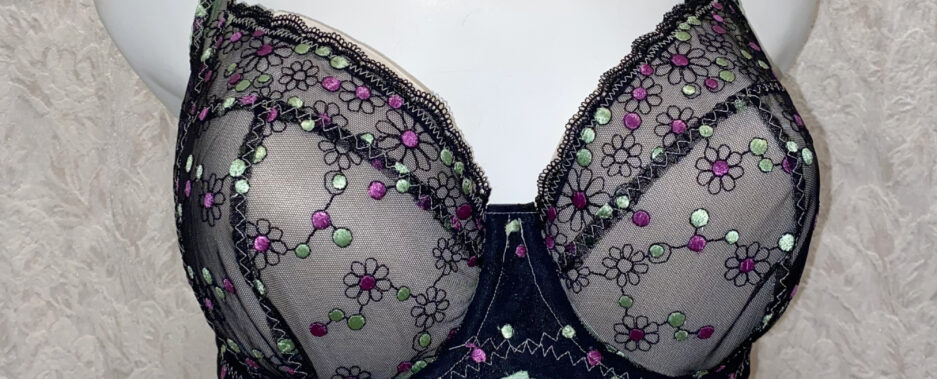
Perfectly Fitting Together 
I’m not going to get tired of this – at all. Look at how lovely that cup and cradle are! They are meeting perfectly and there are no wrinkles, no gathers – just perfectly matched edges. Oh, I can’t tell you how happy this makes me. Let me say, unless you’ve had to gather your cup to fit into your cradle, you’ve been taking those perfectly matched edges for granted. This really is a highlight of my bra-making now.
The Back
I have the sample pack of duoplex from Bra-makers Supply. You can find it here. After looking through it to match this lace, the closest match was the Bluebird blue. The Bluebird blue doesn’t have a matching Finding Kit available. I decided to use beige as it was the closest to the gold leaves in the lace. I’ve also used gold rings and sliders.

Although you can’t tell once the bra is fastened like this, the band does have a downward hike.
Happy Sewing Moments
There are moments when things come together so well, and this lace mirroring is one of them. It’s out by a smidge, but that’s pretty darn good.
Next I plan to make something pretty to match this bra.
Happy creating!


 I was encouraged by these and how well they fit. I will finish these up with a proper waistband, and hem the legs. They’ll make great slim pants for under my Agnes dresses for the summer.
 Here’s the side:
 How about them tomatoes? I won’t be making pants again any time soon, so it’s time to dismantle my ‘legs’.
 To make the legs, I had the cans on top of a stool to add some height. I had the stool sitting on my Lazy Susan. This made it so once I had my mannequin balanced, I could gently turn her for photos. Whew. It all worked, but I’m also glad that’s done.
 I wanted to change the cups on this to make them a little rounder. I also wasn’t completely happy with my power bar. Something seemed a little bit off where the strap tab and the underarm were meeting. I also changed the band to a downward hike, but it needed work too. More on that later in the post.
 There’s really very little difference between these two, but I decided to use the white. Seeing as my lace is a little bit darker than the ivory duoplex I’m using, I thought the white behind it brightened it up a bit.
 I even enjoyed taking my time with all the top-stitching. I was only finished the cups in the above photo, but they were so pretty I had to take a photo.


 Next, putting right sides together, I matched up the elastics with their counter-part. I pinned the elastics right sides together while they were still open, or unfolded.
 I sewed them along the line I marked.
 I trimmed them. so there wouldn’t be a lot of material in the fold.
 Next, I folded them. That little bit in the middle did make them a bit bulky. They kept opening, so I pinned away.
 Lastly, I sewed along that length of fold over elastic that was now joining the front and back, both at the waist and the hip.
 I love this view below. It shows both the upper cup and the panty side. The fold-over elastic finish on the upper cup goes so well with the fold-over elastic detail on the panties.
 And here’s the back.
 I’m really pleased with how these turned out. I think they’re a charming match for my February Challenge make.
 This photo is from the BMS blog. You can read the post
 I planned to use my mashed-up
  These are stretch satin and cotton Lycra. Then finished with stretch lace at the waist and leg openings. I’m loving these!
 Here’s the side view.
  And the back. I was almost out of cotton Lycra, so had to make these with a seam in the back.
 I love these! Next I made a the bra to match.
 The whole bra cup and cradle is stretch satin. I’ve lined the cup and cradle with beige sheer cup lining. That little part on the upper cup that looks like there’s nothing there? That’s sheer cup lining. It disappears against the skin.
 Do you see those puckers where I gathered the cup to fit into the cradle? I don’t like that! Those puckers aren’t so noticeable when I’ve used duoplex. That made me sad.
 Oh, the back looks perfect! The red power net really matches the stretch satin well. I debated using the satin for the band too, but had some red power net in my stash, so went with that.
 I love this sheer cup lining detail. It turned out better than I had hoped.
 Margreet took us through the steps of designing a bra, and part of that was testing the cups in a frame. You can read about it

 You can see I use her a lot, and she is still much-loved. But she doesn’t work the best for displaying bras because we’re not the same size. And because she doesn’t have any legs at all, she really doesn’t work for panties. However, she’s been all I had for a few years, and I made do with her.
 I’ll share more on this bra soon.
 Right away I was asking her questions. Where did she get them, how much did they cost? Drop by her Facebook page:
  I knew I had to go see for myself. I’ve really wanted a better way to display panties.
 I’m happy to have a display for panties. Here are my self-drafted Hipster panties. Even though we’re not the same size, these look pretty great on her.
 Panties just never looked this good pinned onto the front of Catherine.
 I’m thrilled to get all of these new displays!
 In the first photo the shorts are pinned. In the second photo they’re unpinned. I definitely have more going on in the hip and thigh than this display!
 Again, pinned and unpinned.
 I LOVE lilac! I don’t know why I haven’t had a lilac bra and panty set before.
 Below, on this side view, you can just begin to get a peek of the back. This is the combo panty I mentioned earlier. It looks like a brief from the front, but a boyshort from the back.
 Here’s the full back view of the bra and panty.

 I am so happy. This fits perfectly, and I love the color!
 Even though I’m drafting the pattern so there shouldn’t be any difference between the cups and cradle, I still find I’m having a tiny bit of a length difference. A quick little gathering stitch running along the bottom of the cup, and it fits in just fine. Also, there are no wrinkles on me, but a few on Catherine.
 When I was taking the photos for this, I noticed I missed catching the very bottom edge of the strap elastic under the eyes. I’ll have to take that back to the machine and tack it down.
 The Gothic arch looks wonky here, but that’s just on Catherine. I tried to get it to lay flat, but it just wouldn’t.


 That’s the same skirt, same tie, same pockets, same zip in the back. The top is a little different, but that’s it. What a wonderful pattern!
 I bought a lovely stretch velour for the top, which is closer to the original dress’ design which is a knit top. I also bought a gorgeous rich black and red brocade for the skirt.