I don’t know how many of you watched The Great Bra Sewing Bee this August. I loved it! In fact, I’m going to make sure I have the whole year’s access next year.
There was one class I was watching, and I had to rewind the class. What did I just see? It was the Panty Drafting Based on Inspiration Images class with Angela Gough.
At one point in her class, she used a stretch adhesive tape on the edge of her panty. She ironed it, and folded it over and ironed it again! No seams! No sewing!
What? I’ve never seen anything like that before.
I sent off a message to Bodil of B,Wear, and I asked her what this magical tape was. She said she was already looking for it because at the time the video was released it was only available at the Sewing Chest in the UK.
Well, Bodil got some in and sent me a sample with an order. I couldn’t wait to try it. I pulled out one of my favorite panty patterns – Kwik Sew 2286.
I didn’t have enough for the whole panty. I actually didn’t have enough for the whole waistband. But that was okay. I had also purchased some HeatnBond Ultra to test. I used them both on these panties. I used the Fusible Iron-on elastic sample Bodil sent on the back of the panties and it bonded perfectly. I used the HeatnBond on the front, and it didn’t bond perfectly. I had to redo it because after handling the panties it was coming undone.
After a second press with a hot iron, it seems to have bonded now. I’m very happy with my new seamless panties. I can’t wait to have more fun this way.
Happy creating!
 I knew I wanted a blue dress. Their wedding colors for the groom are grey and blue. I thought it fitting to wear blue as I’m on the groom’s side. I loved the first dress, the one on the left, but you know how sometimes navy can be so dark it looks black? It looked black. As well, I was going to have to alter the sleeves. I didn’t want long sleeves.
 When I paired it with the navy I had, it looked more purple than blue.
 I was back to square zero, and still needed to find or make a dress. It was the beginning of August by this point.
 My husband thinks it’s wonderful. He loves the color and the style. I love the full skirt. And did I mention pockets? My husband thought I was going to carry around car keys and such in my pockets! He thought pockets were a terrible idea. No, I’m more thinking of a tissue or two.
 Here are a few of my makes.


 This is the
  I used the same lace as from my Summery bra. I love the delicate floral pattern in it. Seeing as it had bright pink, I decided to match it with some fuchsia I had in my stash. My hubby told me he doesn’t like the combo.
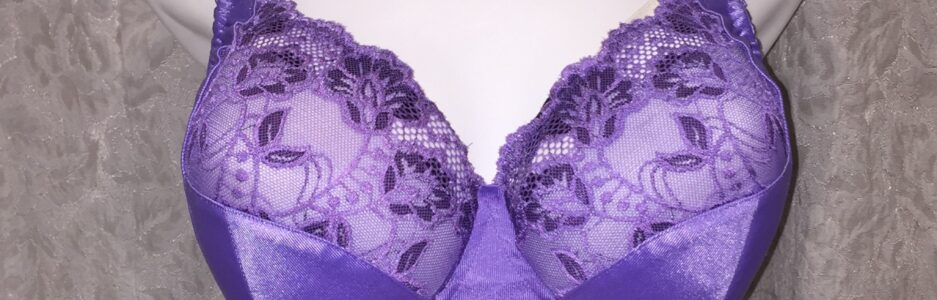
 I think it’s a very pretty summery bra.
 My only disappointment at all is the little embroidered flowers aren’t showing on the bridge. One of them is barely showing. Just peeking out from the bottom edge.
 Isn’t this lovely?
 Her work is really lovely. You can see more on her
  Despite this not being available now, it got me looking at her patterns. I found this one on Etsy. This is
 I grabbed some scraps again, and did a quick tester cup. It’s looking good.
 The bridge is the correct width for me, the cups fit, and the bridge also tacks all the way to the top of the bridge. I hated to take this off for photos.
 Oh, these are adorable!
 I’m a happy bra-maker today, and I’m already planning my next one. However, I also have a dress to make for a family wedding. I’ll have to fit in some time for me too and make a few more pretty Josey bras.
 It’s very pretty, but it’s a tad too small across the cup.
 Just as the inside of the cup doesn’t cover all of the foam cup underneath it, it doesn’t reach all the way across to where it would meet my bridge.
 I got it. Now to test this against all the wires I have.
 This was so odd because when I traced my root with a wire and compared it to the different wire shapes, this was the closest in size and shape. Below is the photo I took of my root trace over the Orange wires.
 However, after wearing this wire, I can tell you it’s not the right wire for me.
 I didn’t have to see this wire-root comparison to know this wire wasn’t the right size or shape. I knew this wire pinched on the sides. Again, this is not the right wire for me.
 So, of course I needed to see how this wire would compare to my root trace.
  This is about as good as it gets. My only hesitation with this is I’ve heard the wires aren’t always as stable (can break) with washing and wearing after they’ve been bent. I had to bend it a fair amount. So, although this is an option, I still had one other wire to try.
 Hmm. About the same as the bent wire above, but I don’t have to bend anything. It will flex and take my shape.
 If you’re interested in reading more about bending wires, and what can happen, Jennifer (Porcelynne) mentions that in her recent
  Right there where the pink arrow is pointing.
 When I was first looking at wires with my root trace, I could see the 40 wire fit the top of my trace.
  Oh, I love this lace. It’s so pretty.
 This is the BMS Ruby pattern, adjusted for an Omega shape.
 You can see here where the wires aren’t coming to the top of the bridge. There’s maybe 2 cm, or better yet 1.5 cm and a touch of wiggle room for the wires. It’s a very small adjustment after some of the others I’ve had to make.
 Oh, I’m so happy with this. I used a trick I learned in one of my classes with Jeannette to help my large cup fit into my smaller band – I stretched the frame on the outside, and ‘eased’ the cup in. It works so well.
 I’m so thrilled to have finally found my correct sized wire, and figured out just how to fix my band as well. I have my next bra kit all picked out, and I’m going to sew some more bras!