I pretty much love all things bra-making. I love patterns, laces and materials, and even elastics. So, when I first read about B,Wear’s Mystery Box subscription, I knew I wanted to try it. However, finances don’t always let me do what I want, when I want. Sometimes I have to wait. Sometimes it just doesn’t happen.
Fortunately for me, Christmas came and I got a subscription as a gift.
The Mystery Box
I’m pretty sure I’m not alone in getting excited when bra-making supplies arrive in the mail. Whether it’s that one item I need to complete a project, or a brand new kit. I get excited.
Well, this box really just adds to that excitement! Look at that label. I bet it’s even intriguing for the mail carriers who are delivering it. Just what is in that Mystery Box? What fun! I couldn’t wait to open it.
The inside was just as fun as the outside. Once the outer box is opened, it’s still a mystery as it’s wrapped up in tissue paper and sealed with a foil heart. I loved this. It’s a lovely presentation. And it only got better for me.
What’s Inside?
What was inside was a treat for me. The January Mystery Box was all about making panties. Doesn’t that all look pretty? Let’s unpack and take a closer look at just what was in the box.
 And if you’re not sure what one of the items is exactly, there’s a note outlining everything.
 This is perfect for me. I love cotton panties! I can’t wait to sew this up. But do you see the bottom of the note? There’s one more item included in the Mystery Box – a new pattern.
Tippi Classic Window Brief
The Tippi pattern is designed by Laurie Van Jonsson – the same person who released How to Grade a Bra and Brief this past year. I haven’t tried any of her patterns yet, so this will be a fun new experience for me. The Tippi is described on her website as:
‘This brief sits low and has all the detail in the back.’
That does sound interesting. However, before I sew this pattern, and have fun with this Mystery Box, I’ll be back to sewing my Fitting Bras. I’m on my fourth bras for the month, so far.
Happy creating!
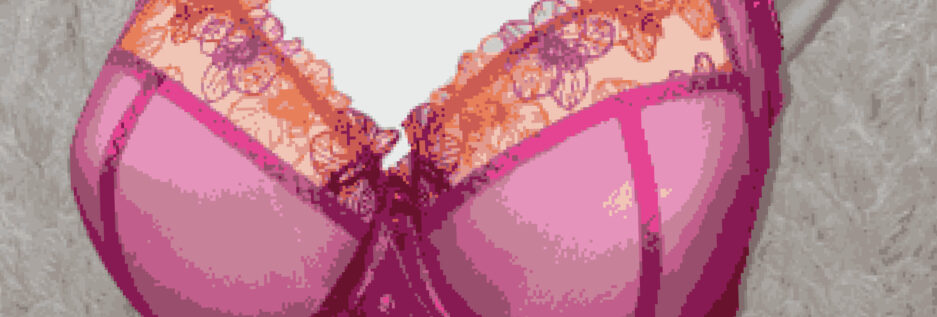
 This is a 48 H Pin-up Girls Classic bra.
 There were a couple of things I didn’t do while sewing this bra. I didn’t do any top-stitching. However, I did do some reinforcing stitching like at the strap and where the band attaches.
 It’s a little hard to see but there’s the seam and then that seam is reinforced with another seam. Those aren’t decorative stitches. Those are to strengthen the straps, and band.
 I wanted to keep the channeling open in case I need to use a different wire size than what is normally used. Trust me, I know very well that a different wire size can be needed. So, I decided it will be better to not finish the channeling on these fitting bras.
 I have a few other sewing projects waiting for me, but they’ll have to fit in and around these Fitting Bras. My goal is to get as many done in February as I can. Let’s see just how many I can do.
 I realized just how quickly these findings will take color. However, the BMS Challenge for January was coming close to an end, so I decided these will do nicely.
 This has me thinking, I might want to do some timed tests with bits of elastic and such and record the results after say 1 minute, 2 minutes, 3 minutes…
 I’ve used 5 x 3 hook and eyes on each side of the bra to attach this back. I can take this off and use another back in the future (When I get another back made.)
 Below is my bra from the front. It doesn’t look any different from a normal bra.
 Lastly, here’s my bra under the sweater on my display.
 What a subtle but lovely little pop of color peeking out!
 I was wearing it while out one day and the wire poked through the top of the channeling – on the left side. I spent the day trying to pushing it back in without drawing attention to myself and my bra woes.
 Oh, I do like this lace. I’ve made an Angie, a Ruby and two pair of panties with this. And after cutting out a second Ruby, there is still more lace left over.
 My New-Same-as-the-Last Ruby
 There are no wrinkles, no puckers, no gathering. It looks clean and professional. Just the way I want my bras to look. I sent off a message to Jeanette telling her (again) how thankful I am for her class and all her little tips.
 It’s almost exactly the same as my previous Ruby.
 I hope I can find a little more time to sew this week. My FIL is almost all moved into his new home, so a little bit more decorating, and I should be able to find time again.
 These are adorable too. I made them in the reverse of the color block I made my first ones.
 And from the back.
 Well, I can say, I definitely don’t like how the bands are flipping up in the photos. Good thing they don’t do that when they’re on me. I’ve got more to fill them out than my display.
 And the back view.
 Oh, they are sweet. And it’s nice to see panties that fit my display perfectly.

 Yes. This was my favorite Challenge make.
 How could I not want to sew something with a little silver and tan pup like mine? There are so many panels coming, but not until Spring. We all will have to wait for a little bit for this adorableness.
 I keep going back to the
 Oh, I’m loving this too.
 You can still see some kitties, but you can also see the black and grey material without the cats that I used for the back. It still gives some visual interest, but doesn’t take away from the front of the bag at all.
 I really like the back of the bag too.
 Don’t they look great? I’ve also used iridescent rivets.
 That adds just a little more bling to the handbag. And this faux leather is lovely to cut. It’s very soft.
 The Handmade tag had to be positioned just so one of the kitties was looking at it.
 A lot more bright colors. All the fabrics I used to make Em’s Miss Maggie’s came from the
  Boxing Day isn’t only an Aussie tradition. It’s also a Canadian tradition, and one I thoroughly enjoy every year.

 Don’t you love all these options? I do. Also, I really like the shape of these. For boyshorts, these actually work for me. There is some curve built in.
 I made these up from some cotton Lycra I had in my stash. I also tested the pattern for Em in CL.
 I really liked this pattern and knew I’d want to make more for myself. Em also requested more. So this style is a hit with both of us. It was time to have some fun with the pattern.
 Here’s my Ruby bra. The same lace I used for this bra, and a previous Angie bra, was now being used to make the Clover Boybriefs.
 I’ve used black and black cherry cotton Lycra for these, and rather than bands or elastic as the pattern calls for, I’m using black lace trim. I’m loving these panties!
 Here they are from the back.
 Oh, this is a lovely set. I need to hurry up and get all my gifts sewn up so I can finish a second pair for me, and for Em.
 Here’s my pup. Isn’t he adorable? He’s wearing the new suede boots I made him just a few months ago. I can see by the photo that I was still in the process of organizing my sewing room. I’ll share more on that later in this post.
 But I do think my cousin was onto a good idea. I’m going to try making the boots with fleece again, but backed with a heavier leather. I’d been using vinyl for the past few years, and I know it doesn’t last.
 Those red cords? We call them the mittens of shame. Does anyone remember having a string of yarn running from one mitt through your sleeve, around your back, down the other sleeve and attached to the other mitt? I do. Because our pup lost his boots, he now has to have these fleece cords pinned onto his coat. They can’t come off his boots either because they’re sewn on under the Velcro. A boot may come off once in a while, but they’re not lost anymore.
 In the photo above, you can see the set I made, the spare set that’s in process, and a few extras I cut out, but am not sewing just now. Those extras are ‘just in case’. If he gets a hole in a boot, I’ve got spares to replace the holey ones, and spares to replace those!
 I was keeping some of my stash in Space Bags. Sadly, this is how they were being stored. Everything was folded, and safe, but it looks a mess.
 A few more storage containers, and it’s almost perfectly organized. I think a couple more containers, and it will all be so nice looking.
 Maybe next year. I can still close the doors on this and it looks neat.