I am so excited to share something with you all. It’s not something I made, but when I saw it I was honestly so very excited. I had to share.
Let me give you some back history to this lovely make. A number of years ago a friend came to me saying she couldn’t wear a bra because of an injury, and did I have any idea what she could wear.
The first pattern I though of was the Wendy Bra-in-a-tank-top. She could decide how much elastic she wanted to use to determine how snug or loose it would fit.
 She loved the idea and made herself a couple of them.
But then found wearing a full tank top all the time under clothing was too hot. So she modified her pattern to more of a shorter bralette style.
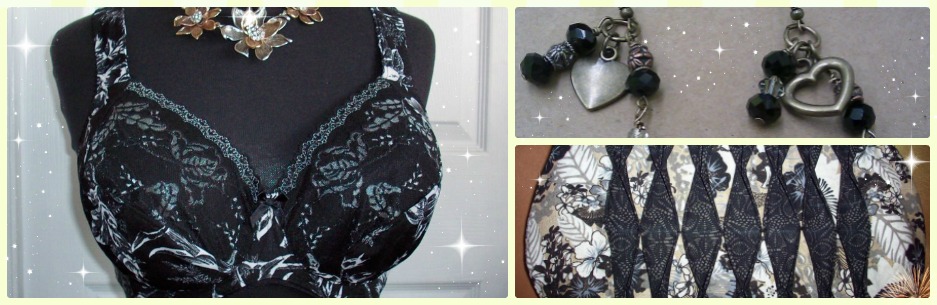
That brings us up to date. Let me share this amazing hand made, hand sewn bra with you.  This is just incredible to me. This is ALL hand-sewn. Every stitch is by hand!
We were getting together to work on slopers, and at one point she removed her top (which she had also made), and everything stopped. I had to know about her bra. I recognized the hand stitching right away. I had to know more.

Her journey started with this book. I recognized the author from her Craftsy classes. I had purchased, watched, and loved them all.
Okay, back to my friend’s marvelous make.  Here is the back. She had noticed young women wearing racer back bra styles and modified her pattern again to have more of a racer back look than the straight across design. She made this change to keep her straps from falling off her shoulders.
The stitching along the bottom where the elastic is encased is designed to stretch. She used a stretch stitch.  However, where no stretch is needed, the stitches don’t have stretch.
 Here is the straight stitch on the side seam along with those stretch stitches.
And here are the stitches along the top of the bra’s back.  I am in love with all the thought and detail in this – from the use of stretch stitches where stretch is needed, to changes in design.
Here’s one more photo to show this incredible hand sewn bra. Here is the inside of the bra where the elastic is enclosed. Look at how neat this is! My friend has made two bras for herself – one with blue thread and one with pink.
These are so lovely with all the design, thought, and the hours of hand sewing work that went into them.
This is no sewn-up-in-an-afternoon kind of make. This literally stopped me in my tracks. Changed the course of what we were doing. I was and am so very impressed with this.
These bras are made with 100% cotton jersey. And sewn with Coats button craft thread and the DMC cotton pearl thread. I’m told both threads are better to use than sewing machine thread as they are a little thicker and don’t tangle when hand sewing.
I hope you enjoyed this amazing make as much as I did. Honestly, I am so inspired by this.
Happy creating!
 I’ve shared before how I love the golden color of beige. I think it’s so pretty. So with for this bra, I’ve paired it with a gorgeous golden beige lace.
 I can’t even say what it is I love about this lace but I do love it.
 Do you have a favorite lace? Or even a favorite color you just go back to again and again? Let me know.
 I love the golden hue to beige. I think it’s really quite lovely.
 This lace matches so well with the beige as well.
  I had a small problem when I was making this bra. After I attached the strap to the front of the bra something didn’t look quite right. So I checked the front again. No. I’d attached it correctly. I looked at the back again. Gah! I’d sewn the strap elastic to the inside of the band rather than the outside!
 You can see just the slightest difference in the sewing along the eyes where I had to resew that part after reattaching the strap elastic.
 Oh, isn’t that all so very pretty?
 Isn’t this just lovely? I love the colors.
 I am in love. Here’s a close up showing just how pretty this fabric is.
  Just gorgeous.
 If you haven’t sewn with cotton poplin, it’s very easy to sew with it. All the cut edges do end up enclosed, so you don’t have to worry about any unraveling of those edges. You don’t need to finish those raw edges in any way. They are all enclosed in the bra. As with most of the seams in a bra, they are sewn over more than once.
 That little cherries charm was too adorable for me not to use. It’s just so sweet!
 I used some beige duoplex and power net I had in my stash to compliment this lace. I think it’s very pretty together.
 I wanted a little more lace on the bra, so I added some to the side of the bra’s frame. Just a little added color there, and a pop of prettiness.
 I’m still pinning the back to get everything to lay nice and flat.
 It definitely produced a neater look and fit. However, I really need the fullness throughout the bra cup.
 So as pretty as this is for a basic white bra with lace, it was ultimately a failed experiment.
 It’ll be back to basics after this – what I know works.
 They look a lot like a hipster from the front.
 You can see here they are not hipsters from the side.
  Aren’t they cute little cheeky panties?
  That lace!
 So, some of the changes I’ve made… I raised the bridge. Even though my wires don’t come all the way up to the top, this allows me to raise the upper cup up a bit and give me a little more coverage. Coverage that I need.
 This bra kit was so lovely. I think the lace and lingerie satin go together perfectly.
  Doesn’t that go so well? It’s so pretty.
  And lastly, I didn’t like the looseness and bagginess on the display form. So I’ve pinned it here. You can still see the back well enough – but if you think this looks terrible, please let me know.
 I used this cotton voile fabric. Oh! I love the bright colors.
 I made a full-length robe. To me, nothing feels more luxurious than a full-length robe. Even though this is very light-weight, it will still feel wonderful.
 The back has a lovely design to it. It’s not a rectangle pattern. There is style and design to this pattern, and honestly I love it!
 Here is a closer view of the back.
 This is really a lovely robe pattern. I actually think it’s the nicest robe pattern I’ve ever made.
 I know I say this all the time, but I think it’s also safe to say we all have lace addictions in the bra-making world. So… isn’t this pretty? I love the lace and the color.
  I loved the lace so much I had to use some on the power bar as well. Just a little more lace to love.
  And the back band. Just look at that power net. And matching hooks and eyes.
  This kit came with silver rings & sliders, but B,wear has rings & sliders in pistachio as well. I think it’s my new favorite color.