So, last week I told you how I was altering my cloned Fantasie bra. And now I’m going to tell you how I made it a reality.
I did have a few questions. One was how to adjust for the smaller wire. I thought back to my Craftsy moulage-sloper making class. One of the ways they measure is to turn the measuring tape on its side and follow the line of the pattern that way. I don’t find that the easiest — usually I’ve just moved the measuring tape along by about 1/2-inches. My friend, who also recently made a sloper, said in her class they had a flexible ruler they were using and you just bend it to fit the line. That sounds nice right about now. But what I have is my measuring tape, so that’s what I used.
First, I’ll show you my custom bridge and cradle.

Here you can see the little bit of the cradle that comes up above the wire line – that’s the flat spot adjustment I make.
Now onto some measuring, and I measured everything!

This photo shows the easier of the measurements I took. For the photo I had my scissors hold the top of the tape against the top of the wire. Then I carefully followed the curve of the wire without any gaps. Basically, I made a new cradle and compared that to the original cloned one. And I measured everything to see where the changes needed to be made.
To be sure, I double measured everything. And after that, I made up a mock cup and cradle and sewed them together. My main concern here was making sure the cup still fit smoothly into a now smaller cradle.

And here it is. It all came together quite well. There was one really small adjustment I had to make in the cup, maybe 1/8-inch.

You can see in the photo above the cup needed just a touch of an adjustment. So, it was all looking good, so onto the good materials. All my materials were from Bra Makers Supply.

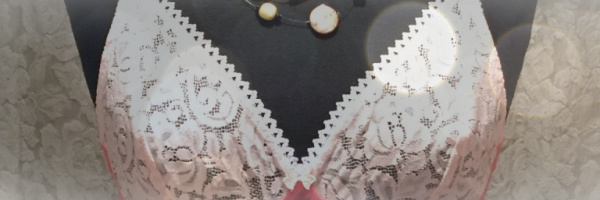
Here’s my Fantasie made a reality. The cups are a full cup, not the modified ones I’d been making. And the bridge is a full bridge. There are black foam cups behind the lace/duoplex cups to fill out the shape, but they are not part of the bra.
There were a couple of changes I made to the bridge. I narrowed the bridge, because the original was too wide for me. On this one the two pieces of channeling for the wire overlap at the top. And the rest of the bridge is still my custom bridge.
Some of you might remember, I had attempted a Fantasie Vivienne before. The lace can be a bit confusing as to which way it goes on the upper cup. And the last time I attempted it, I got it wrong. As that bra was a clone and didn’t have any of the adjustments, I decided it didn’t fit well enough to bother fixing it and continuing. This time I got the lace in correctly. Whew. Another relief.

Here you can see that narrow bridge. It’s just the right width for me, and thankfully just enough for the channeling to fit into as well.

And here you can see where the lace ends before the strap tab. That was a little tricky, but I got it to look neat.
You might have noticed there are no bows on it yet. I want to follow the same style as the original bra. They used two very narrow ribbons of coordinating colors to make the ribbons and I want to find some black and pink and do the same.

You can see here the beige and white ribbons together, as well, how much wider that bridge is at the top. This style of bow is such a pretty and unique feature, I’d like to add that too, so I’ll have to go shopping for some thinner ribbon than what I have.
And lastly, the back of the bra. Again, on this I simply cloned from the original.

The only thing I didn’t do the same on this is the original is only two hooks and eyes, and I made this three.
So, does it fit? Perfectly? Almost. It looked great when I put it on, but after wearing it for a little bit, I noticed the bridge does not go all the way back. Almost perfect. My best to date.
I think the difference in fitting is the materials I used. I’ve mentioned before that a lot of RTW manufacturers don’t use duoplex, but rather something more stretchy. I used duoplex for the cups. This gives me more support, but likely took a little of the depth out of the cup too.
There’s another slightly different Fantasie on the horizon.
Happy Creating!


