Basic Black Butterfly

This week started with me drawing, re-drawing, and re-drawing vertically seamed cups. I think I have a good pattern to cut out, but after all that work, I wanted to sew something that I was sure would fit – back to my Pin-Up Girls Classic Full Band pattern. So once I test the vertical cups, my next bra just might be my Prima Donna Milady copy. I don’t have the bra, so can’t make a clone, but will just make something similar based on their lovely bra.

I went back to basics colors this week, but wanted a little something special, so I added a Butterfly Effect. It’s really a lovely effect, and doesn’t take a lot of lace.

100_2942

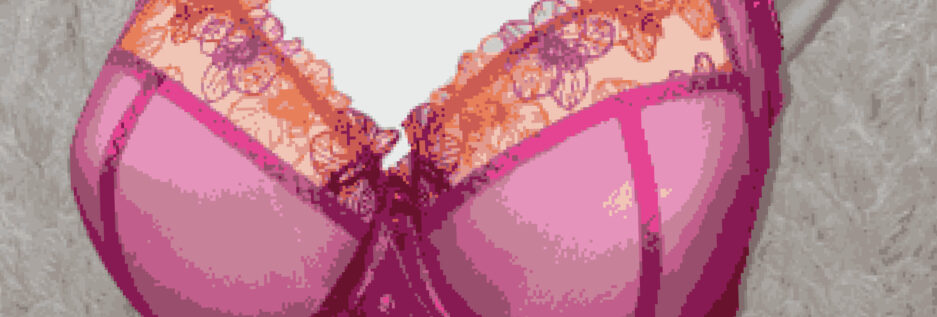
The lower cup on this bra has been split, which I’m told is always helpful to someone with an Omega shape. I also made a few fitting alterations to the pattern. On this bra, I took in the lower part of the cup along the wire line so it fits into a smaller cradle – no gathers this time. I put darts in along the wire line to take out the excess. The cups really do look a lot smoother in the bra. Those tiny gathers aren’t anything that would be visible under clothing, but I like that little extra of the cup fitting perfectly in the cradle.  I also made the underarm area smaller by putting a dart in the pattern there. I used my custom bridge, which is altered for a flat spot and also lowered 1/2″, and I thinned the elastic under the cup.

100_2942 b

Here’s a close up of the Butterfly Effect. It really does look quite a lot like a butterfly. I think the lace I used, which has a clear border, helps to outline that effect nicely. The upper cup is trimmed with loopy elastic, but it’s not showing very well. It seems to want to curl inward on Catherine.

100_2940

Here you can see how smoothly the cups go into the smaller band. (Here I go again.) I do really like that. The gathers, however, are an easier option, and really hardly show at all. If anyone reading this is making that adjustment for an Omega shape, do yourself a favor and do the gathers initially.

100_2941

I did change one part of the back. I made the back strap elastic join the bra with a slider attached to elastic on the band rather than attach directly to the band, so the back strap elastic is done in two parts rather than just one. This method seems flatter on the back.

From the comments I’ve been hearing this week from my dear hubby, this is the prettiest bra I’ve ever made! He really likes it. Then, I think he doesn’t want to upset me and says all the other bras I’ve made are pretty too, but this one is really pretty. He’s so cute.

I do want to do this effect again and cut away the Duoplex from behind the lace. That gives a sheerer look to the butterfly effect. I think that would be really lovely too.

I have some of the leaves from the lace cut out and ready to be sewn onto some matching panties, but didn’t have as much time this week to sew as I might have wanted. That will have to wait until next week.

A friend of mine came over yesterday to take some photos. She’d made a lovely shawl and wanted to use Catherine to display her shawl. I was happy to let her and took a few photos too.

100_2932

I watched as this shawl took shape, week after week, while we had a ladies’ night and watched Downton Abbey.

100_2934

Here’s a close up of the two fibers. I like the sheerness the one yarn has.

100_2935

This is my favorite part though – the little details are what always win me over. Julia unraveled some of the yarn on the fringe and beaded it. It’s just lovely.

Happy creating!

Could It Be?

That was pretty much how I was feeling. Could it be that I was one alteration away from my perfect fit? After all this time, and all these tries, could it be? I have to be honest, I was not hopeful at this point. I have wandered around close for so very long, I just thought I’d be close again. But… I got it!

100_2663

Here’s my perfectly fitting black and ivory bra. I used black and ivory because I didn’t have enough bits of either fabric for a bra in just one color. That’s how un-optimistic I was feeling. And I’m usually a the-glass-is-half-full kind of girl. Heck, if there’s water in the glass, why would anyone complain? But too many not perfects had worn me down a bit. So, I had some black duoplex and some ivory duoplex, power net, and lace (all from Bra Makers Supply), and I set out one more time.

You all know how it is, I had one alteration to make, so that really meant two, and if you’re making two, that’s really four. Every time you change one part of the pattern, you have to change the corresponding part. And every alteration I made, I feared I would mess up the fit completely.

But… IT FITS! I could just keep typing that over and over. IT FITS! IT FITS!…

I watched along with Beverly on the Craftsy class again. I love having her right there explaining and seeing how she does this or that. It’s much more fun than just pulling out the pattern instructions again.

One of the little tidbits she shows in the class is the Butterfly Effect done with lace. I decided I’d do that on this to pull together to two colors a little more.

100_2664

This shows the Butterfly Effect up close. It’s a really pretty options for lace. And of course, if you’re going to have butterflies, then you need flowers not bows. So I added a little black rosette to the top of the bridge.

100_2665

I didn’t add the rosette until after I tried it on though. There must have been some hope somewhere inside because I did do all the top stitching on this bra. Oh, but after changing threads a few times, I’d had enough of that. I still wasn’t sure it was going to fit, so… ivory thread showing on black. I’m going to have to say it’s a design feature at this point. The strap trim is something I’ve been saving for a long time – just waiting to use. This seemed like the right time. The pins on the side are to help get the wrinkles out of the bra on Catherine.

100_2666

This shows the back, showing the hooks and eyes, strap elastic, findings and all the elastics that only peek out are all in black.

Another change I made was to go with the triple hook and eye rather than the double. It really does offer more support and I’m surprised how much more comfortable it is. I had wanted to do what I saw in the Prima Donna bras I’d purchases in the past, but don’t think I’ll do that anymore. I really prefer this. I just have to learn how to get in and out of it as easily as the double hooks I’ve always worn.

One of the alterations I made on this was the bridge… and it’s perfect! Simply perfect. It comes up high enough to offer good support, but not too high as to get in the way and push away from me.

All those really nice fabrics I’ve saved in my stash for that elusive day when I had my fit down… get ready! That day has come.

Happy creating!

A Black Plunge with Butterfly Effect

I must say, I was inspired recently after reading Madalynne’s blog where she planned to do a bra-making marathon. (Way to go, Madalynne!)  I was inspired and thought I’d see what I could do too.

So bright and early Saturday morning, I cut out 2 bras. One in black with some gorgeous black and pink lace. The second bra is a beige, with a pretty beige and tan lace. Both sets are from Bra Makers Supply. I was off to a good start. Then reality began to impinge on my plans. I had laundry to catch up on, and my dear hubby and son arrived home after a 4-day camping trip. But I did make some progress.

The black bra was the first one I worked on. And it was coming together very well. Until I hit a bump. Perhaps because there was so much activity happening around me that wasn’t usual activity, whatever the reason I made a faux pas after attaching the upper band elastic to the outside of the strap. I didn’t notice it either. It wasn’t until I had turned the strap over and was trimming the excess, and had a brief thought as my scissors snipped the material, ‘that looks folded’. SNIP.

I’m not sure how I folded excess material under the elastic, but I did. And then I cut it! Ouch. Well, I know me too well; I’d never accept that. I knew I wouldn’t wear it if it had a flaw. So, out came my trusty seam ripper, and I carefully started removing all the stitches from the strap. First, I removed all the stitches from the elastic I’d just sewn on. That wasn’t too bad. That was just a zigzag. But the side with the trim on it had both zigzag and 3-step zigzag stitches that had to come out.

I got it all done, and attached a new strap. I re-sewed all the elastic and trim to the outside of the strap, and then carefully turned it and matched it up and sewed the 3-step zigzag. And it looks good. Whew.

Okay, enough drama. Here’s my black plunge with a Butterfly Effect.

100_2317

I think the Butterfly Effect is more pronounced when the style isn’t a Plunge style, but I’m still very happy with it. It’s a very pretty way to add some lace to a bra. And I do like lace.

100_2316

Here’s a closer view of the Butterfly Effect. You can also see the foam cups I have behind the cups. The way a Butterfly Effect is done is a bit unusual. You start to sew the cups together, stop, add the lace, and then finish sewing the cups together. This effect is shown and explained in detail in the Bra Makers Manual.

The little pink bows that match the pink so perfectly were from the Bra Maker’s teacher I had here one weekend. (I’ve had the lace in my stash that long.) She had a big bag of bows and I think I might have drooled when I saw it. She let me match up a few bows to lace I had. Thanks, Jane.

100_2312

Isn’t that adorable? I took the picture before I had sewn the bows on.  They’re just pinned on at this point. But what a great color match.

100_2313

Now on this one, there are two pins. One is holding the bow in place for where it will go. the red-headed pin is to make sure I remembered, once the bra was all sewn, which strap I’d messed up. Looking at this, I’m really pleased with how well I repaired this faux pas.

100_2315

And the back of my newest plunge bra. I may tweak this back a bit and bring the shoulder straps in a bit. They’re not falling off my shoulders, but they do look quite far apart when I look at the back. Something for me to think about.

And that second bra I cut out? Well, it’s all cut out and sitting on my desk just waiting for me to have a few hours to myself to begin it.

100_2309

The good news is, it will wait.

Happy creating!