I must say, I was inspired recently after reading Madalynne’s blog where she planned to do a bra-making marathon. (Way to go, Madalynne!) I was inspired and thought I’d see what I could do too.
So bright and early Saturday morning, I cut out 2 bras. One in black with some gorgeous black and pink lace. The second bra is a beige, with a pretty beige and tan lace. Both sets are from Bra Makers Supply. I was off to a good start. Then reality began to impinge on my plans. I had laundry to catch up on, and my dear hubby and son arrived home after a 4-day camping trip. But I did make some progress.
The black bra was the first one I worked on. And it was coming together very well. Until I hit a bump. Perhaps because there was so much activity happening around me that wasn’t usual activity, whatever the reason I made a faux pas after attaching the upper band elastic to the outside of the strap. I didn’t notice it either. It wasn’t until I had turned the strap over and was trimming the excess, and had a brief thought as my scissors snipped the material, ‘that looks folded’. SNIP.
I’m not sure how I folded excess material under the elastic, but I did. And then I cut it! Ouch. Well, I know me too well; I’d never accept that. I knew I wouldn’t wear it if it had a flaw. So, out came my trusty seam ripper, and I carefully started removing all the stitches from the strap. First, I removed all the stitches from the elastic I’d just sewn on. That wasn’t too bad. That was just a zigzag. But the side with the trim on it had both zigzag and 3-step zigzag stitches that had to come out.
I got it all done, and attached a new strap. I re-sewed all the elastic and trim to the outside of the strap, and then carefully turned it and matched it up and sewed the 3-step zigzag. And it looks good. Whew.
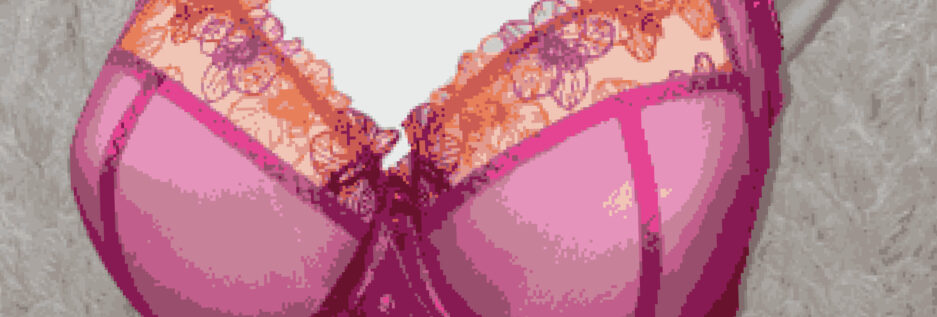
Okay, enough drama. Here’s my black plunge with a Butterfly Effect.

I think the Butterfly Effect is more pronounced when the style isn’t a Plunge style, but I’m still very happy with it. It’s a very pretty way to add some lace to a bra. And I do like lace.

Here’s a closer view of the Butterfly Effect. You can also see the foam cups I have behind the cups. The way a Butterfly Effect is done is a bit unusual. You start to sew the cups together, stop, add the lace, and then finish sewing the cups together. This effect is shown and explained in detail in the Bra Makers Manual.
The little pink bows that match the pink so perfectly were from the Bra Maker’s teacher I had here one weekend. (I’ve had the lace in my stash that long.) She had a big bag of bows and I think I might have drooled when I saw it. She let me match up a few bows to lace I had. Thanks, Jane.

Isn’t that adorable? I took the picture before I had sewn the bows on. They’re just pinned on at this point. But what a great color match.

Now on this one, there are two pins. One is holding the bow in place for where it will go. the red-headed pin is to make sure I remembered, once the bra was all sewn, which strap I’d messed up. Looking at this, I’m really pleased with how well I repaired this faux pas.

And the back of my newest plunge bra. I may tweak this back a bit and bring the shoulder straps in a bit. They’re not falling off my shoulders, but they do look quite far apart when I look at the back. Something for me to think about.
And that second bra I cut out? Well, it’s all cut out and sitting on my desk just waiting for me to have a few hours to myself to begin it.

The good news is, it will wait.
Happy creating!
