Some Matchy Matchy

I do like matchy matchy. Maybe it’s an indicator of my age, but I do like things to match. So, now I have my first (two) great fitting bras, it was time to make something to match.

I couldn’t find any ivory cotton, but did stock up on black, red, beige and pink. So, going forward I’ll have a nice choice of basics from which to choose. My most recent Shelley bra was mostly black, but had some red and ivory in it as well. So I chose red and black for my panties.

100_2694

Here’s my first pair. It’s a modified Kwik Sew 2286, which is basically a hipster. I copied the lace inset from Kwik Sew 2908, but I prefer how the 2286 sews together – no seams showing on the inside. The crotch seams are hidden between two layers of material and then when the lace is sewn on – you don’t see an exposed seam. The 2908 has the front and crotch as one piece, and then the back is sewn to that. It looks similar on the outside, but on the inside you can see the seam very clearly. In the past, I’ve made 2908 and modified it to do the seams the same as the 2286.

100_2692

And the set pinned on Catherine. They look long, more like a high cut here, but I’ve made them before and they are a hipster. My only disappointment is I’m not in love with this as a set. The lace is the same on the panty as the bra, but it doesn’t pull together quite as much as I’d wanted. I don’t think there is enough red in the bra to pull it off. However, it’ll still be a second choice option for me.

100_2696

Here’s the second pair I made. I like this one a lot better. I think it pulls together with the bra without any problem.

100_2695

Here it is pinned onto Catherine. That looks like a set. That’s much better. I really am happy with this set. This will be my first choice to wear.

100_2697

Here are both panties with my bra. It’s very fun to have my first set. The materials are from both Bra Makers Supply, and Merckwaerdigh‘s Etsy store. The panties are mostly cotton from BMS with that little accent of lace/Lycra from Merckwaerdigh’s.

Next I’m going to have to play with my pattern to make an asymmetrical pair – and I think I’ll go with the black & Lycra for that one.

Happy creating!
Fits Like A Dream

My newest bra fits like a dream, but she isn’t peaches and cream.

For the better part of the last two years I’ve only worn my own bras. I did purchase a couple of bras too, but to be honest, the ones I made fit better – and they weren’t fitting perfectly. Because I was so used to wearing what I’d made, I thought I’d still wear my not-perfectly-fitting bras, but oh no. Once I had one that fit so well, I found the others just weren’t as comfortable. I have a list of things to sew, but one bra just wasn’t enough. So sewing another bra went to the top of my sewing list.

fav

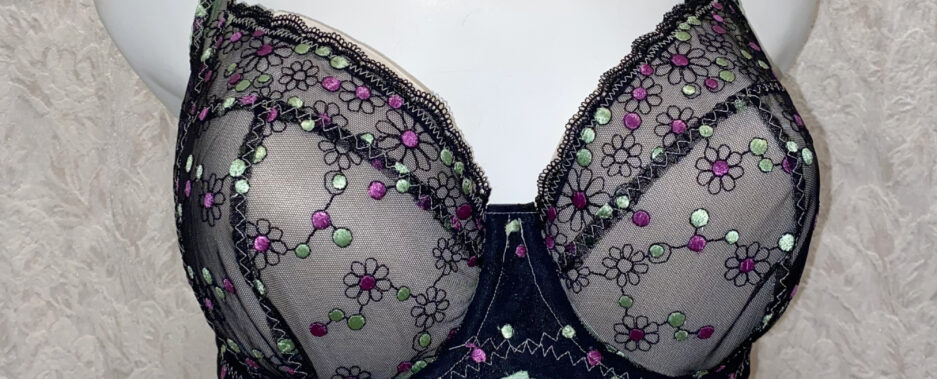
Here’s my latest (and perfectly fitting) Pin Up Girls Shelley. And she fits like a dream.

I love that little pop of color on the power bar and bridge. That’s just fun. And I’m all about lace. So this bra is bringing together lace and a bit of fun and I’m thrilled.

100_2686

Here’s a better view of the power bar. Oh, I love that. This is such a beautiful pattern. There are so many fun things to do with it. Although the power bar looks like Lycra, it has the support of duoplex under it. I did the same on the bridge. The Lycra and lace are from an older fabric set I bought from Merckwaerdigh‘s store a few years ago. Everything else is from Bra Makers Supply.

sewy-rebecca-left-side-view

Here you can see the Sewy Rebecca I’d done with this material. You can also see I made the wrong size. I still have this bra in the bra drawer – it’s too pretty to throw away or cut up. Back to the material,  I don’t have a lot left, so I got creative in the placement of what I did use on the bra. I wanted to save some for panties. Yup, now that I have my bra fit down, I’m going to start making matching bra and panty sets.

100_2688

And the back of my bra. I did the 3 x 3 hook and eye closure again. I’m getting better at getting it done up and undone, and it really does make it more comfortable. Who knew?

100_2689

Here’s part of my stash for panties. That’s some gorgeous cotton/spandex from Bra Makers Supply, and my bit of Lycra left over from the kit from Merckwaerdigh, and some black lace for trim. I also found some pictures online for inspiration. I’m thinking of changing up my panties from the basic pattern I have now. I really love things that are asymmetrical, and love that I found some fun panties with just that look.

One of the best aspects of this journey I’ve been on with trying to find the perfect fit for my bras is the freedom I now feel in altering patterns. I used to feel they were somehow beyond my grasp and I wouldn’t think of altering them. I have no such fear now!

100_2690

And lastly, I’m trying to decide what color bows I want on my new bra. I’m leaning towards the red, or maybe red and black together …

I still have some fitting issues to plan for when starting out, but I did the same thing on this bra – I went up a cradle size from my wire size. This takes care of most of my cup alterations as it’s only one size different than the cup size I’m using. Is that clear?

Let me explain that a bit more. The Omega shape needs a larger cup size than wire. Let’s say I need a 38 wire, but my cup corresponds to a 42 wire. I’m meeting the two half way in between. By using the 40 cradle, the 38 wire will still fit, and so will the 42 cup. This one change eliminated a lot of alterations.

However, I still made a few. I thinned the bra under the cup  little more this time, so I ended up trimming my elastic under the channeling. I lowered the bridge 1/2″ again, and on this bra I adjusted for a flat spot I have. And I put in a vertical dart in the underarm area. I don’t think there are any other alterations I would even want to make on this bra.

Ah… a perfectly fitting bra feels so good.

Happy creating!

A Marathon of Muslins

I was so excited to finally have a bra that fit with the bridge going all the way back that I made a whole bunch of bra muslins to try on over that bra. I went through almost all of my patterns – there are a few that I likely won’t ever make – and I sewed up muslins for test fittings.

This first bra muslin I made was a brand new pattern just released. It was Orange Lingerie’s new pattern, the Marlborough pattern.

Marlborough

You can see here the fit looks like it will be really close and I won’t have to do very much in the way of alterations. The Marlborough doesn’t actually list my size in the size range, but I know all about finding the right size by the wire size. So using my ever-so-used BMM chart, I found the correct cup size to fit into my band.

Great! I marked the muslin where I’d need to reduce it a bit at the bottom where it overlaps the seam allowance on the actual bra, and pinned it to the pattern for when I’m ready to tackle making this bra.

Shelley

Next it was the Pin-Up Girls Shelley pattern. Again, the depth looks good, but it’s not perfect. I marked where the seam lines fell under the muslin, and I marked these right on the muslin. It’s now pinned to the pattern and ready for the alteration stage as well.

After Shelley, I did the Pin-Up Girls classic pattern.

PUG Classic

You can see I also wrote the pattern name and size on the muslin.

After I finished with my Pin-Up Girls, it was time to try a few of Merckwaerdigh’s patterns. This is where I had to do a re-do.

BHST2 B too small

I started with BHST2, but you can see the cup is too small in this size for me. It just won’t meet all those seam lines under it. I quickly traced off the next size up and that one was fine.

BHST2 B

This one gives me all the depth I need, and I’ll alter the pattern to fit my shape. Again, I marked on the muslin what changes I’ll have to make and pinned it to the pattern.

For some reason I didn’t trace of the CUPL-16 pattern I have. I must admit I was running out of steam by this point.

I did trace off my Sewy Rebecca. I wasn’t sure about the size,  and the size I chose was actually too big. So my next muslin of this will be smaller.

Sewy R 1

You can see here the cup is clearly too big.

I was really tired after all this, but have a great place to tackle each of these bras now – one at a time.

Happy creating!

One More Fantasie Clone

I was so close on that last bra. And at this point, I do have a drawer full of bras I can wear that mostly fit. But I must admit, I am like a dog with a bone when I want to figuring something out – and getting that perfect fit is my objective.

I’d recently read something very encouraging from Annele, the founder of MakeBra said:

“An older lady, who was running her own lingerie business only few years ago, told me that you need at least twenty test fitting sessions before the bra pattern is ready to go.”

You can read about it here. Oh, that was such a relief to read. Then I’m not obsessed, or a terrible sewer. Whew!

Thankfully, at one time I’d bought the same Fantasie bra, but one size bigger. I think it was one size bigger. For example, what would be the size difference between a 34D and a 34DD? The only charts I have are from Bra Makers Supply, and they don’t do the double letters.

Back to the bra. I’d cloned it, and then after wearing it for a little while, gave it to a friend because I found it a bit loose in the upper cup. However, I was thinking this size would be perfect  with the firmer Duoplex material. All the materials are from Bra Makers Supply.

100_2410

Here it is. I think it shows the cups are a little fuller than the last bra. And just because the cups are fuller, it doesn’t show here how the bridge is really narrow at the top. The channeling and wires completely overlap at the top of the bridge. And the bridge goes all the way back!

As much as I loved the thin ribbon on the original Fantasie Vivienne, I couldn’t find anything in a beige or tan, only white. So I went with some bows I had for this bra.

100_2424

Here is a picture from the inside to show the wires and channeling overlapping at the top. It’s a bit tricky to sew this. What I do is sew the first channel down completely, and then the second channel is only sew down completely at the top and on the inside seam.

On the outside seam where the channeling pieces are overlapping, I do not sew it completely. There’s only maybe 2 cm opening where it is not sewn on the outside of the channeling. It has to be left open on the outside there so the wire can slide through that lower channeling.

On the top piece of channeling, I sew up to the outer seam line on the lower channeling, and it makes an attractive inverted V-shape in the stitching on the front of the bridge.

100_2431

And here is the back. I reduced this to make it a 2 hooks and eyes set again. This is how the original RTW bra came, so I wanted to do that again. It’s a wonderfully comfortable bra – and the bridge goes all the way back except for a tiny bit at the very top after I’ve been wearing it for a bit. It looks like I’ll be shortening my wires by 1/4″. But at least I’ll still have a full bridge.

Now I have a pattern that really works for me, the next thing I want to do is to take this pattern and use it to figure out what size I’d want to make in all my other patterns – the Sewy Rebecca, and the Pin-Up Girls Shelley and Classic, and the Merckwaerdigh E-BHST2 and E-CUPL 16.

And now I have one more pattern in my collection to try – Norma from Orange Lingerie just released a bra pattern! The Marlborough bra pattern. You can find the pattern at Orange Lingerie’s Etsy shop.

Happy creating!