I’m still working away on my Fitting Bras. Someone asked me why I was making 22 bras for me. These bras aren’t for me to wear. In fact, my size isn’t a more common size, so I won’t even be making one I can wear. No. I’m making these so customers can be fitted and I can make a bra for them.
Fitting Bra Three
Here’s Fitting Bra three. You can see, I’m getting more comfortable writing on them. The size is prominent on the upper cups. However, I also thought it would be a good idea to write the wire size and the bottom cup depth as well.
 Number four is half sewn, so only 18 1/2 left to sew up.
Break Time
I needed a break from sewing. I’ve just been too busy lately. I’ve been sewing strikes for Libelle Sewing’s Round 4 Pre-Order (which was great fun), and I’ve been taking classes (which I loved). However, all my fun came at the same time. I wanted a sewing break, but I still wanted to do something creative.
Last year when I took a class on Collage Quilting, a friend came with me to the Pop-Up Shop and we both bought the Paisley Bear collage quilt pattern, agreeing we would work on it together. Isn’t this great?
We did get together a few times. We ironed Steam-a-Seam 2 on the back of our fabrics and visited. We cut out some pieces and visited.
After our last get together, I got carried away. I finished my cutting out all my flowers after my friend left, and then I started to place some of my flowers. I was wondering if I had enough flowers cut out, or if I’d need more. Well, I placed one, then another… and I just kept going.
One of the great things about Steam a Seam 2 is you can move things around and decide just how you want things. At least you can move them around until that final ironing. Here, take a look at the eye I did the first time. I did like that little rosebud eye, but decided I wanted more pop for the eye, and nose. I thought it would look better if it didn’t blend in so much. As well, that large flower on the face just wasn’t sitting right with me.
In this next photo, I had made a couple of changes. I used a peacock feather for the eye and a little black-centered pansy for the nose. As well, I changed up the face a bit. This was better. Although there’s a lot more pop for the eye, I thought it was too much. And I still wasn’t happy with the face.
So, a little more cutting and moving things around, and here’s the final version. I’m still using a peacock feather for the eye, but only the very center of it. I think it looks much better now. In fact, I was happy with it at this point and ironed everything down.
There’s still a lot to do. I still need to finish my last collage quilt as well. They both need backings. And then I’ll quilt them both. As I need a break from sewing Fitting Bras, the Bra-Makers 2019 Challenge, or whatever else I’m sewing to keep busy, I’ll work on my quilts.
And I still have another collage quilt I want to make this year. This is the Perfect Form Dress Form collage quilt. It will be so pretty. I’m going to need a lot of flowers for this one.
Happy creating!

 And below no pins are needed to hold the channeling in place. The channeling will stay. It’s a little thing, but it really does help.
 Did you notice on the package it says ‘wash-away’? That’s right. I can leave it right there after I sew on the channeling, and it will wash away in the laundry. It doesn’t get much better than that.
 I use the guide on the foot to guide me along the curve of the channeling. I can sew nice and close to the edge of the channeling. And I don’t have to worry about not enough room for the wires.
 I move my needle to be where I want it and away I sew. This gives a nice, neat, close-to-the-edge finish to the channeling.
 I hope these little tips are helpful.
 This is a 48 H Pin-up Girls Classic bra.
 There were a couple of things I didn’t do while sewing this bra. I didn’t do any top-stitching. However, I did do some reinforcing stitching like at the strap and where the band attaches.
 It’s a little hard to see but there’s the seam and then that seam is reinforced with another seam. Those aren’t decorative stitches. Those are to strengthen the straps, and band.
 I wanted to keep the channeling open in case I need to use a different wire size than what is normally used. Trust me, I know very well that a different wire size can be needed. So, I decided it will be better to not finish the channeling on these fitting bras.
 I have a few other sewing projects waiting for me, but they’ll have to fit in and around these Fitting Bras. My goal is to get as many done in February as I can. Let’s see just how many I can do.
 I realized just how quickly these findings will take color. However, the BMS Challenge for January was coming close to an end, so I decided these will do nicely.
 This has me thinking, I might want to do some timed tests with bits of elastic and such and record the results after say 1 minute, 2 minutes, 3 minutes…
 I’ve used 5 x 3 hook and eyes on each side of the bra to attach this back. I can take this off and use another back in the future (When I get another back made.)
 Below is my bra from the front. It doesn’t look any different from a normal bra.
 Lastly, here’s my bra under the sweater on my display.
 What a subtle but lovely little pop of color peeking out!
 I was wearing it while out one day and the wire poked through the top of the channeling – on the left side. I spent the day trying to pushing it back in without drawing attention to myself and my bra woes.
 Oh, I do like this lace. I’ve made an Angie, a Ruby and two pair of panties with this. And after cutting out a second Ruby, there is still more lace left over.
 My New-Same-as-the-Last Ruby
 There are no wrinkles, no puckers, no gathering. It looks clean and professional. Just the way I want my bras to look. I sent off a message to Jeanette telling her (again) how thankful I am for her class and all her little tips.
 It’s almost exactly the same as my previous Ruby.
 I hope I can find a little more time to sew this week. My FIL is almost all moved into his new home, so a little bit more decorating, and I should be able to find time again.
 Yes. This was my favorite Challenge make.
 How could I not want to sew something with a little silver and tan pup like mine? There are so many panels coming, but not until Spring. We all will have to wait for a little bit for this adorableness.
 I thought it would be fun to see how the same lace can look very different used in different ways. I’ll be using black duoplex and power net for my newest bra.
 I am loving this! I love the colors. I love the shape and fit. Oh, these new patterns are so nice.

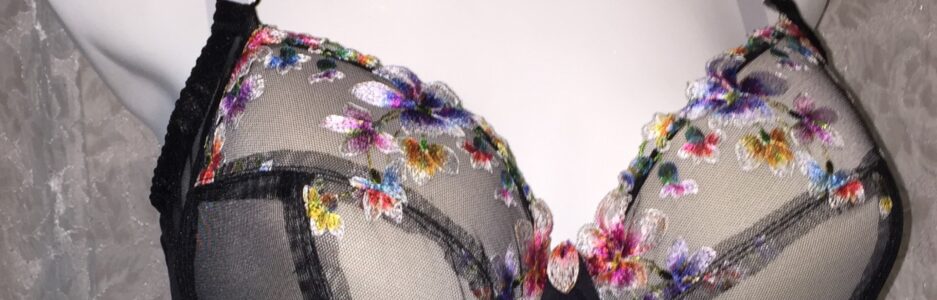
 I really do love this bra. It’s kind of funny, but my hubby is taking all the credit for this bra because he brought the lace back from Amsterdam. We all know there’s a little more to the bra than just lace. But he’s having fun taking credit.
 It’s a very pretty pop of color.
 Even though I used the same lace on both of these bras, they definitely look different. Do you have a preference? Let me know which one you like best.
 This is the new Amethyst pattern.
 I thought of a few ways to use lace on the Angie. I’ve seen people use it laid horizontally across the lower part of the cups. I’ve seen people use lace on every other cup piece, and on every cup piece. None of those were what I wanted to do for this one. I didn’t think any of those options would showcase this lace the way I wanted. So I decided to cut out the floral part of the lace, and applique it onto the cups. A little Misty Fuse to hold things in place, a small zigzag, and they look lovely.
 Yes, this lace goes beautifully with the black cherry duoplex. I really like this! You can also see I’ve added a strap tab to this Angie. I like the strap tab addition and will likely continue to use one.
 This is not my bra, and not my photo. It is beautiful though, and shows you can use lace in different ways than just on the upper cup. If you want to see the most stunning lingerie, go look at the post I linked above. The bras are amazing.
 You can see here, although the front is black cherry, I’ve used black for the back band and all the elastics.
 The band has a downward hike to it.