At the end of April I took the Bra Fitting 101 Retreat at Central Sewing. Our instructor was Jeanette of Sew Uplifting Custom Bras.
Day One started with another gift bag for each of the students. Let me show you the goodies we got. There was a Fitting binder, and a bra and finding kit in my bag (not shown). As well as the great canvas tote. For students who hadn’t taken the Drafting course, they got a few more goodies like sample packs of Duoplex and Power Net, as well as a set of Pin-Up Girls patterns. I had all those already.
We also were given sheets of these little tiny bra parts that we’d be using over the next few days. We spent the morning cutting these out. On Day Two we were starting to learn what changes to make for different alterations – all using those little tiny bra pattern pieces. It was really great to have these, and to have them to keep as a reference.
 You can see here in this example, it wasn’t a complicated adjustment – just lengthening the band. Having the samples makes it much neater to look and see any of the adjustments – much better than me freehand drawing these examples.
On Days Three and Four we started to work with live models – who turned out to be the other students in the class. We fitted one another with wires, and with Jeanette’s fitting bras – all under the guidance of Jeanette.
I can tell you, I need more experience with both assessing wire sizes and cup sizes. I wasn’t way off. None of us were way off. But we weren’t able to look at someone and just know the size either. Jeanette made it look easy.
While each woman was in a fitting bra, we went through a check list of possible fitting issues. From basics like is that the right size cup, does the band fit, are the straps too long or short, to all the more detailed adjustments.
That takes us to Day Five.
On Day Five, Jeanette assigned each of us to make a bra for another student. But it was all hush-hush. We knew whose bra we were making, but not who was making one for us.
We all had a checklist, and traced off a bra pattern in the correct size. Then we made the alterations to that pattern based on what we’d seen in the fitting bras and what was on the check list.
Day Five was quiet and intense. We were all feverishly sewing trying to get our bras finished. I just made it.
One of the store clerks came to remind us we had to be packed up and out of the store in 20 minutes and I was still sewing! But I was at the hooks and eyes, so I finished those, gave the bra to my fellow student to try on, and saw what further adjustments she would need. I was close, but it wasn’t perfect. I quickly altered her pattern with a little more help from Jeanette, and gave my fellow student her bra and a newly re-adjusted pattern.
Then I managed to pack up just in time to make the store closing deadline.
Whew!
Are you wondering what the bra I made looked like? Well, I didn’t have time to take a single photo. I got home and my hubby said show me the bra you made, and I couldn’t even show him.
I can show you the bra I had made for me. And I can tell you it needs a few adjustments too. Overall, I have to say it was a great class, and gave us all some fabulous tools to take and use going forward.
Happy fitting and creating!

 The fabric on this is so pretty.
 To make the pattern work for foam, all we had to do was cut off some of the seam allowances. I did that. I did that three times.
 I’ve used the red and black floral scuba with all red findings, including red foam on the inside.
 One small disappointment was my band turned out to be too big. It’s not fitting well on the display either.
 Looking at it when I was sewing it, I thought it might be, so I just have the hook and eye tacked on here. I’ll take that off and trim off a bit from each side. After I measure and compare to a well-fitting band, of course.
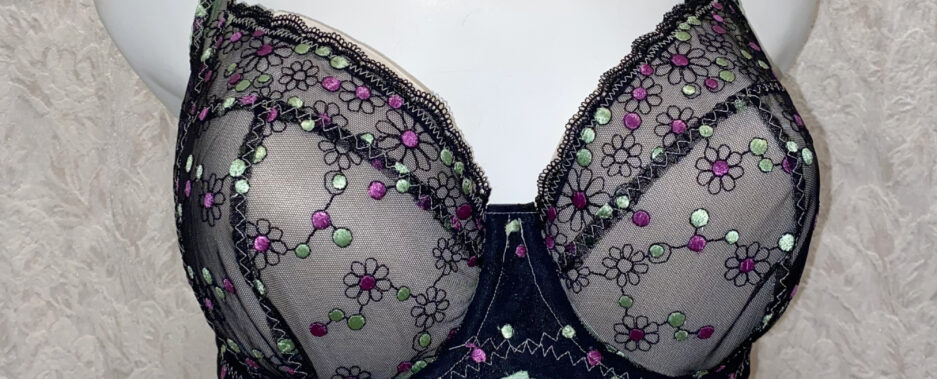
 Isn’t that a neat and pretty neckline finish? Below you can see it from the inside of the cup.
 We also learned how to stabilize our strap elastics to give better support.
  We’ve sewn non-stretch seam tape to the inside of our straps at the front. It’s nice and soft, and helps keep those elastics from stretching.
 Have you been wondering how that adjustment turned out?
 I made this muslin in cotton Lycra, and all seemed to be going well.
 This is where I started to think something wasn’t right. It was too small on the mannequin. I’m bigger than the mannequin. There was a problem.
 And I didn’t enter the Challenge that month.
 Now, I have to share a story with you. Jeanette brings suitcases full of bra kits and finding kits, plus other goodies to these classes. And we all descend on them like vultures. Honestly. Everything in the class comes to a stop when those cases open.
 I was able to bring in my swim bra and use that inside my new swimsuit. So last year wasn’t a complete wash.
 Oh, that front panel is amazing.
 The suit has lovely princess seams. We used the Pin-up Girls Denise pattern.
 I love the keyhole opening at the back. It’s lovely, supportive, and it fits! This is the first time a one piece has ever been long enough for me.
 It was a great class. And I’m already looking forward to using my new pattern, and making a Tankini.
 Yes. This was my favorite Challenge make.
 How could I not want to sew something with a little silver and tan pup like mine? There are so many panels coming, but not until Spring. We all will have to wait for a little bit for this adorableness.
 It was a pleasant surprise to find I knew the other students. We’d all taken either the Beginner Bra-making class or Shelley class at Central last year. And of course, we’d all taken those classes with Jeanette of Sew Uplifting Bras too. It was like a class reunion.
 This is the manual we were given. It has the complete Drafting course in it, as well as a bunch of other great resources.
 We also got a full set of Long wires, and a complete set of Classic patterns (all the sizes). There were sample packs of duoplex and power net, a notebook, a binder (shown above), a set of curves, and a bra kit with findings. All in a great bag. I’m pretty sure that was the best swag bag ever.
 By the end of the first day, we’d all been measured and learned how to measure someone else by measuring one another – all under Jeanette’s instruction. We were almost ready for Day Two, but before that, we had homework to do.
 Day Three built upon Day Two. We were starting our lower cup draft. Well, we needed our frame to be done correctly at this point, and the one I had with me in the class still wasn’t corrected. Things weren’t fitting together. Again, Jeanette pointed out what I’d done wrong on my frame. I was back to the drawing board. Literally. I’d had a little more practice drawing frames by Day Three after Day Two’s homework, so it went much more quickly. I was on track in no time. We finished the day with a draft of our lower cup, our upper cup, and lots of information on how to do adjustments if needed.
 Something I’ve heard and read repeatedly is: To get accurate measurements you have to start with a well-fitting bra. It’s so true. Jeanette brought fitting bras with her, so we all started with a well-fitting bra to get our measurements. And it works!
 I started off thinking I’d make shapewear. I was interested in making the Slimming Shorts that are covered in the class. But as I was watching the class, I decided it was too close to the pants I’d just made for the April Challenge. I didn’t want to make another pair of pants right away.

 I’ll be the only one who will ever see if, but it is adorable. I had pulled this material out recently to use to line a handbag. I’ll share more on that a little later.

 The back shows how lose it is in I’ve had to pull these laces completely closed – and it’s still loose on me. There is supposed to be a two-inch gap at the back. I don’t have a gap at all.
 Oh, a pattern drafted for me? Yes! I was interested. I signed up right away.
 Although this first bra didn’t fit perfectly, I was so happy with it. Let me show you why.
 Do you see how the cup meets the cradle and they’re both the same length? I haven’t had that happen in a bra since my second or third bra when I found out I had an Omega shape. I am so excited about that.
 Overall, even though I could already sew a bra, I’m so glad I took the beginner class.
 On this bra, we’ve lowered the bridge, adjusted the cups for the lowered bridge, and adjusted for my Omega shape. I also added a Gothic arch, but that wasn’t part of the class. However, as a class, we thinned the band.
 Another lovely feature that shows in the side view is the power bar. It’s an S-shape. That was a first for me. It’s so pretty.
 Again, on this bra I’ve used sliders only rather than rings and sliders. It does give a neater line on the back, but I have a lot of rings and sliders in my stash, so I will be using those still.
 In the first photo the shorts are pinned. In the second photo they’re unpinned. I definitely have more going on in the hip and thigh than this display!
 Again, pinned and unpinned.
 I LOVE lilac! I don’t know why I haven’t had a lilac bra and panty set before.
 Below, on this side view, you can just begin to get a peek of the back. This is the combo panty I mentioned earlier. It looks like a brief from the front, but a boyshort from the back.
 Here’s the full back view of the bra and panty.
 I am so happy with these lovely sets and am looking forward to the next BMS Challenge.


 Here’s the bralette on a model.
 The last lesson in the class shows how to make some matching knickers and suspenders (panties and garter belt). Both of these patterns are included in sizes S – L. Alison does say you can make the patterns larger, but doesn’t give a lot of detail on just how to do that.
 And here are the suspenders.
 Personal Recommendations
 It goes up to an M cup! And the band goes up to a 38, but it fits loose, so probably more like a 40 or 42 band. So, conservatively that’s a range of 28 A – 40 M! That is a size range!


