December – Snowy and Snuggly – Stay warm and cozy this winter in your new favourite snugly underwear. Not only do we encourage you to make warm and comfortable underwear, but why not think outside the box and try lining your bra with something that will take the chill off? It could be cotton lining, foam, fleece, fur, or something you come up with on your own!
For the challenge this month, I didn’t do a bra or underwear. This month it’s a set of matching sleep tees for a couple of dear sisters. A friend called and asked me if I’d make them for a Christmas gift. And I thought they’d be perfect for my entry because they are definitely something snugly and to keep warm.
Both sisters are musicians, and their mom found a great knit with a musical motif. How adorable is this? Being a musician myself, I love it.
I shared earlier the pattern I planned to use. It’s a really great pattern. Quick and comes together well. I made view B with short sleeves for both of the sleep tees.
Here they are from the front. I think they turned out quite well. I love the treble clefs.
I also finished both of these with my Cover Pro machine to give them a nice finished look.
Here’s the side view. I really like the curved hem on these too. I think it’s very flattering.
On the first one, I followed the instructions, which have you hem the front, back, and sleeves before sewing up the side seam. I didn’t love that, so didn’t do that on the second one. On the second one, I sewed that side seam up and then hemmed the tee with my Cover Pro. I did like that way better.
And the back view. Yes, I think these will be warm and snugly.
Happy New Year, and as always, Happy Creating!
 My son loved the last few pairs I made him. He’s also told me he wears the ones I make as often as he wears his SAXX.
 If you look at these photos, the elastic all looks the same, but it’s not. The black & white print pair have elastic I bought at the fabric store. It’s not the same as the plush elastic I bought at BMS – so says my son.
 Believe it or not, I couldn’t figure out how I did this. I had to sit down an re-read my old blog post. I just wasn’t getting it when I first started to sew. But once I saw what I’d done, I got it again.
 They don’t fit my dress form as well as my panties, but this works better than pinning them on my dress form.
 On the side view, you can see just how ill-fitting they are. There’s not as much of a difference between the waist and hips on these. And that will fit my son much better than something more curvy.
 And the back view.
 So these are fully equipped. They’ve got the front opening and the sling.
 These were the first two I made. Then I went on to make a whole bunch more. 15 more to be exact.
 Next I have fun with my Hot Fix tool and add crystals.
 And you can tell, I like my crystals. They fun, they add pop, and when the light hits them they’re even more fun.
 Then I hand-sew the backs onto each brooch.
 I think these will make lovely little Christmas gifts for family and friends. I know I’m keeping a couple of them for me too.
 This is lovely, and I may copy that little peep hole feature at some point.
 A foam cup for some amazing lift, and a vertical lace cup over top.
 This is the Panache Quinn High Waist brief. On, this is pretty. Yes, this is my inspiration this month.
 I chose not to do a high cut brief. I used to love high cut briefs when I was in my 20s… before I had kids. I’m much happier with hipsters these days.
 There is a peek of that lace in both views.
 Ooh, that is so pretty. This lace is so soft too, so these cotton-Lycra panties will still be so comfortable, as well as very pretty.
 I just may have to make more of this design.
 Then it was time to cook.
 It looked even better when it came out of the oven. Except that little pale spot? The duck skin I’d put on top stuck to the lid!
 And here’s the Turducken when it came out of the oven.
 The Duck meat created so much juice. I poured it off into a jar and almost half of it was fat! I put that in the fridge for the fat to harden up and I’ll throw the fat away. My hubby will get some nice soup with the broth that’s left over.
 And my Turducken roll browned up, and carved.
 I wasn’t the only one to brought an out of the world dish to our dinner.
 These looked amazing. Unfortunately, I couldn’t have any, but enjoyed watching Jan’s joy as everyone else dove into them.
 To round out our dinner, our shepherdess friend brought Shepherd’s pie, with meat from her own flock.
 It was a great dinner, and there are lots of Turducken leftovers.
 I even have a couple of kits with strap lace in my stash. You know those kits that you save for someday. The strap lace is similar to what’s shown below on this gorgeous bra.
 Just look at these straps from a favorite RTW bra, the Prima Donna Milady. Those little bits of heart lace are adorable. I have some similar bits in kits from Kantje Boord. In fact, I bought the kit for the strap lace.
 This is a gorgeous left & right mirrored lace. It was my first time using anything like this, and it was fun. I chose beige duoplex for my frame because there was some pretty floral detail in beige too. I tried it with brown, but that was just too dark.
 To reinforce them, I’ve used sheer cup lining to make narrow tubes behind this strap lace. It worked perfectly.
 I’ve used the lower edge of the lace with just a little bit of the embroidery on it for the lower cup pieces.
 Lastly, I cut out a tiny floral from some of the remaining embroidered lace and used that instead of a bow on the center front.
 Have you used a kit with strap lace before? I really enjoyed it and want another kit now.
 This is a lovely coral and silver lace, with coral sheer cup lining, coral stretch mesh, and some coral findings. As well, it has small silver strap elastic, and silver upper cup elastic.
 Does anyone else feel a little geeky about how excited they get over lace, or findings? I hope I’m not alone, because I really did get excited about these.
 Didn’t they take color beautifully? I really am seeing why so many others have started to dye their findings or lace to make the exact colors they want.
 Look at that glaringly white bow. It didn’t take any color at all. It must not be polyester like the other findings. It’s a good thing the kit from Kantje Boord came with three little silver grey bows.
 Perfection!
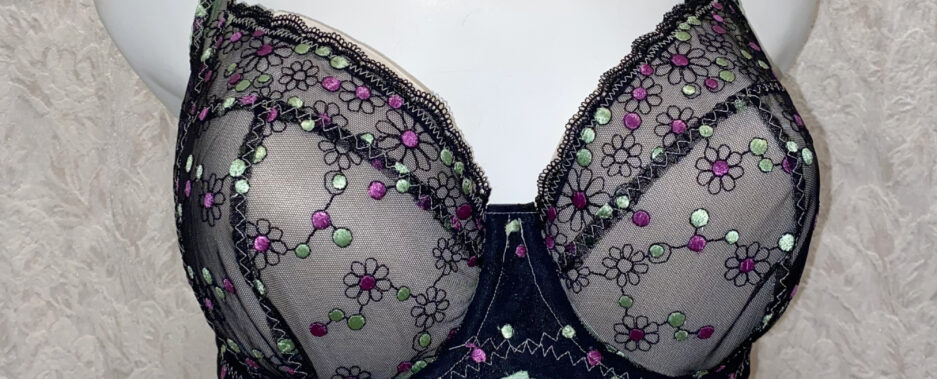
 This is the lovely Ruby pattern. The cups are all lace with sheer cup lining behind the lace. That lining is not my sheer though. You can’t actually see the sheer part of my bra from the front.
 I’ve used this awesome burnout material for the band. It’s a little bit lighter than regular power net, but I couldn’t resist it. And it’s a fun little detail to make the sheer detail part of the band.
 I love this material. This was a purchase from a few years ago from Merckwaerdigh’s Etsy store.
 Oh, I love this material! I think a whole bra in this would look amazing.
 From left to right we have Tracy, Jess, and Em.
 I also hot glued the saucer to the cup to make it one unit rather than two pieces. It’ll make it easier seeing as no one is trying to drink out of it.
 And here’s Jess enjoying the scent of her homemade candle.
 I made a sweet little lemon-scented uncolored candle in this little votive holder.
 I also made a lovely pink candle in one of my husband’s grandmother’s tea cups.
 We all had fun, and made as many candles as we wanted. I had a 12-case of jars and only one or two had already been used. So we have lots of options each.
 Em also made a bunch of heart-shaped candle melts. Unfortunately, when she was removing them from the mould, both of mine split in half. Being as creative as she is, Em had a solution. She used hot wax to glue them back together.
 It was a really fun evening, and we’re already planning another evening. I think we should start our Christmas baking soon.
 This lovely lace is from Libelle Sewing. Everything else was in my stash.
 I brought the back straps in a bit because my friend is petite, however, they still look wide on the display. I’ll have to see how they are on her.
 I hope it fits perfectly. I haven’t had a problem with sizing for the Watson before, so here’s hoping for one more perfect fit.