One More Try

I don’t know about anyone else out there, but having to wear a bra every day, I really am motivated to get the fit right. So, I decided I needed one more try. And that one more try was just the trick.

Using the half-size right in between the size I’d been working with for so long, and the next size up that was too big was brilliant! I woke up at 4:30 that morning and came downstairs to work on my bra pattern. And I have to say, after 2 years of trying, I was not really as enthused as I was say a year and half ago. I’ve had too many bras that weren’t what I wanted. I’m still wearing them, but perfection felt beyond my reach.

All that changed this week. I’ve found my size! Oh what relief. I encourage you, if you are still struggling, don’t give up.

So, let me take you back to my process.

I had what I thought was going to be my size. But I felt rather defeated thinking of the alterations I would have to make to a new cup because I knew the wire and cup size still didn’t match. The good news was this cup size is only two sizes larger than the wire size I need, and one size smaller than what I’d been using.

That got me thinking again; I knew from reading the Bra Makers Manuals that we can go up or down one wire size without changing the cradle. Okay, I was going to go up one cradle size. I traced out a 40 cradle instead of a 38. This now meant the cup I needed, which corresponds to a 42 wire was only one size away. Oh, the relief of that realization! I cut everything out and sewed it up as is – no alterations.

100_2659

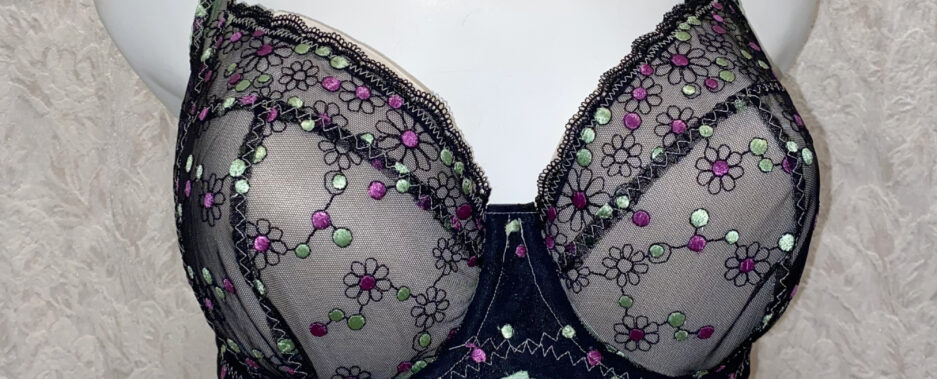
Here’s the Pin Up Girls Classic pattern, as is, except I split the lower cup. There are a couple of pins in there trying to (unsuccessfully) smooth things out and get rid of the wrinkles on Catherine. This is my best fit yet. There are only a couple of minor fitting issues at this point. If you’re dealing with an Omega shape, I strongly recommend doing this – go up one cradle size. It will really help as there will be fewer alterations to do, or the ones you still do need to do will be less drastic.

100_2660

This will be one alteration I make to the cup. It gaps a little at the underarm. A tuck in the pattern there will eliminate that for future bras.

And the second alteration I will make to the pattern is the bridge. I made this one bra without any alterations to the bridge – so I didn’t use my custom bridge and it’s just too wide (I knew that) and too high. But just how much too high was it? That led to my second brain wave this week. I took my custom bridge at the full bridge height and drew 1/2″ line down from the top. Then another 1/4″ down and a second 1/4″ down.

Here’s my custom bridge with the first 1/2″ cut off. And that’s the exact amount I need to shorten it.

100_2655

Here’s a closer up picture showing the markings I made on the top of the bridge:

100_2658

I’d already snipped off the first 1/2″, so now I know how much I need to lower my bridge.

There were a couple of other things I’d said in the past I’d share, so I took pictures as I was sewing my bra. Oh, and a side note here, I signed up for Beverly Johnson’s Bra class on Craftsy and I had her explaining the steps as I was sewing. That was such fun. It was almost like having her right here with me.

100_2639

You can see here the bottom band elastic coming up under where the channeling will be sewn on. This just fits, but if it didn’t, here’s how you fix that.

100_2640

Fold the channeling over the elastic so you can see how much you’ll need to trim away. See that pink dotted line? If I needed to trim, that would be my cutting line.

100_2641

And here with the channeling out of the way again. Follow the curve of the channeling when drawing your dotted line (better than I did here) and you’ll have your exact cutting line.

I’m off to make those changes to my pattern and cut out another bra.

Happy creating!

Making Your Own Bows

It was a while ago now, someone asked me if I made my own bows. At the time I didn’t think too much about it. I usually bought kits from Bra Makers Supply, and they always come with a bow. So I didn’t think I needed to make my own.

Then I had a weekend with a professional Bra Maker, Jane, and I took a few things away from that weekend. One of them was how I attach my straps – it’s forever changed since Jane showed me a slightly different way. You can read about that here.

The second thing I took away from that weekend, is when Jane said to attach bows to the center front and also over the seams where the straps join the cups. I LOVE that look. So, I’ve been doing that since then.

Well, that means that one little bow isn’t enough for me now. I do have a small stash of bows, and I do mean small. I probably have a dozen or so. And not many of them are the fancier bows – the ones with little pearls on them. You know that moment when you see someone’s stash and envy it? I experienced that when Jane pulled out a large plastic bag of bows. Oh my!

Since then I’ve been looking for bows. I’ve been looking on eBay, and haven’t been able to find the mini bows with pearls, or in colors I’d like. So I kept looking.

A site I came across, which unfortunately has been taken down. However, I had a screen shot of what you start with:

bow 1

To the finished bow:

bow 2

She also suggests wrapping ribbon around the elastic or sewing a pearl on.

Another great source is this video. I used both the fork, and my little cardboard template, and I must say I go back to the cardboard. I find it easier.

These were the exact style I was wanting. I went to the fabric store to buy ribbon to start, and the fabric store is not the place to buy ribbon. Michaels was much more economical. They had three out of the four colors I wanted.  I’ve also been looking at some pretty, and probably more-expensive-than-I-need Swarovski pearls to attach to the bows. I haven’t bought those yet, but they’re saved in my ‘want to buy’ folder.

So now I have an option for making my bows. And just in time for making bows, a very generous gift of ribbon and some lovely lace. I’d mentioned to a friend how I couldn’t find one color, and look what she sent me. I don’t think I’ll run out of ribbon any time soon. Thank you, Naomi.

100_2578

Happy creating!

‘My’ New Serger

I can’t even begin to tell you how excited I was to bring home my friend’s serger. And then to be told she wasn’t in any hurry to get it back; that I could just keep it at my house; that she’d never used it even. Thrilled would be a good place to start.

I found a great tutorial with really clear instructions on how to oil your serger, and where to oil it. It was much clearer than the manual’s instructions. You can read it here.

The machine really sounded terrible when I serged that first test swatch. Imagine the sound of metal grinding against metal. That was pretty much how it sounded. Once I oiled it, it did sound better. However, my second test swatch still sounded rough to me.

My plans to finish the scarf for my Mum went out the window, as well as a camisole I wanted to make for my Mum. At least as far as using the serger for those projects went. So the machine was packed up and put in the trunk of my car to make a trip to the repair man.

The trip to the repair man was good news on one hand – there’s nothing wrong with the machine. It is usable. He said it could use a tune up, but the blade is still sharp and it was working as it was. The not great news is he said this model is a noisy model and it vibrates a fair amount. He said it also sometimes skips stitches. Hmm, as I said, not great news. So, it’s back home with me, but also still sitting in the box awaiting its fate. I’m not feeling quite as thrilled.

So to finish one of my projects I decided to use my overlock stitch on my sewing machine to sew up the camisole. It turned out so nice.

Cami for Mum

This is a lovely shaped camisole pattern. It’s Kwik Sew 2286. And it actually has shaping to it – it curves in at the waist.

The material I used is a burnout knit. I was wishing I had more of it. I only bought a 1/4 of a meter when I first bought it a couple of years ago, as at that time I was only planning on using it to cover foam bra cups with it.

Black burnout knit on beige cups

Here’s an older photo of a foam cup bra I made when I first started making bras, and I used the burnout knit to cover the cups. This was the burnout knit over beige foam cups from Bra Makers Supply. Such a pretty material! You can read about the bra on my blog here.

100_2492

And here’s how the material is over my hand. This will be a fun and flirty camisole, but not likely one to be worn showing. It’s a little too transparent for that I think.

As for the scarf clone? Well, I’m still contemplating doing the hem by hand AND contemplating oiling up the serger again and giving the rolled hem a try. I haven’t decided yet how I’m going to finish that one yet. I’m encouraging myself right now even, that I as I type this; I have the serger here, and it does work… I just might be leaning towards the serger rolled hem.

Happy creating!

A Small Parade of Panties

I’ve been asked why I don’t make panties. The funny thing about that is ever so many years ago when I was first pregnant, I hated the maternity panties that were available, so I made all my own panties, as well as some of my own maternity clothes. Then I don’t know what happened to making panties. I just stopped.

The question stayed with me. I have to admit, one reason I hadn’t made panties yet is because I love my cotton panties. But I also love lace on them and I can’t always find that. As well, I’d looked around for cotton to make panties and just wasn’t sure about so many sources, so I hadn’t ordered any. A quick call to Bra Makers Supply and I found out their Cotton Spandex Double knit is just what I’m wanting. It’s a blend of 94% cotton, 6% Lycra. I’m thinking it will be perfect. You can find it here. It also comes in the same colors as their Power net and Duoplex – I do like things to be matchy matchy.

I have a few panty patterns in my collection, so decided I’d try a couple of them to see which ones I preferred.

Here are the patterns I tried.

100_2414

The first one I tried is a throwback – high cut panties. I haven’t worn anything like this for years, but loved them way back in the day.

100_2401

I used some knit that was a gift from Naomi. Thank you, Naomi! These are a basic black knit with stretch lace elastic trim. The pattern is Kwik Sew 2075, view D. It was funny, when I was making these I would just start to do something, and then think, oh it’s been a while I better read the instructions. I’d read them, think yup, and keep going. It was amazing how much came back to me so quickly.

This high cut style is very comfortable on, but as I say, it’s been years since I’ve worn anything high cut. I think I now prefer something more of a hipster. So the next pattern I made was more along that style.

black grey100_2412

I really like these. These are very comfortable and almost the same as a favorite La Vie En Rose pair I’d saved. I loved the La Vie En Rose ones so much I cloned the pattern. However, this is almost exactly the same. Only very slight differences, so I went with the pattern. This is Kwik Sew 2286. The pattern is mainly for tops, with one pair of panties thrown in. There is no option for a different view or style for the panties, but I really like these, so don’t know that I’ll look elsewhere. These just might become my TNT basic pattern. But then, there are so many pretty options out there from which to choose.

And the last pair I made is a friend’s TNT pattern. It’s similar to the pattern above, but this one is Kwik Sew 2908.

100_2413

These are the same black material I used on the first pair I made, but these have a sweet pink trim on them to match the black Fantasie clone I made with black and pink lace. I did change this pattern slightly. For the ‘gusset’ (I don’t like crotch, just as I’ve read some don’t like panties. And I do know it’s not really a gusset), the pattern has the gusset attached at the front with a single seam at the back. I changed this so the gusset has two seams – front and back – and that way I could enclose the seams completely. I’ll show that in another posting.

And I still have a few other patterns I’ve collected I want to try. I’m thinking of making one of Merckwaerdigh’s patterns next. I have E-SH20 and E-SHL 30 of hers. I also have one of Stretch & Sew’s patterns. Not pictured here is Ezi-Sew Ladies’ Knickers pattern and two more Kwik Sew patterns, 2100 and 2868. Seriously, I have a pattern addiction! But it’s way more fun than the OPI nail polish addiction I had. (smile)

100_2415

One last panty resource I have is The Make & Fit Panties book from Bra Makers Supply. So now I’ve practiced a bit again, and I’ve found my source for cotton, I see more matching sets ahead.

Happy creating!

A Marathon of Muslins

I was so excited to finally have a bra that fit with the bridge going all the way back that I made a whole bunch of bra muslins to try on over that bra. I went through almost all of my patterns – there are a few that I likely won’t ever make – and I sewed up muslins for test fittings.

This first bra muslin I made was a brand new pattern just released. It was Orange Lingerie’s new pattern, the Marlborough pattern.

Marlborough

You can see here the fit looks like it will be really close and I won’t have to do very much in the way of alterations. The Marlborough doesn’t actually list my size in the size range, but I know all about finding the right size by the wire size. So using my ever-so-used BMM chart, I found the correct cup size to fit into my band.

Great! I marked the muslin where I’d need to reduce it a bit at the bottom where it overlaps the seam allowance on the actual bra, and pinned it to the pattern for when I’m ready to tackle making this bra.

Shelley

Next it was the Pin-Up Girls Shelley pattern. Again, the depth looks good, but it’s not perfect. I marked where the seam lines fell under the muslin, and I marked these right on the muslin. It’s now pinned to the pattern and ready for the alteration stage as well.

After Shelley, I did the Pin-Up Girls classic pattern.

PUG Classic

You can see I also wrote the pattern name and size on the muslin.

After I finished with my Pin-Up Girls, it was time to try a few of Merckwaerdigh’s patterns. This is where I had to do a re-do.

BHST2 B too small

I started with BHST2, but you can see the cup is too small in this size for me. It just won’t meet all those seam lines under it. I quickly traced off the next size up and that one was fine.

BHST2 B

This one gives me all the depth I need, and I’ll alter the pattern to fit my shape. Again, I marked on the muslin what changes I’ll have to make and pinned it to the pattern.

For some reason I didn’t trace of the CUPL-16 pattern I have. I must admit I was running out of steam by this point.

I did trace off my Sewy Rebecca. I wasn’t sure about the size,  and the size I chose was actually too big. So my next muslin of this will be smaller.

Sewy R 1

You can see here the cup is clearly too big.

I was really tired after all this, but have a great place to tackle each of these bras now – one at a time.

Happy creating!

One More Fantasie Clone

I was so close on that last bra. And at this point, I do have a drawer full of bras I can wear that mostly fit. But I must admit, I am like a dog with a bone when I want to figuring something out – and getting that perfect fit is my objective.

I’d recently read something very encouraging from Annele, the founder of MakeBra said:

“An older lady, who was running her own lingerie business only few years ago, told me that you need at least twenty test fitting sessions before the bra pattern is ready to go.”

You can read about it here. Oh, that was such a relief to read. Then I’m not obsessed, or a terrible sewer. Whew!

Thankfully, at one time I’d bought the same Fantasie bra, but one size bigger. I think it was one size bigger. For example, what would be the size difference between a 34D and a 34DD? The only charts I have are from Bra Makers Supply, and they don’t do the double letters.

Back to the bra. I’d cloned it, and then after wearing it for a little while, gave it to a friend because I found it a bit loose in the upper cup. However, I was thinking this size would be perfect  with the firmer Duoplex material. All the materials are from Bra Makers Supply.

100_2410

Here it is. I think it shows the cups are a little fuller than the last bra. And just because the cups are fuller, it doesn’t show here how the bridge is really narrow at the top. The channeling and wires completely overlap at the top of the bridge. And the bridge goes all the way back!

As much as I loved the thin ribbon on the original Fantasie Vivienne, I couldn’t find anything in a beige or tan, only white. So I went with some bows I had for this bra.

100_2424

Here is a picture from the inside to show the wires and channeling overlapping at the top. It’s a bit tricky to sew this. What I do is sew the first channel down completely, and then the second channel is only sew down completely at the top and on the inside seam.

On the outside seam where the channeling pieces are overlapping, I do not sew it completely. There’s only maybe 2 cm opening where it is not sewn on the outside of the channeling. It has to be left open on the outside there so the wire can slide through that lower channeling.

On the top piece of channeling, I sew up to the outer seam line on the lower channeling, and it makes an attractive inverted V-shape in the stitching on the front of the bridge.

100_2431

And here is the back. I reduced this to make it a 2 hooks and eyes set again. This is how the original RTW bra came, so I wanted to do that again. It’s a wonderfully comfortable bra – and the bridge goes all the way back except for a tiny bit at the very top after I’ve been wearing it for a bit. It looks like I’ll be shortening my wires by 1/4″. But at least I’ll still have a full bridge.

Now I have a pattern that really works for me, the next thing I want to do is to take this pattern and use it to figure out what size I’d want to make in all my other patterns – the Sewy Rebecca, and the Pin-Up Girls Shelley and Classic, and the Merckwaerdigh E-BHST2 and E-CUPL 16.

And now I have one more pattern in my collection to try – Norma from Orange Lingerie just released a bra pattern! The Marlborough bra pattern. You can find the pattern at Orange Lingerie’s Etsy shop.

Happy creating!

Fantasie to Reality

So, last week I told you how I was altering my cloned Fantasie bra. And now I’m going to tell you how I made it a reality.

I did have a few questions. One was how to adjust for the smaller wire. I thought back to my Craftsy moulage-sloper making class. One of the ways they measure is to turn the measuring tape on its side and follow the line of the pattern that way. I don’t find that the easiest — usually I’ve just moved the measuring tape along by about 1/2-inches. My friend, who also recently made a sloper, said in her class they had a flexible ruler they were using and you just bend it to fit the line. That sounds nice right about now. But what I have is my measuring tape, so that’s what I used.

First, I’ll show you my custom bridge and cradle.

100_2343

Here you can see the little bit of the cradle that comes up above the wire line – that’s the flat spot adjustment I make.

Now onto some measuring, and I measured everything!

100_2344

This photo shows the easier of the measurements I took. For the photo I had my scissors hold the top of the tape against the top of the wire. Then I carefully followed the curve of the wire without any gaps. Basically, I made a new cradle and compared that to the original cloned one. And I measured everything to see where the changes needed to be made.

To be sure, I double measured everything. And after that, I made up a mock cup and cradle and sewed them together. My main concern here was making sure the cup still fit smoothly into a now smaller cradle.

100_2350

And here it is. It all came together quite well. There was one really small adjustment I had to make in the cup, maybe 1/8-inch.

100_2352

You can see in the photo above the cup needed just a touch of an adjustment. So, it was all looking good, so onto the good materials. All my materials were from Bra Makers Supply.

100_2388

Here’s my Fantasie made a reality. The cups are a full cup, not the modified ones I’d been making. And the bridge is a full bridge. There are black foam cups behind the lace/duoplex cups to fill out the shape, but they are not part of the bra.

There were a couple of changes I made to the bridge.  I narrowed the bridge, because the original was too wide for me. On this one the two pieces of channeling for the wire overlap at the top. And the rest of the bridge is still my custom bridge.

Some of you might remember, I had attempted a Fantasie Vivienne before. The lace can be a bit confusing as to which way it goes on the upper cup. And the last time I attempted it, I got it wrong. As that bra was a clone and didn’t have any of the adjustments, I decided it didn’t fit well enough to bother fixing it and continuing. This time I got the lace in correctly. Whew. Another relief.

100_2389

Here you can see that narrow bridge. It’s just the right width for me, and thankfully just enough for the channeling to fit into as well.

100_2390

And here you can see where the lace ends before the strap tab. That was a little tricky, but I got it to look neat.

You might have noticed there are no bows on it yet. I want to follow the same style as the original bra. They used two very narrow ribbons of coordinating colors to make the ribbons and I want to find some black and pink and do the same.

100_2386

You can see here the beige and white ribbons together, as well, how much wider that bridge is at the top. This style of bow is such a pretty and unique feature, I’d like to add that too, so I’ll have to go shopping for some thinner ribbon than what I have.

And lastly, the back of the bra. Again, on this I simply cloned from the original.

100_2391

The only thing I didn’t do the same on this is the original is only two hooks and eyes, and I made this three.

So, does it fit? Perfectly? Almost. It looked great when I put it on, but after wearing it for a little bit, I noticed the bridge does not go all the way back. Almost perfect. My best to date.

I think the difference in fitting is the materials I used. I’ve mentioned before that a lot of RTW manufacturers don’t use duoplex, but rather something more stretchy. I used duoplex for the cups. This gives me more support, but likely took a little of the depth out of the cup too.

There’s another slightly different Fantasie on the horizon.

Happy Creating!

A New Fantasie in the Works

I get emails from a few online bra stores. They’re full of bras, so full of design ideas. Does anyone else do that?

One came from HerRoom recently with a video attached. The video is part of a fitting series, and was talking about how the ‘center panel’ should fit. The center panel is what I’m familiar with as the bridge. I watched to see what they’d say because I’ve had so many issues with bridge-fitting. You can watch the video here.  A wonderful little extra right under the video is a transcript of the video. Here’s the part that got my attention:

“The center panel should rest firmly against your sternum. If it doesn’t, your bra cups are not deep enough so you need to go up a cup size. If your center panel is significantly pulling away from your sternum, you probably need to go up several cup sizes and down a band size.”

I knew a lot of the information in the video, including the information in the above quote, but it did give me reason to re-think my bra-making bridge issues. I had followed the instructions in the Bra Makers Manuals and ‘Frankensteined’ my bras that didn’t go all the way back to the chest wall. I did this more than once, and one of those times was with the teacher here. And even doing that. I did not get the fit I was looking for. After what felt like too many attempts, I’d given up. It was suggested I just use a lower bridge and that does work. But I’m not really one to leave things alone or give up. I wanted to find a solution to this.

So, with that very persistent personality trait, and the video stirring up questions in my mind, I thought about the RTW bras I have that fit with the bridge going all the way back to the chest wall. The Prima Donna bras I have do not do that. Neither the Deauville bra, nor the Duchess bra achieve that aspect of fit, but the Deauville is somewhat better. However, because they didn’t fit to begin with, I didn’t even look at either of those to help me in drafting a new pattern.

The one RTW bra I have that does achieve this fit level is the Fantasie Vivienne.

non plunge

This picture is from the internet as, at the time of this writing, I had not made a Fantasie clone yet. The cups on this RTW fit perfectly AND the bridge does go all the way back. But the bridge does not fit properly – it’s too wide. The wire is not the correct size either. Although it’s the closest I’ve ever found in a RTW bra. It’s even got Vertical wires. Those wires are one size too big. And too big is still too big.

I was thinking, if the bridge not going all the way back is a cup-depth problem… and these cups fit perfectly… then I can use the cups. And I’ll fix the bridge and the wire size. I’d want to fix the bridge, even if the other bridge fit better because I have a custom bridge that also adjusts for a flat spot. I’d also want to use the cradle I made for the Vertical wires I use.

Out came the pattern drafting paper, and I started to re-draw my custom bridge and cradle, starting with my wires. This method is described in the Bra Makers Manual.

100_2341

Here’s the first steps of that new bridge. You can see how it is the same shape as the Vertical wire. I felt like I was off to a great start here. I know the cups fit, so at this point no changes to them (at least not yet). And with the cups fitting, the depth should be spot on.

I now have a cradle and bridge drawn, and the bridge had the custom aspects added, and I have cups that fit. I’m feeling pretty confident at this point.

Now to address how some of the changes I’m making affect the cloned pattern I already have. I’m using a different wire and it’s not the same height as the wires that came in the RTW Fantasie.

100_2342

You can see the difference in the wires here. I have to say, although the RTW wires are a bit sturdier, they are a LOT less pretty to use.

I measured the difference between my new custom bridge and the cloned one, and took that amount out of the upper cup as well. It was only a 1/4-inch, so not a huge amount, but that excess still has to go somewhere. The next adjustments to make will be to the lower cup to help it fit into a smaller cradle.

As this is getting quite long, I’m going to sign off here, and next week I’ll have the conclusion of alterations and hopefully a perfectly fitting bra, with a full bridge that goes all the way back to the chest wall!

Happy Creating!

Beige Lace Overlay

With this Beige Lace Overlay bra, I feel I have my beige bra wardrobe complete. I have enough of a basic color to now branch out. I won’t be able to do that tomorrow, but hopefully soon.

Here’s my latest bra – the Beige Lace Overlay:

100_2333

This style is the same as the last beige bra I made. I was so happy with the lace on that bra, I decided I’d do the same again. My thinking was if the lace is different, then it feels completely different – at least to me. (smile)

All the materials are from Bra Makers Supply – including the pattern, but it isn’t the original pattern. What I’ve done is taken the Classic Full band pattern and altered it significantly to fit me. I’ve altered the cradle, the bridge, the upper cups and the lower cups, drew my own band based on a Prima Donna band. Heck I even alter the wires.

100_2326

Here’s a close up of the front. You can see here the lace doesn’t go all the way to the top of the upper cup – but lays over the upper cup. It’s a very pretty option for this style. You can also see how the upper cup curves with the style. This style is described in the Bra Makers Manual as a Fake Demi Cup. It still gives the coverage of a full cup.

100_2327

And this photo is just because I really love adding bows to cover the strap seam. It is such a pretty feature.

I won’t show the back or sides of this bra as they are the same as what I usually do – so no changes there. However, I do want to show you something else I thought to share with you. I remember when I first started making bras. Knowing where to cut the channeling was always a bit fuzzy for me. It was rather hit and miss for a while. Sometimes it ended up under the upper band elastic, but sometimes not. I would just zigzag over it in those cases. it still worked, but wasn’t quite as pretty as I was wanting. Then I figured out a way to do it.

100_2322

You can see here I’ve folded my upper band elastic over to where I will sew it, but it’s not sewn down  yet. It’s not even pinned yet. Then I lay the channeling over that. This gives me a clear visual to use. I’m holding the channeling here for the picture because it just didn’t want to lay flat. Pins come in so handy, don’t they?

100_2323

And once I see where I want to cut it – where the top of the channeling will lay under the elastic – then I cut it. I also cut it on a bit of an angle. I follow the slope of the band rather than cutting it straight across the top of the channeling.

100_2324

And here you can see how neatly the 3-step zigzag finishes that channeling. I hope this helps.

One last bit here, do you remember this?

scan0002-b

I’m in the hunting-gathering stage for this project. I’m collecting laces to put together to make my own version of this beautiful bra Amy Relf made. I LOVED this, and have the picture beside my sewing desk to remind me to work on this.

Happy creating!

A Black Plunge with Butterfly Effect

I must say, I was inspired recently after reading Madalynne’s blog where she planned to do a bra-making marathon. (Way to go, Madalynne!)  I was inspired and thought I’d see what I could do too.

So bright and early Saturday morning, I cut out 2 bras. One in black with some gorgeous black and pink lace. The second bra is a beige, with a pretty beige and tan lace. Both sets are from Bra Makers Supply. I was off to a good start. Then reality began to impinge on my plans. I had laundry to catch up on, and my dear hubby and son arrived home after a 4-day camping trip. But I did make some progress.

The black bra was the first one I worked on. And it was coming together very well. Until I hit a bump. Perhaps because there was so much activity happening around me that wasn’t usual activity, whatever the reason I made a faux pas after attaching the upper band elastic to the outside of the strap. I didn’t notice it either. It wasn’t until I had turned the strap over and was trimming the excess, and had a brief thought as my scissors snipped the material, ‘that looks folded’. SNIP.

I’m not sure how I folded excess material under the elastic, but I did. And then I cut it! Ouch. Well, I know me too well; I’d never accept that. I knew I wouldn’t wear it if it had a flaw. So, out came my trusty seam ripper, and I carefully started removing all the stitches from the strap. First, I removed all the stitches from the elastic I’d just sewn on. That wasn’t too bad. That was just a zigzag. But the side with the trim on it had both zigzag and 3-step zigzag stitches that had to come out.

I got it all done, and attached a new strap. I re-sewed all the elastic and trim to the outside of the strap, and then carefully turned it and matched it up and sewed the 3-step zigzag. And it looks good. Whew.

Okay, enough drama. Here’s my black plunge with a Butterfly Effect.

100_2317

I think the Butterfly Effect is more pronounced when the style isn’t a Plunge style, but I’m still very happy with it. It’s a very pretty way to add some lace to a bra. And I do like lace.

100_2316

Here’s a closer view of the Butterfly Effect. You can also see the foam cups I have behind the cups. The way a Butterfly Effect is done is a bit unusual. You start to sew the cups together, stop, add the lace, and then finish sewing the cups together. This effect is shown and explained in detail in the Bra Makers Manual.

The little pink bows that match the pink so perfectly were from the Bra Maker’s teacher I had here one weekend. (I’ve had the lace in my stash that long.) She had a big bag of bows and I think I might have drooled when I saw it. She let me match up a few bows to lace I had. Thanks, Jane.

100_2312

Isn’t that adorable? I took the picture before I had sewn the bows on.  They’re just pinned on at this point. But what a great color match.

100_2313

Now on this one, there are two pins. One is holding the bow in place for where it will go. the red-headed pin is to make sure I remembered, once the bra was all sewn, which strap I’d messed up. Looking at this, I’m really pleased with how well I repaired this faux pas.

100_2315

And the back of my newest plunge bra. I may tweak this back a bit and bring the shoulder straps in a bit. They’re not falling off my shoulders, but they do look quite far apart when I look at the back. Something for me to think about.

And that second bra I cut out? Well, it’s all cut out and sitting on my desk just waiting for me to have a few hours to myself to begin it.

100_2309

The good news is, it will wait.

Happy creating!