Have you heard of B,Wear? They’re a bra-making/lingerie supply company in Sweden. I love how in our day and age we can shop globally.
I’ve ordered a few things from B,Wear in the past. So when they came out with a gorgeous pattern, I didn’t hesitate to order it.
Angie
Here’s the Angie pattern. I’ve seen a few of these sewn up and they’re lovely! I was excited to try such a beautiful new pattern.
Testing, Testing
The first thing I did was to make a tester cup. I made it and had it sewn into my tester band. The cup seemed a bit big. However, I hadn’t added my elastics yet. Then I’d read a few comments in a Facebook group, and had second thoughts about my size. I made another set of tester cups – this time one cup size smaller.
Isn’t this a lovely shape? It reminds me of a sea shell. I even tried making the cup size in Swedish tracing paper just to see if it was close. Just in case, I sewed my bra with wash-away thread.
My First Angie
This isn’t finished as neatly as I’d normally finish a bra – there’s no top-stitching to be found – yet, it still looks quite pretty. Let me tell you there is lift happening with this lovely pattern. I do need to go back to that first cup size though. I’ll try it with elastics this time.
That’s the great thing about using the wash-away thread – I can use everything but the cups to use again after a quick soak. The thread will dissolve, and I’ll have all usable parts and elastics once they dry. I also have the cups sewn from the first tester bra, so I’ll be ready to go again quickly.
A Closer Look
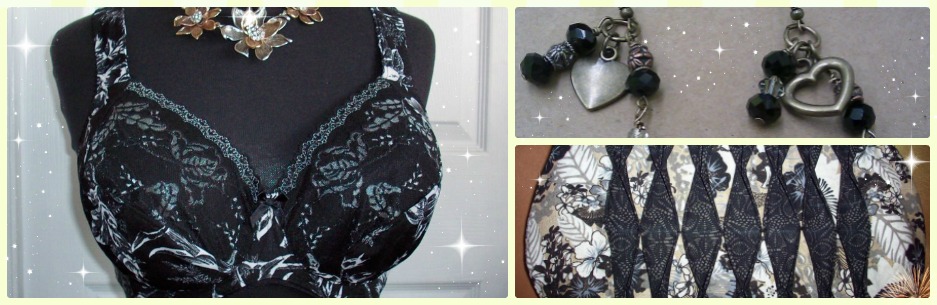
Here’s the front. Do you see all those vertical seams? Vertical seams really lift. The cup has a lovely round shape as well.
I’ve used my custom bridge on this, and thinned the band. I’ve overlapped my wires at the top of the bridge too. I just need a little more cup than this size offered.
Here’s the side view. I really like the shape of the cup, and especially at the side. This fit me quite well, which is encouraging. I usually need to take the underarm in, and I won’t need to on this pattern.
And the back. The back has a downward slant to the pattern, which is great for me. It reminds me of some of those high-end bras with the downward hike to the band. I’m very impressed with my first attempt at Angie, and only wish I’d gone with my first cup size choice.
Second Attempt
I’m already working on my second Angie. Again, because I don’t know if this will fit perfectly, I’m going to use wash-away thread to sew the cups into the frame, and sew on the elastics. It’s so much nicer to not to have to unpick everything.
Time Commitments
I should be back blogging on a regular basis again. All those commitments that were taking up my time are more than half done. I still have some, but not four days a week like I’ve had for the past six weeks. At this point, I’m happily sewing and writing again, and hope to continue.
Happy creating!
 Ingrid is a non-wired bra pattern, with three front-closing options, as well as a comfort band option.
 I really like this bra. I’m rather impressed with the support it gives for not having a wire.
 I looked for a grey hook and eye set, but my stash seems to be very low on hooks and eyes. That’s something to stock up on. So rather than grey on the back, it’s white. If you look closely, you’ll see I didn’t have 3/8″ upper band elastic in black or grey. Again, I had white on hand, so that’s what I used.
 Here’s the back of the repair. There’s double-sided interfacing fused between the duoplex and that little strip.
 Thankfully, the majority of this repair isn’t seen in the bra – it’s in the seam.
 I also like the power net inserts at the front. I think it looks unique.

 These aren’t hemmed yet, but I’m adoring them so far. In fact, I tried them on and didn’t take them off. I wore them all day. Love them.
 I found this image on the internet. It shows the knotted pants perfectly. I’m so happy to have found this pattern. They’re also quite easy to make up.
 You might recognize the lace I used in this Watson as the same lace I used in the first Watson I made for Em. I thought the peach would look really nice with the charcoal mesh.
 Em loves the new color combination. That’s good news. I have more charcoal mesh for the next bralettes I make for her.
 I’ve used fusible knit interfacing for the front cradle. I might need to buy some in black to use with the rest of the charcoal mesh I have. I don’t love the white behind this.
 There’s a little fold in the material where the band meets the hooks and eyes. Em lost some weight and the bands were too loose on her this time. I measured her again, and she’s two inches down around her rib cage. I had to take these in after I’d made them.
 I think this one is just adorable. The lace is from Libelle, a new Canadian source for me. I’ve ordered from her a couple of times now, and the quality is very good. The prices are even better.
 I thought both of these were lovely, and fun.
 And the back.
 There’s the same little tuck in the fabric on this bralette as on the long-line. It’s not too noticeable, and it did the job. It took the bralette in enough for her to wear them and adjusted the pattern for next time.
 It’s had a lot of use, and it’s still looking good! Below is how it looks after daily use for a year.
  The only real wear I’m seeing on it is on the handle where I used maple leaf fabric. It’s looking less bright now. The photo on the left is when the bag was new. A year later on the right.
 It doesn’t even look that bad.
 I think this lining fabric will be adorable. I found this on
  This turned out quite nicely. The only real problem I had was doing the top stitching at the end. My machine kept skipping stitches, and I had to keep going back over it to fix it.My machine was fine with two layers, and even three, but it decided four layers of leather was just too much.
 And a slip pocket.
 Aren’t all those bras adorable?
 As well as the tassel, I used swivel hooks to attach my straps to the anchors. Adding just that little bit extra length to the straps makes this a shoulder bag for me.
 I love this bag, and my first attempt to make a leather bag turned out great! I will definitely be making another one – but I’ll tune up my Singer Featherweight to do the top stitching on that next one.
 I started off thinking I’d make shapewear. I was interested in making the Slimming Shorts that are covered in the class. But as I was watching the class, I decided it was too close to the pants I’d just made for the April Challenge. I didn’t want to make another pair of pants right away.

 I’ll be the only one who will ever see if, but it is adorable. I had pulled this material out recently to use to line a handbag. I’ll share more on that a little later.

 The back shows how lose it is in I’ve had to pull these laces completely closed – and it’s still loose on me. There is supposed to be a two-inch gap at the back. I don’t have a gap at all.

 You might have noticed, I haven’t added any bows. It’s not because it’s not bow-worthy this time. I’m not sure I want bows. I made some. I pinned them on to see what I thought, but I wasn’t over the top in love with the bows on it. I may look for a little golden leaf charm. I think that would look great on this bra and mirror the gold leaves in the lace.

 It’s out by a smidge, but that’s pretty darn good.
 Here’s my drafted cradle and the tester frame. This was pretty good.
 This one is good too. And it will be much easier to use with the added material in the cradle.
 That’s quite a difference the wire makes.
 Everything is exactly where it is supposed to be. The bridge is right up where it needs to be, not pushed down, not coming away from the chest wall. The wires are just right too.
 How is it fitting? In all honesty, this probably would have been fine if I’d made it into a bra. It fit better than any RTW bra I’ve had. But I figured why not go for the brass ring. Seeing as this was still only a tester, I still made a couple of changes to my pattern.
 Another adjustment was deciding if I wanted to lower the upper cups to meet the bridge, or raise the bridge a bit. I pulled out the custom bridge I’d drafted a few years ago, and decided to incorporate that into the frame. That means the cups won’t need to be lowered any more than they are now. The bridge will come up 1/4-inch to meet them. I’ll have to overlap my wires, but I’ve done that before.
 Once again, I’m going for that perfectly matched cradle and cup at the side seam, and once the upper band elastic is added to the underarm of the cup, I’m going to have it!
  Yes, I’m happy with how this is all coming together.
 Oh, a pattern drafted for me? Yes! I was interested. I signed up right away.
 Although this first bra didn’t fit perfectly, I was so happy with it. Let me show you why.
 Do you see how the cup meets the cradle and they’re both the same length? I haven’t had that happen in a bra since my second or third bra when I found out I had an Omega shape. I am so excited about that.
 Overall, even though I could already sew a bra, I’m so glad I took the beginner class.
 On this bra, we’ve lowered the bridge, adjusted the cups for the lowered bridge, and adjusted for my Omega shape. I also added a Gothic arch, but that wasn’t part of the class. However, as a class, we thinned the band.
 Another lovely feature that shows in the side view is the power bar. It’s an S-shape. That was a first for me. It’s so pretty.
 Again, on this bra I’ve used sliders only rather than rings and sliders. It does give a neater line on the back, but I have a lot of rings and sliders in my stash, so I will be using those still.